This feature lets you configure Automated Security Manager (ASM) to automatically respond to a variety of attacks on your network. ASM uses Extreme Networks Intrusion Prevention System (IPS) to identify threats to your network security and data integrity. Working with the NetSight database, an intrusion detection product (such as Extreme Networks IPS), and Policy Manager, ASM can identify a threat, locate its source, and automatically take action to isolate an offending port and mitigate a threat.
ASM is configured using the ASM Configuration Window. This window takes you step-by-step through configuring ASM actions and targets. The content of the ASM Configuration Window is dynamically updated as you set or change and define settings, always presenting the appropriate options based on your selections. As you move through the steps, the selections that you make along the way determine the appropriate selections for subsequent steps.
Common Features
Mode: View/Edit
Editing the configuration is only possible when the Configuration Window is set to Edit. Edit mode is only available to users that are members of an authorization group that has the Manage Configuration capability enabled. Refer to the Authorization/Device Access - Users and Groups Tab for more information.
Restore Defaults (Variable settings only)
Restores the default settings to the Variables in the ASM Configuration Window.
At each step, click Continue to apply your settings and advance to the next configuration step. You can return to an earlier step by clicking any step in the left panel. At the final step,click Save to save the current rule definition.
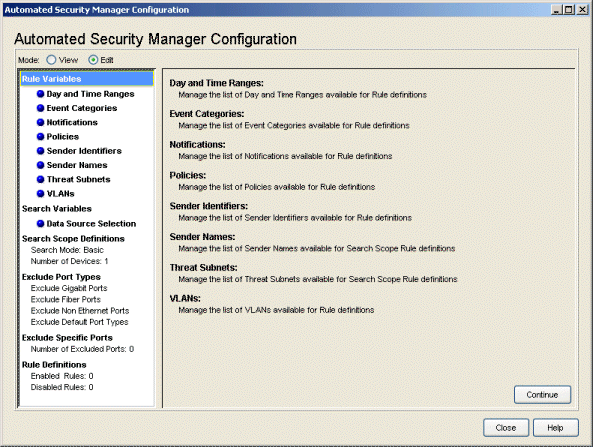
Rule Variables
This section lets you define elements that can be matched by rules that determine when specific actions are applied. The View/Edit buttons above the left panel determine the ability to set or change the configuration in this window.
| NOTE: | The following Rule Variables views can be accessed from the ASM
Configuration window or
from the Qualifier Tabs
in the Create Rule window. |
|---|
Day and Time Ranges
This view lets you identify specific time intervals that may be pertinent when applying threat responses.
| NOTE: | The Day and Time Ranges view can be accessed from the ASM
Configuration window (as shown below) or
from the Qualifier Tabs
in the Create Rule window. |
|---|
Click areas in the window for more information.
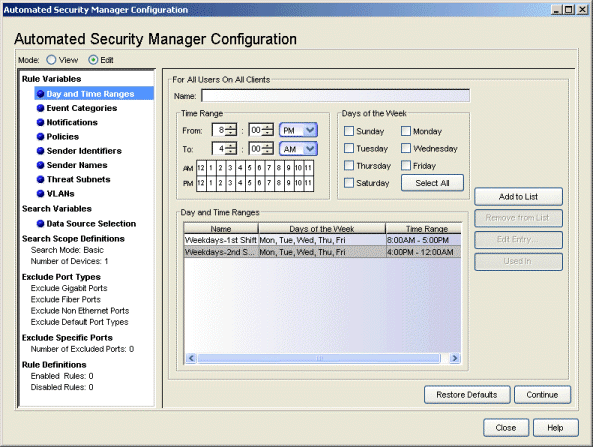
- Select All/Deselect All
- Selects all of the checkboxes in the Days of the Week area. When all days are selected, the button changes to a Deselect All button.
- Edit Entry
- Opens the Edit Day/Time Entry window where you can adjust the current settings for a Days and Times definition selected in the Day/Time Ranges list.
- Used In
- Select a Day/Time Range in the list, and click the Used In button to open a window that displays the ASM rules using the range.
Event Categories
This view lets you define the event categories that match events reported by an intrusion detection system. To be recognized by ASM, the text string in the event message sent by the IPS must match exactly the event category names here and in the Rule Definitions.
| NOTE: | The Event Category view can be accessed from the ASM
Configuration window (as shown below) or
from the Qualifier Tabs
in the Create Rule window. |
|---|
Click areas in the view for more information.
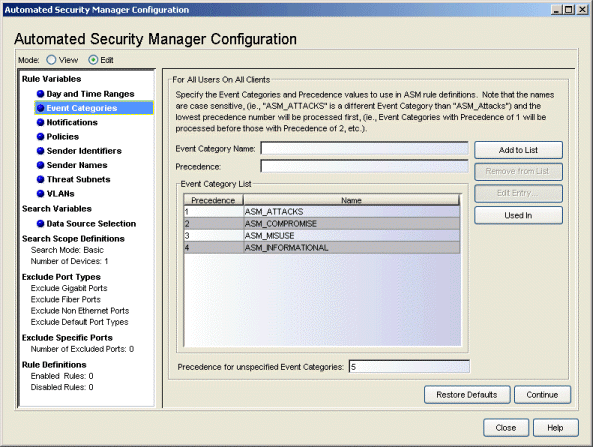
Extreme Networks IPS has four default notification rules: netsight-atlas-asm-attacks, netsight-atlas-asm-compromise, netsight-atlas-asm-informational, and netsight-atlas-asm-misuse. Each of the notification rules has a corresponding event category in ASM: ASM_ATTACKS, ASM_COMPROMISE, ASM_INFORMATIONAL, and ASM_MISUSE.
For ASM's response to a serious threat to be timely and effective, it is important that ASM only be notified of serious threats. The following table lists the Extreme Networks IPS events for which notification to ASM is recommended:
| BACKDOOR:PHATBOT | COMP:MS-DIR | COMP:ROOT-ICMP |
| COMP:ROOT-TCP | COMP:ROOT-UDP | COMP:SDBOT-LOGIN |
| COMP:SDBOT-NETINFO | COMP:SPYBOT-DOWNLOAD | COMP:SPYBOT-INFO |
| COMP:SPYBOT-KEYLOG | COMP:WIN-2000 | COMP:WIN-XP |
| GENERIC:UPX-EXE | MS-BACKDOOR | MS-BACKDOOR2 |
| MS-BACKDOOR3 | MS-SQL:HAXOR-TABLE | MS-SQL:PWDUMP |
| MS-SQL:WORM-SAPPHIRE | MS:BACKDOOR-BADCMD | MS:BACKDOOR-DIR |
| SMB:SAMBAL-SUCCESS | SSH:HIGHPORT | SSH:X2-CHRIS |
| SSH:X2-CHRIS-REPLY |
- Event Category List
- This list contains all of the Event Categories defined
for ASM. You can restore the default list by clicking Restore Defaults. The default event category
and precedence settings are:
Precedence Event Category Precedence Event Category 1 ASM_ATTACKS 2 ASM_COMPROMISE 3 ASM_MISUSE 4 ASM_INFORMATIONAL - Precedence
- Precedence determines the order that ASM responds to certain Event
Categories. A lower number yields a higher precedence, which means when multiple events are recognized, ASM responds to the highest
precedence first. If all of the numbers are the same, then events
are processed in the order they are received.
The Precedence values for the Default Event Categories are:
- ASM_ATTACKS
- ASM_COMPROMISE
- ASM_MISUSE
- ASM_INFORMATIONAL
- Name
- The name of the event category. Extreme Networks IPS has four default notification
rules: netsight-atlas-asm-attacks, netsight-atlas-asm-compromise,
netsight-atlas-asm-informational, and netsight-atlas-asm-misuse. Each of the default notification rules has a corresponding default event
category in ASM: ASM_ATTACKS, ASM_COMPROMISE, ASM_INFORMATIONAL, and
ASM_MISUSE. ASM uses Rules to compare incoming trap messages with
specific event categories, then determines where and what action to
apply as a response.
NOTE: Event Category names are case sensitive.
- Precedence for unspecified Event Categories
- If a threat is received that contains an Event Category not defined in the Event Category list, it is assigned the Precedence specified here. If you want to process all events according to the order they are received, set this value the same as the Precedence of all other Event Categories. If you want ASM to respond to these Event Categories first (since they are not expected and indicate an incorrect configuration on the network), set the Precedence to a lower number than all the others. If you want ASM to respond to these Event Categories last (since they are deemed to be the least important), set the Precedence to a higher number than all the others.
- Edit Entry
- Opens the Edit Event Category window where you can change the Name/Precedence for the selected Event Category.
- Used In
- Select an Event Category in the list, and click the Used In button to open a window that displays the ASM rules using the category.
Notifications
This view lets you create, edit, and remove Notifications that can be activated together with a threat response. You can create notifications that send E-Mail, create a Syslog entry, trigger a SNMP trap, execute a script, or trigger a SNMP trap that is sent to Extreme Networks IPS. You can also combine two or more notifications into a group and treat that group as a single notification, thereby activating multiple notification types for a single event.
| NOTE: | The Notifications view can be accessed from the ASM
Configuration window (as shown below) or
from the Qualifier Tabs
in the Create Rule window. |
|---|
Click areas in the view for more information.
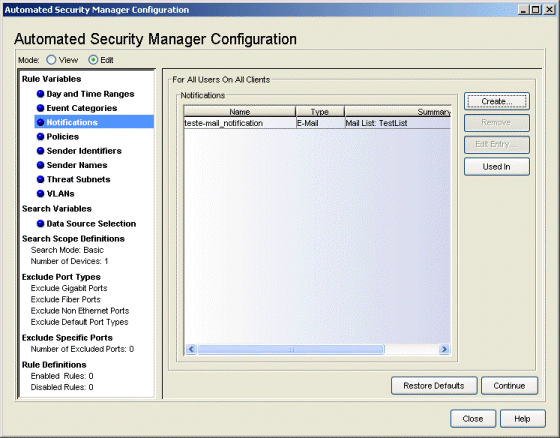
- Create
- Opens the Create Notification window. This window takes one of several forms, depending on the type of notification being created (E-Mail, Syslog, SNMP Trap, Script, Extreme Networks IPS, or Group).
- Remove
- Removes notifications selected in the Notifications list from the list. Notifications cannot be removed if they are currently in use by a rule. Attempting to remove a notification currently in use by a rule opens the Error removing Notification(s) window, which shows the rules where the selected notifications are used.
- Edit Entry
- Opens the Edit Notification window for a notification selected from the Notifications list. The specific form of Edit Notification window opened depends on the type of notification selected in the list (E-Mail, Syslog, SNMP Trap, Script, Extreme Networks IPS, or Group).
- Used In
- Select a Notification in the list, and click Used In to open a window that displays the ASM rules using the notification.
Policies
This view lets you add or remove Policies. Policies serve two purposes: they compare against roles currently applied to a port and they can also be applied as a response to a threat.
| NOTE: | The Policies view can be accessed from the ASM
Configuration window (as shown below) or
from the Qualifier Tabs
in the Create Rule window. |
|---|
Click areas in the view for more information.
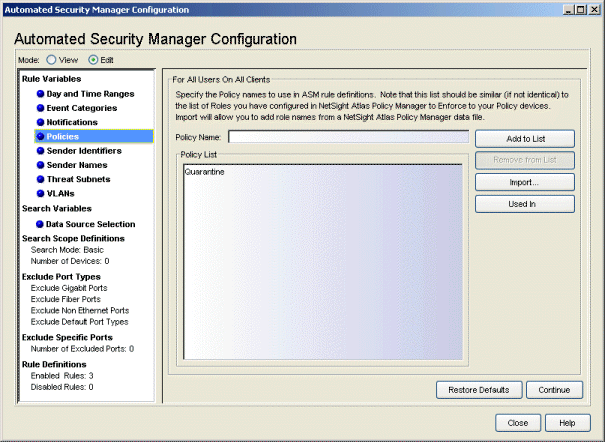
- Import
- Opens a file browser that allows you to select a .pmd file to import role names created in NetSight Policy Manager.
- Used In
- Select a Policy in the list, and click Used In to open a window that displays the ASM rules using the policy.
Sender Identifiers
This view lets you add or remove Sender Identifiers used to match events reported by an intrusion detection system.
| NOTE: | The Sender Identifiers view can be accessed from the ASM
Configuration window (as shown below), from the Qualifier Tabs
in the Create Rule window, or from the
Rule Conditions section in the Create/Edit Search Scope Rule window. |
|---|
Click areas in the view for more information.
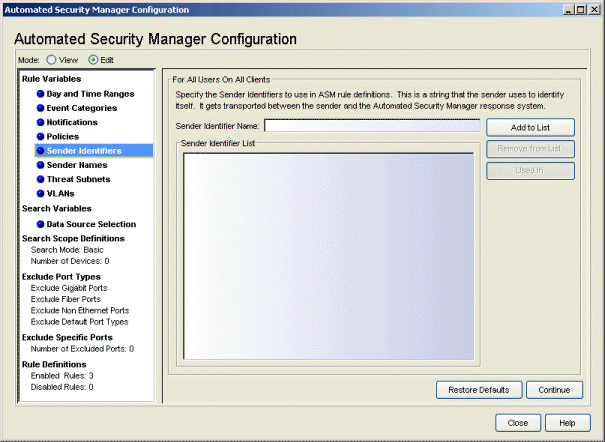
| NOTE: | Sender Identifier names are case sensitive. |
|---|
- Used In
- Select a Sender Identifier in the list, and click Used In to open a window displaying the ASM rules using the identifier.
Sender Names
This view lets you add or remove Sender Names used to define the ASM search scope when Extreme Networks IPS notifies ASM of a threat.
| NOTE: | The Sender Names view can be accessed from the ASM
Configuration window (as shown below), from the Qualifier Tabs
in the Create Rule window, or from the
Rule Conditions section in the Create/Edit Search Scope Rule window. |
|---|
Click areas in the view for more information.
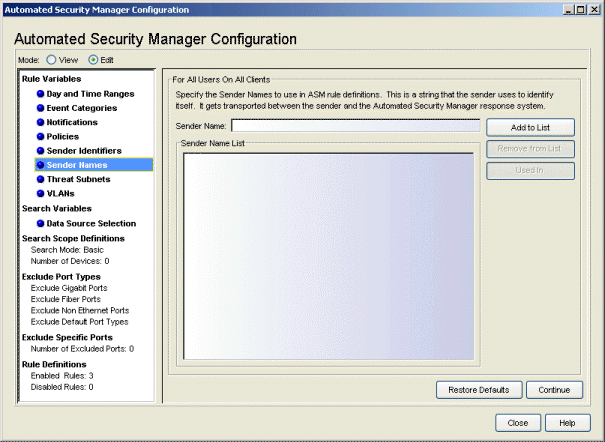
| NOTE: | Sender Names are case sensitive. |
|---|
- Used In
- Select a Sender Name in the list, and Used In to open a window that displays the ASM rules using the name.
Threat Subnets
This view lets you add or remove subnets that define the ASM search scope when Extreme Networks IPS notifies ASM of a threat.
| NOTE: | The Threat Subnets view can be accessed from the ASM
Configuration window (as shown below), from the Qualifier Tabs
in the Create Rule window, or from the
Rule Conditions section in the Create/Edit Search Scope Rule window. |
|---|
Click areas in the view for more information.
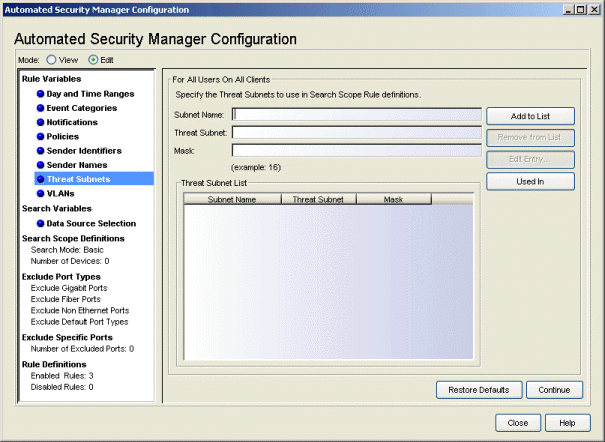
- Threat Subnet
- The subnet the ASM search scope uses when Extreme Networks IPS notifies ASM of a threat.
- Mask
- The mask that further defines the associated subnet address. The format for the Mask is determined by the current Network Mask setting (CIDR or Dot-Delimited) selected in the Console Options - Data Display view.
- Edit Entry
- Opens the Edit Threat Subnet window where you can adjust the current settings for the selected Threat Subnet definition.
- Used In
- Select a Threat Subnet in the list and click Used In to open a window that displays the ASM rules using the subnet.
VLANs
This view lets you add or remove VLANs. VLANs serve two purposes. They are used to compare against roles currently applied to a port and they can also be applied as a response to a threat.
| NOTE: | The VLAN view can be accessed from the ASM
Configuration window (as shown below) or
from the Qualifier Tabs
in the Create Rule window. |
|---|
Click areas in the view for more information.
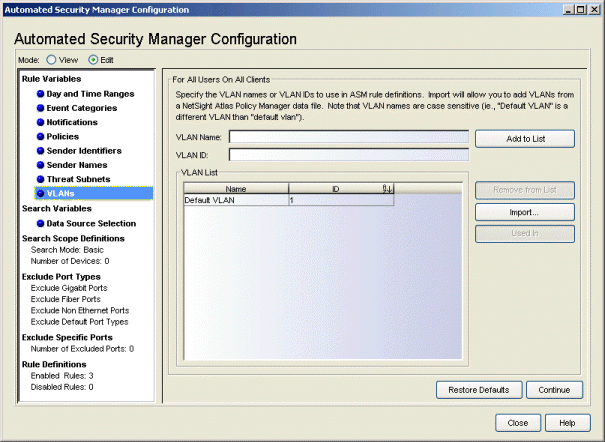
- Add to List
- Adds the VLAN Name/VLAN ID, typed into the associated field(s), to the list (VLAN names are limited to 32 characters).
- Import
- Opens a file browser where you can select a .pmd file to role names created in NetSight Policy Manager.
- Used In
- Select a VLAN in the list and click Used In to open a window that displays the ASM rules using the VLAN.
Search Variables
ASM lets you select specific sources to be used when searching for the source of network threats.
Data Source Selection
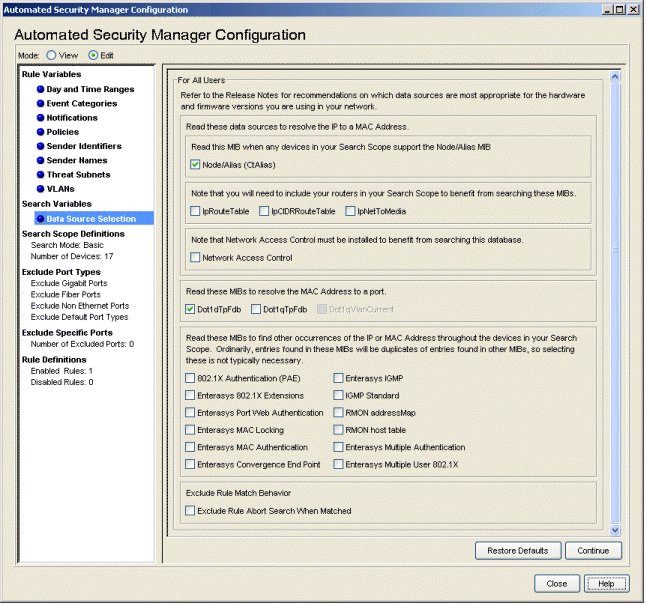
This view lets you select the data sources and MIB objects used to resolve the IP address to a MAC address. Refer to the MIB/Table Descriptions topic for information about specific MIB object and data source selections. The selection for data sources used with ASM are separate from the selection made for Compass in the NetSight Console Options.
At the bottom of the view, there is an option that determines the match behavior for Exclude rules. By default, each rule is processed in the order listed in the Rule Definitions panel and the first rule that matches determines the action taken for that port. The exception to this behavior is an IP address that matches an Exclude rule. In this case, ASM continues looking at the other rules within the search scope, even though there was a match. However, when the Exclude Rule Abort Search When Matched checkbox is selected, if a threat matches the Exclude rule, ASM aborts the search and stops processing the additional rules looking for a legal search scope. If you select this option, verify the rules are listed in the appropriate order in the Rule Definition panel to prevent a search from aborting too soon.
Here is an example of the Exclude rule match behavior with and without the option enabled:
With a Threat IP Address of 10.2.222.2
Example Search Scope Rules:
Search Scope Rule 1: Exclude 10.2.222.0/23
Search Scope Rule 2: Match 10.2.0.0/16
With the option enabled, IP address 10.2.222.2 is within the excluded range of Rule 1. This causes the Search to abort.
With the option disabled, IP address 10.2.222.2 is not a match for Rule 1 and ASM continues to
Rule 2 which is a match and starts the search.
Search Scope Definitions
This view lets you select the devices searched when Extreme Networks IPS notifies ASM of a threat. You can set the search scope to Basic to create a single group to be searched or to Advanced to create more than one group of devices to search.
| NOTE: | ASM searches are performed by the NetSight Server, using the profile
for the server, not the profile for the ASM client user. |
|---|
Basic Search Scope
With Basic Search Mode selected the Search Scope Definitions view lets you include or exclude selected devices/device groups from a search to define the specific devices searched when Extreme Networks IPS notifies ASM of a threat. You can include or exclude specific devices, according to Device Type, Location, Contact, and Subnet.
Click areas in the window for more information.
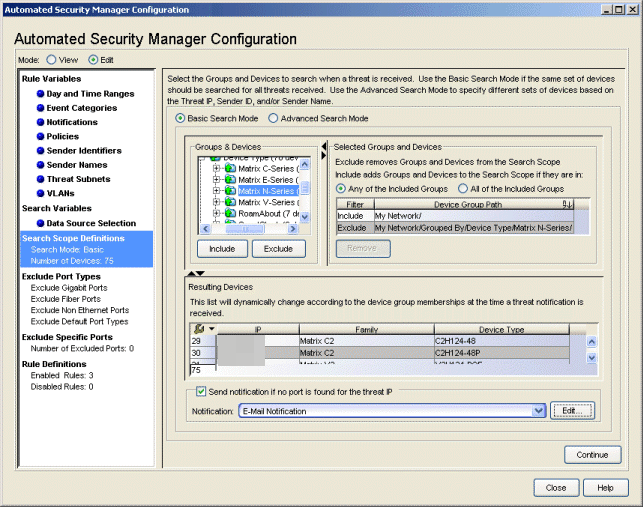
- Groups & Devices
- This panel shows the device tree for devices modeled in the Console
database. You can expand branches of the tree to select Devices/Device
Groups to be searched when Extreme Networks IPS notifies ASM of a threat. After making a
selection, click Include to designate your selection(s) as being
included in the search scope or click Exclude to designate your
selection(s) as being specifically excluded in the search scope.
You can repeatedly select devices/device groups individually and click Include/Exclude or use multiple selection techniques (Control-click or Shift-Click) to select or deselect multiple Devices/Device Groups in a single operation.
NOTES: - When devices on your network do not support layer
3, include routers in the list of targets to allow ASM to
use its IP to MAC address resolution feature to locate the end
station. This includes the following devices:
C3
E1 (1G6xx Series)
E5
V-Series
SS9000
Vertical Horizong
1st Generation 1HxxxSeries - ASM resolves IP addresses to MAC addresses using information from
router MIBs (ipNetToMediaTable, ipNetToMediaTable, ipCidrRouteTable
and ipRouteTable), but only if devices that can be modeled as a
switch or a router are created in the Console database using the
router's IP address. ASM cannot query information from the router
MIBs unless devices are created using an IP address for the router
interface.
- Do not use Layer 3 NAC Controller and the NAC Gateway appliance as a search device in ASM. Configure ASM to search other devices in the network for the IP-to-MAC-to-port bindings, such as gateway routers for IP-to-MAC bindings and access edge switches for MAC-to-port information.
- When devices on your network do not support layer
3, include routers in the list of targets to allow ASM to
use its IP to MAC address resolution feature to locate the end
station. This includes the following devices:
- Selected Groups and Devices
- This panel lists the devices/device groups selected from the Groups &
Devices panel. The Filter column in the table indicates whether the
device(s)/device group(s) can be included or excluded. The Device Group
Path column shows the specific IP address and branch of the tree for
selected devices/device groups.
Devices/device groups designated as Excluded are excluded from the search scope, regardless of any Include settings. For example, if a particular device is set to Excluded and the same device is a member of a device group that is set to Included, then the excluded device is not searched.
You can further refine your search scope by selecting either Any of the Included Groups or All of the Included Groups.
- Any of the Included Groups creates an OR condition such that if a selected device (not specifically excluded) is a member of any of the selected groups, then it is included in the search scope and appears in the Resulting Device/Device Group table. For example, selecting a specific Vertical Horizon device that is not in subnet 172.18.19.xx together with the Vertical Horizon and IP Subnet 172.18,19.xx Device Groups and clicking Any of the Included Groups includes all Vertical Horizon devices (including the individual VH device) and all devices from the 172.18,19.xx subnet.
- All of the Included Groups creates an AND condition. When selected, only devices that are members of all of the selected device groups are included in the search scope. This selection is useful when you want to select all of a particular device type, but only in a specific location--for example, all the routers in a particular building. When a device type (Routers) and a location group (Building2) are both selected, then only the devices contained in both groups (Routers in Building2) are included in the search scope.
- Resulting Devices
- The resulting list of devices searched when Extreme Networks IPS notifies ASM of a threat. The table is dynamically updated according to your device/device group selections and include/exclude arguments.
- Send Notification...
- This checkbox allows you to select a notification performed in the event no port is found for the Threat IP. For example, you can specify an E-Mail notification sent when no port is found. Select the desired notification from the drop-down menu. Click Edit to open the Edit Notifications window which lists the configured notifications. In this window, you can select a notification to edit, or click Create to open the Create Notification window.
- Include/Exclude
- Adds your tree selections to the Selected Groups and Devices table and sets the Filter column to either Include or Exclude.
Advanced Search Scope
With Advanced Search Mode selected, the Search Scope Definitions view lets you create search scope rules to determine which devices to include or exclude from the ASM search when Extreme Networks IPS notifies ASM of a threat. Search Scope Rules are evaluated in order (from top-to-bottom) to examine the attributes of a threat (Sender ID, Sender Name and Sender Subnet) and when the threat matches the rule, the Search Scope Group associated with the rule is included in or excluded from the ASM search scope, according to the include/exclude arguments.
Click areas in the window for more information.
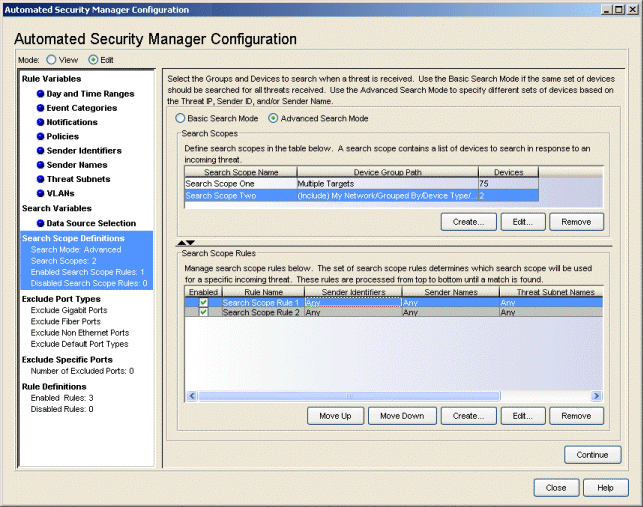
- Search Scopes
- This panel lists the Search Scopes associated with Search Scope Rules, which ultimately determine the devices searched when Extreme Networks IPS notifies ASM of a threat. You can add New Search Scopes using the Create button or you can modify existing Search Scopes by selecting the Search Scope and clicking Edit.
- Search Scope Rules
- This panel lists the Search Scope Rules. The rules are evaluated in order (from top-to-bottom) and, when the attributes from a threat match the rule, the Search Scope associated with the rule determines the devices searched when Extreme Networks IPS notifies ASM of a threat. You can add New Search Scope Rules using the Create button or modify existing Search Scope Rules by clicking Edit. You acn adjust the order of rules by selecting a rule in the table and using the Move Up/Move Down buttons to change its position in the table.
- Create (Group)
- Opens the Create Search Scope Group window to create groups of devices searched when Extreme Networks IPS notifies ASM of a threat.
- Edit (Group)
- Select a Search Scope in the table and click Edit to open the Edit Search Scope Group window to edit the set of devices included in the group.
- Move Up/Move Down
- Search Scope Rules are evaluated from top to bottom in the order in which they appear in the table. These buttons allow you to arrange the order by selecting a particular rule and clicking Move Up or Move Down to move it to the desired position.
- Create (Rule)
- Opens the Create Search Scope Rule window to create rules that determine the search scope used when a specific threat is detected.
- Edit (Rule)
- Select a Search Scope Rule in the table and click Edit to open the Edit Search Scope Rule window to edit the conditions of that rule.
- Continue
- Confirms the defined Search Scopes and Search Scope Rules and takes you to the Exclude Port Types view.
Exclude Port Types
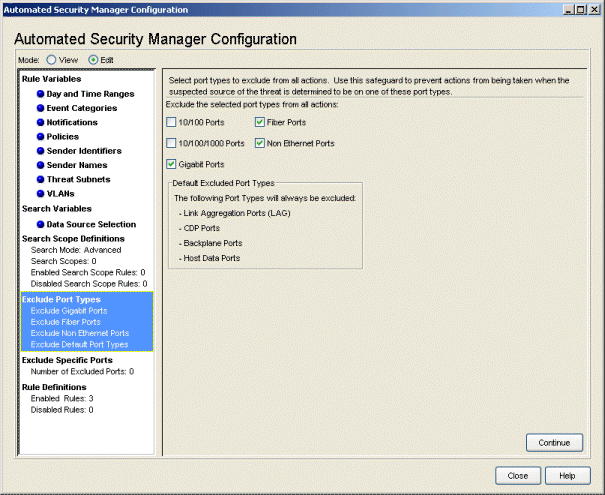
This view lets you exclude specific ports from threat management actions based on port type. This allows you to safeguard critical port types. Several check boxes list the port types available from the devices targeted for ASM actions. A check for a particular port type excludes that port type from threat management actions. Link Aggregation, CDP, Backplane, and Host Data ports are always excluded, by default.
Exclude Specific Ports
This view lets you select specific ports to exempt from the actions by ASM to prevent shutting down critical ports.
Click areas in the window for more information.
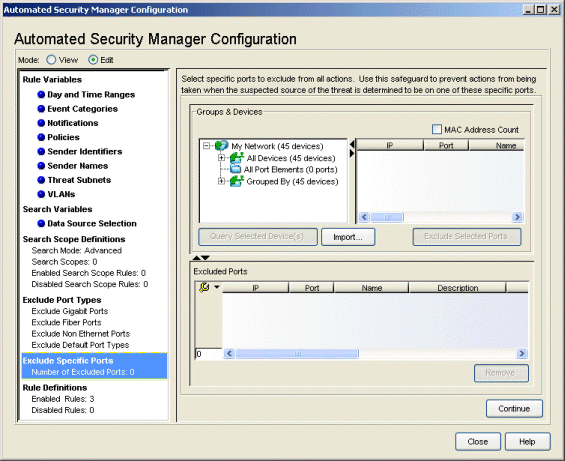
- MAC Address Count
- This feature lets you distinguish between single-user ports and multi-user ports (routers). When checked, ASM expands its query to determine the number of MAC addresses connected through each port. The number of MAC addresses found appears in the MAC Address Count column of the Groups and Devices table.
- Groups & Devices
- The device tree shows the devices and port elements modeled in the Console database. Expand the tree to allow selecting one or more devices/port elements whose ports are excluded from ASM actions. Clicking Query Selected Device(s) displays the ports available on the devices in the table to the right of the tree.
- Query Selected Devices
- Queries the Port Elements and device(s) selected in the tree to obtain a list of available ports.
Rule Definitions
This view lets you arrange the order of rules and enable or disable rules for the actions to be taken in response to intrusion threats. Upon notification of a trap from the intrusion detection system, the rules are executed from top to bottom, as they appear in the table. The Create button allows adding new rules to the table. The Edit button allows modifying an existing rule selected in the table.
Click areas in the window for more information.
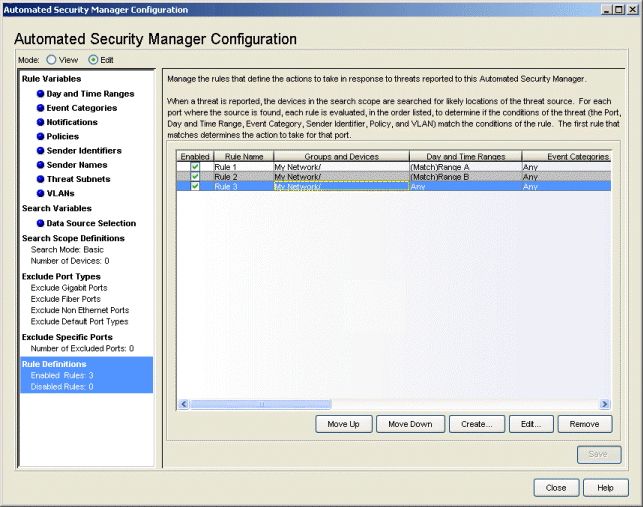
- Enabled
- When checked, the action associated with the rule is executed in response to an intrusion threat.
- Groups and Devices
- The devices/device groups on which a threat is suspected of ingressing the network.
- Policies
- Port policies defined for this rule. Depending on how the rule is created, these policies may be overridden by the rule.
- Action to Take
- Identifies the action executed in response to the threat (None, Apply Policy, Disable Port, Apply PVID) when the rule matches the event criteria.
- Move Up/Move Down
- Rules are executed from top to bottom in the order in which they appear in the table. These buttons allow you to arrange the order by selecting a particular rule and click Move Up or Move Down to move it to the desired position.
- Create
- Opens the Create Rule window where you can define a new rule to be added to the table.
- Edit
- Opens the Edit Rule window where you can modify an existing rule selected from the table.
For information on related windows:
For information on related tasks: