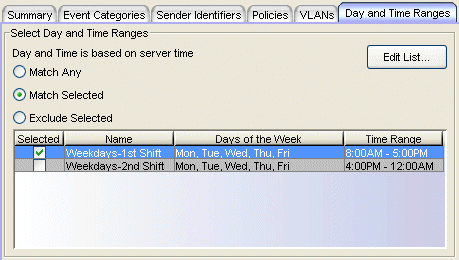
The Create Rule and Edit Rule windows define new rules or modify existing rules used as Automated Security Manager responses to network security threats. The Edit Rule window opens with information for the rule selected in the Rule Definitions view, while the Create Rule window opens with blank or default settings.
Rules have two distinct functions:
- Examine the source of the threat (switch/port) to determine if certain conditions exist (e.g. threat category, source of the notifying IDS, policies currently applied to the port, etc.).
- Define the action taken when these conditions match the criteria defined by the Rule.
Click areas in the window for more information.
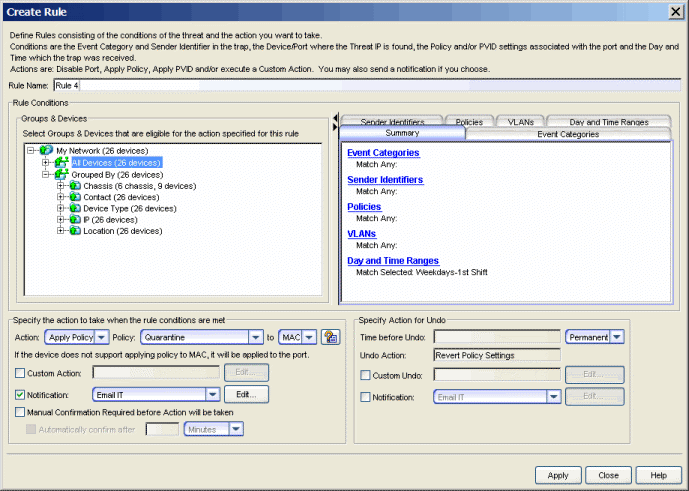
- Name
- The name given to this rule. The name can be any character string, excluding spaces, up to 64 characters.
Rule Conditions
The following attributes are compared against the device(s) located by the ASM search and the event information reported by the IDS to determine the applicability of the specified action. When the information from the search and the event information match these attributes, then the action specified below is applied.
- Groups & Devices
- The tree in this panel can be expanded to select a target device or device
group that is eligible for the action specified in the rule. You can create several rules to
respond to a particular threat and apply different actions based on the device/device group selected here.
For example, if you are creating a rule with an action that applies a policy, you do not want to select a
device/device group for a device type that does not support policies. Or as another example, in some rules,
you may want to apply different actions or more or less permanent actions for certain subnets containing
critical network resources.
NOTE: Do not select the Layer 3 NAC Controller and the NAC Gateway appliance as a device eligible for the action specified in the rule.
- Qualifier Tabs
- Summary
-
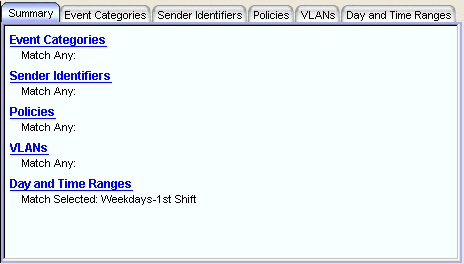
This tab shows a summary of the currently defined qualifiers for this rule. Clicking a particular heading selects that tab.
- Event Categories
-
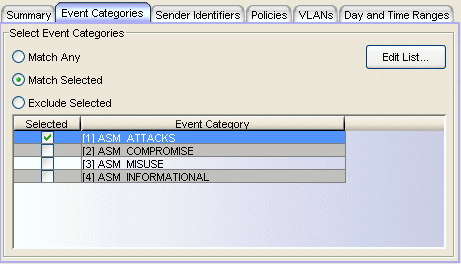
This tab lets you select one or more event categories, reported by the IDS, to determine whether or not to apply an action.
- Match Any - This is an unconditional match for the category.
- Match Selected - The event category is compared against one or more categories selected from the list.
- Exclude Selected - The event category matches if it is not one of the categories selected from the list.
- Sender Identifiers
-
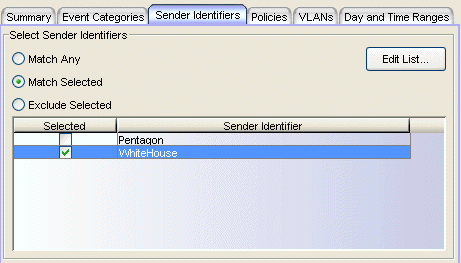
This tab lets you select one or more unique identifiers, associated with the intrusion detection systems that detected the security event, to determine whether or not to apply an action.
- Match Any - This is an unconditional match for the Sender ID.
- Match Selected - The Sender ID is compared against one or more Sender Identifiers selected from the list.
- Exclude Selected - The Sender ID matches if it is not one of the Sender Identifiers selected from the list.
- Policies
-
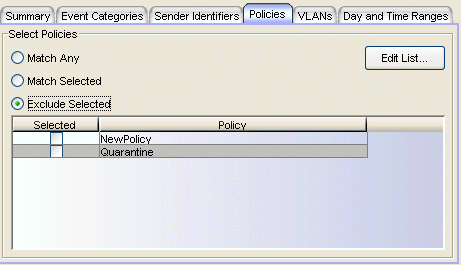
This tab lets you select one or more policies to determine whether or not to apply an action.
- Match Any - This is an unconditional match for a currently applied policy.
- Match Selected - A match occurs when the currently applied policy is one of policies selected in the list.
- Exclude Selected - A match occurs when the currently applied policy is not one of the policies selected in the list.
IMPORTANT:
Whether or not a policy matches a selection from the Policy List depends on the operational mode/features supported on specific device types:- N-Series Platinum:
- Multi-auth - The Apply Policy action determines the specific policy being matched. If the action is Apply Policy to Port, then only port policies are compared to your selection(s) from the Policy List.
- StrictX - Same as N-Series Platinum in multi-auth mode, except the port-based policy is used for authentication. In any case, the policy matching works the same way as the N-Series Platinum (multi-auth).
- N-Series Gold:
- Multi-auth - N-Series Gold does not support MAC/IP override. As a result, the only ASM action you can take for applying a policy is to Apply Policy to Port. Policy matching always compares the policy(ies) selected in the Policy List against the policy currently in effect.
- C2: Functions the same way as the N-Series Gold (StrictX).
- E1/E7: Policy matching always compares the policies selected from the Policy List against the policy currently in effect on the port.
- VLANs
-
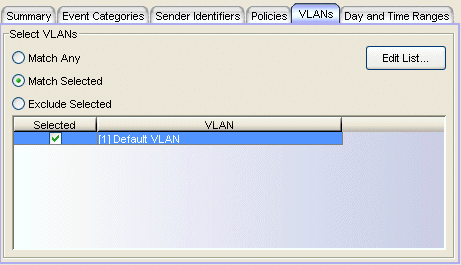
This tab lets you select one or more VLANs, currently applied on the port, to determine whether or not to apply an action.
- Match Any - This is an unconditional match for a currently applied VLAN.
- Match Selected - The currently applied VLAN is compared against one or more VLANs selected from the list.
- Exclude Selected - The currently applied VLAN is not one of the VLANs selected from the list.
Specify the action to take...
This area defines the actions to be taken when the event matches the above criteria set by a rule. It allows taking a specific action on a port, MAC address, or IP address or taking a Custom Action (launching a program to be run).
- Action
- Use this drop-down menu to select a response to the threat: None, Disable Port, Apply Policy,
Apply PVID, or Notify NAC.
- Apply Policy
- Use the Policy drop-down menu to select a policy to be applied on the device. The available policies are listed in the Policies tab.
You must also specify whether to apply the policy to the MAC source, IP source,
or the port.
Multi-User Authentication
When the action for a rule is set to Apply Policy and the threat is located on a port on a device that supports Multi-User Authentication (e.g., Matrix DFE), you can apply a policy to a specific MAC address or IP address. This lets you isolate a single user instead of affecting all of the users on the port. You can apply a user-specific policy to an IP address or MAC address instead of changing the port policy. If the threat MAC address is unique to a particular Threat IP (typically on devices at the edge of your network), select MAC to apply the policy to the MAC address and override its port or dynamic policy. If the threat is on a device at the core of your network and the MAC address maps to several IP addresses, select IP to apply the policy to the IP address and override its port or dynamic policy.NOTE: Policies applied to a MAC source override policies applied to an IP source. So, if there is a policy currently applied to a MAC source, applying a policy to an IP-source policy has no effect. See also the IMPORTANT Policy Matching notes, above.
- Apply PVID
- Use the PVID drop-down menu to select the PVID applied to the port. The available VLANs are defined in the Automated Security Manager Rule Variables - VLANs view. The associated PVID Egress drop-down menu lets you either retain the current PVID egress state by selecting None or change the egress state to Untagged. When Untagged is selected, the PVID is applied and the egress state is set to Untagged. When None is selected, the egress state is unchanged and only the PVID is applied. If you have specified a Discard VLAN as the PVID, selecting None usually means traffic is discarded.
NOTE: Applying a PVID to a port does not clear the VLAN from egress lists for non-PVID VLANs. This is normal operation. If Apply PVID is selected, change the egress state to Untagged or apply a quarantine policy to the port. - Notify NAC
- When Notify NAC is selected, ASM notifies NAC Manager in response to a real-time security threat from an end-system on the network. NAC Manager automatically adds the end-system's MAC address to the Blacklist end-system group, effectively putting the end-system in quarantine and preventing the end-system from accessing the network from any location. If ASM notifies NAC Manager the security threat is no longer present, then NAC Manager removes the end-system from the Blacklist group and the end-system is dynamically re-authenticated to the network. You can view ASM blacklists in the NAC Manager Advanced Configuration view, by selecting Tools > Manage Advanced Configurations from the menu bar. In the left-panel tree, expand the Rule Components folder and the End-System Group folder, and click on Blacklist. An ASM blacklist entry has a description of "ASM."
- Custom Action
- Check Custom Action and click Edit to open the Specify
Program for Action window where you can customize the response to an event
by selecting a program to execute.
NOTE: When a custom action script does not specify the path for its output, the output is placed in the <install directory>\jboss\bin directory.
- Notification
- You can specify a notification to be part of the rule's action. For example, you can
specify that an E-Mail notification is sent in response to a threat. Check Notification
and select the desired notification from the drop-down menu. Click Edit to open the Edit Notifications window,
which lists the configured notifications. In this window, you can select a
Notification to edit, or click Create to open the
Create Notification window.
| NOTE: | If you create a rule with an action that requires a manual confirmation, and an email notification is configured for the action, you can use the Advanced Settings option (Tools > Options) so ASM also sends an email notification when the action needs to be confirmed. The notification has a subject line of "Awaiting Manual Confirmation." Once the action is performed, the notification is sent again, with the subject line originally defined in the notification. |
|---|
- Manual Confirmation Required
- When checked, the selected action requires human intervention before executing. The action/event must be selected in the Automated Security Manager Activity Monitor and confirmed with the Confirm Response button.
Specify Action for Undo
With one exception, you can undo applied actions. The exception can occur when two actions are defined within a rule: a standard ASM action and a custom action. If the standard ASM action fails, the custom action applies and, if successful, cannot be undone. Under these circumstances, configure your custom action to take into account the potential failure of the standard ASM action.
- Time before Undo
- This setting determines whether the action is Permanent or set to a time span of Minutes, Hours as defined in the associated field. Permanent means that ASM does not automatically undo the action after a certain time interval, but it can still be manually undone.
- Undo Action
- This field shows an Undo Action that corresponds to the Action previously selected/applied to a port. It cannot be edited.
- Custom Undo
- Check Custom Undo and click Edit if you want to specify an
action taken when an action is undone. This opens the
Specify
Program for Undo window where you can select a program to be executed.
This does not alter the Undo Action, the Custom Undo is executed in addition to the Undo
Action.
NOTE: When a custom undo action script does not specify the path for its output, the output is placed in the <install directory>\jboss\bindirectory.
- Notification
- You can specify a notification to be part of the rule's action. For example, you can specify an E-Mail notification to be sent in response to a threat. Check Notification and select the desired notification from the drop-down menu. Click Edit to open the Edit Notifications window which lists the configured notifications. In this window, you can select a Notification to edit, or click Create to open the Create Notification window.
For information on related windows:
For information on related tasks:
