This window lets you create or edit notifications activated with your response to network threats. The window takes several forms depending on the type of notification being created or edited. Use the drop-down menu at the top of the window to select the type of notification you want to create. The appropriate fields are automatically provided.
E-Mail Notification
This window lets you configure E-Mail (message) notifications that trigger with your response to network threats.
Click areas in the window for more information.
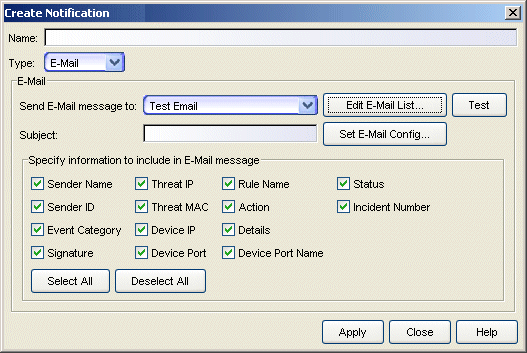
- Send E-Mail message to:
- Use this drop-down menu to select one of your pre-defined E-Mail lists. If no lists have been defined, the menu is empty. Click the Edit E-Mail List button to define a list.
- Set E-Mail Config
- This button opens the Options - SMTP E-Mail Server view, where you can specify an Outgoing SMTP E-Mail Server and a Sender address that appears as the sender in E-Mail notifications.
- Specify information to include in E-Mail message
- These check boxes let you select elements of the event information that are added to your E-Mail notification message. The Select All button places a check in all of the boxes and the Deselect All button removes checks from all of the boxes. The information is added to your message as unformatted, space-delimited text.
- Test
- This button allows sending a test message to simulate a notification sent in response to a network threat.
Syslog
This window lets you configure notifications to create a Syslog entry.
Click areas in the window for more information.
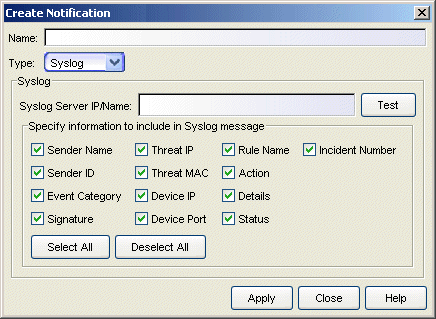
- Syslog Server IP/Name
- This is the IP address or hostname that identifies the Syslog server where the message is sent.
- Specify information to include in Syslog message
- These checkboxes let you select elements of the event information to add to your Syslog notification message. The Select All button places a check in all of the boxes and the Deselect All button removes checks from all of the boxes. The information is added to your message as unformatted, space-delimited text.
- Test
- This button allows sending a test syslog message to simulate a notification sent in response to a network threat.
SNMP Trap
This window lets you configure notifications that send a SNMP Trap triggered with your response to network threats.
Click areas in the window for more information.
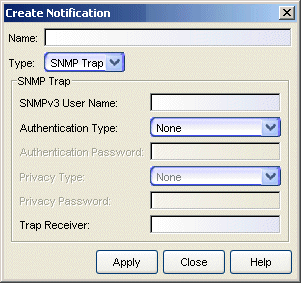
- SNMPv3 User Name
- This is the user name for the credential used when sending the trap to the Trap Receiver.
- Authentication Password
- This is the password (between 1 and 64 characters in length) used to determine Authentication. This field is disabled if Authentication Type is None.
- Privacy Type
- Select DES or None from this drop-down menu. These settings are disabled if Authentication Type is None.
- Privacy Password
- This is the password (between 1 and 64 characters in length) used to determine Privacy. This field is disabled if Privacy Type is None.
- Trap Receiver
- The IP address for a trap receiver (the system where devices send traps). Valid trap receivers are systems running a SNMPTrap Service.
Script
This window lets you identify a script executed with your response to network threats.
Click areas in the window for more information.
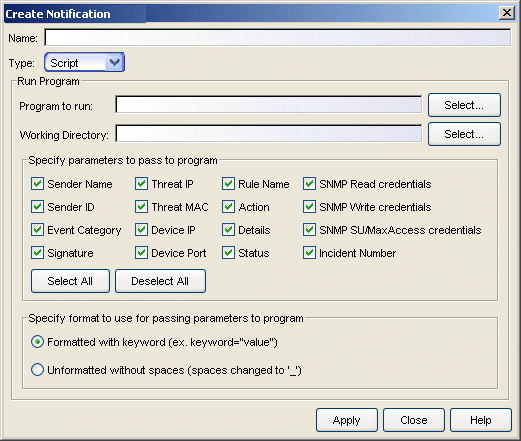
- Program to run
- This field defines the script launched as this Custom
Action. Scripts are stored in the <install directory>\appdata\AutoSecMgr\scripts directory. Type a script name, if known, or use the Select
button to open a file browser window and choose a script.
The Program to run field does not allow using options. For example, you cannot enter myscript.bat –i <IP Address> -m <MAC Address> in the Program to run field.
TIP: To execute a script with options, create a script without options that executes another script that has options (Windows only). For example: - Create a script named, asm_script.bat with an entry to call myscript.bat such as:
C:\Program Files\My Custom Files\myscript.bat –i %1 -m %2". - Uncheck all but the Threat IP and Threat MAC checkboxes and select Unformatted without spaces (you don't want to send any keyword (thip= or thmac=) to your script.). The variable %1 returns <Threat IP Address> and %2 returns the <Threat MAC Address>
If you are using PERL script, use a different argument variable, such as $ARGV[0] (First argument) or @ARGV (all arguments). Also, using the shell script is similar to a Windows batch file script (%1 for the first argument, %* for the all arguments).
- Create a script named, asm_script.bat with an entry to call myscript.bat such as:
- Working Directory
- This is the path to a directory from which the script executes. Any path references within your script that are not absolute paths, will be relative to this directory. Enter a path or use the Select button to open a file browser window and choose a directory.
- Specify parameters to pass...
- These check boxes let you select elements of the event information to be passed as parameters to your program. The Select All button places a check in all of the boxes and the Deselect All button removes checks from all of the boxes.
- Specify format to use...
- This area lets you select the format used to pass the selected parameters to your program:
- Formatted with keyword...
- When selected, passed parameters use a format that includes a keyword associated with each parameter (e.g., keyword="value"). So, for example, if Sender Name is selected as a parameter, the keyword sname is used and the information passed to the script is sname="dragon_id" followed by a space and then the keyword and value for the next parameter. The following table defines the keywords for each parameter and the order that the values are passed to the script (listed from top to bottom in the table).
Parameter Keyword Sender Name sname Sender ID sid Event Category ecat Signature sig Incident Number incident Threat IP thip Threat MAC thmac Device IP dev Device Port port Rule Name rname Action action Details dtls SNMP Parameters see Note 1 Status stat Note 1: When selecting any SNMP parameter, snmp=value indicates the SNMP version and the subsequent parameters contain the values assigned for the credentials associated with the device. When selecting multiple SNMP parameters (e.g., SNMP Write and SNMP Read) the values for the highest access level are used for the script.
SNMP v1, SNMPv2 SNMPv3 Parameter Keyword Parameter Keyword SNMP Read snmp="v1"
roSNMP Read,
SNMP Write,
SNMP SU/Max Accesssnmp="v3"
user
seclevel
authtype
authpwd
privtype
privpwdSNMP Read snmp="v1"
rwSNMP Read snmp="v1"
suExample:
If you select Sender Name, Sender ID, Threat MAC, and SNMP Write and the device is configured for SNMPv1 credentials, the information passed to the script appears similar to the following:
sname="my sender name" sid="dragon id" thmac="00.00.1d.11.22.33" snmp="v1" rw="public"
And, for a script named myscript.bat, the resulting script command is executed as:
C:\Program Files\Extreme Networks\NetSight\appdata\AutoSecMgr\scripts\my_script.bat sname="my sender name" sid="dragon id" thmac="00.00.1d.11.22.33" snmp="v1" rw="public"
- Unformatted without spaces...
- When selected, the parameters are passed as space delimited, unformatted text, without keywords. For this option, your script must know which parameters are being passed and the order in which they are passed. If a parameter contains any spaces, they are replaced with an underscore ( _ ).
Example:
You select Sender Name, Sender ID, Threat MAC, and SNMP Write and the device is configured for SNMPv1 credentials, the information passed to the script appears similar to the following:
my_sender_name dragon_id 00.00.1d.11.22.33 v1 public
And, for a script named myscript.bat, the resulting script command is executed as:
C:\Program Files\Extreme Networks\NetSight\appdata\AutoSecMgr\scripts\my_script.bat my_sender_name dragon_id 00.00.1d.11.22.33 v1 public
Extreme Networks IPS
This window lets you configure a SNMPv3 trap notification sent to Extreme Networks Intrusion Prevention System (IPS) (formerly Dragon) when ASM responds to a network threat. This is similar to the SNMP Trap notification, except that for Extreme Networks IPS, you must specify an Authentication Type and Privacy Type.
Click areas in the window for more information.
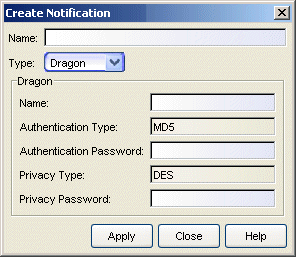
- Authentication Password
- This is the password (between 1 and 64 characters in length) used to determine Authentication. This field is disabled if Authentication Type is None.
- Privacy Type
- Select DES or None from this drop-down menu. These settings are disabled if Authentication Type is None.
- Privacy Password
- This is the password (between 1 and 64 characters in length) used to determine Privacy. This field is disabled if Privacy Type is None.
Group
This window lets you combine notifications in a group to provide multiple notifications when ASM responds to a network threat.
Click areas in the window for more information.
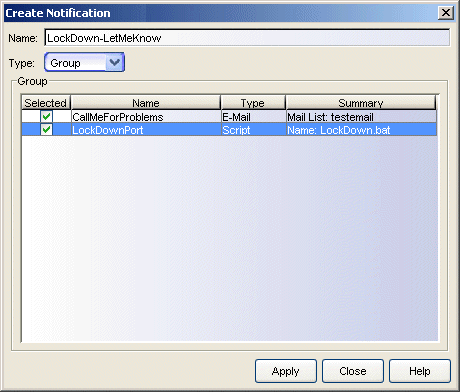
- Group
- This list shows all of the notifications (including other groups) included in this group. Checking selected groups and clicking Apply creates/edits the group with the checked notifications as members.
For information on related windows:
For information on related tasks: