The Server Information window lets you view and configure certain Extreme Management Center (formerly NetSight) Server functions, including management of client connections, database backup and restore, locks, and licenses. It also provides access to the server log and server statistics. To access this window, select Tools > Server Information from the menu bar. You must be assigned the appropriate user capabilities to access and use this window.
Click the link for information on the following Server Information window tabs:
Client Connections Tab
The Client Connections tab provides information that lets you view and manage current client connections to this server, and also view a history of client connections.
Click the graphic for more information.
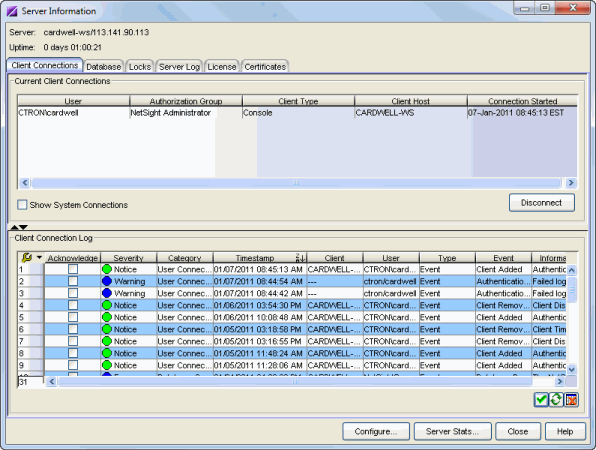
Current Client Connections
This table lists all of the currently connected clients for this server, with the most recent connection at the top. The list is automatically updated when clients connect or disconnect.
- Show System Connections
- Check this checkbox to display system connections in addition to standard client connection. System connections include connections for several web services as well as connections that are opened for the Management Center Scheduler report PDF generation.
- Disconnect Button
- Disconnects the selected client. The client being disconnected receives a message saying that their connection will be terminated in 30 seconds. You must be assigned the appropriate user capability to disconnect clients.
Client Connection Log
The client connection log displays a list of all client connect and disconnect activities, and allows you to track the history of a particular client connection. The table displays the last 50,000 log entries, and updates automatically when a client connects or disconnects. The current log file is automatically archived when its size reaches 1 megabyte and opens a new log.
- Acknowledge
- This checkbox lets you acknowledge an event and also hide items that have been
acknowledged. Click the checkbox to acknowledge the item and then click the
Show Acknowledged Events button
 to hide or show the checked items.
-
 Show/Hide Acknowledged Events
 - This button hides or shows items in the table that have been acknowledged by a check in the Acknowledge column.
-
 Clear Log
 - Clears the log. If you want to retain a copy of the log that you are clearing, you must manually copy the date-stamped file in the <install directory>\appdata\logs\admin.log.
Database Tab
This tab allows you to manage the password and connection URL for the database, and perform database backup and restore operations. You must be assigned the appropriate user capabilities to perform these functions.
Click the graphic for more information.
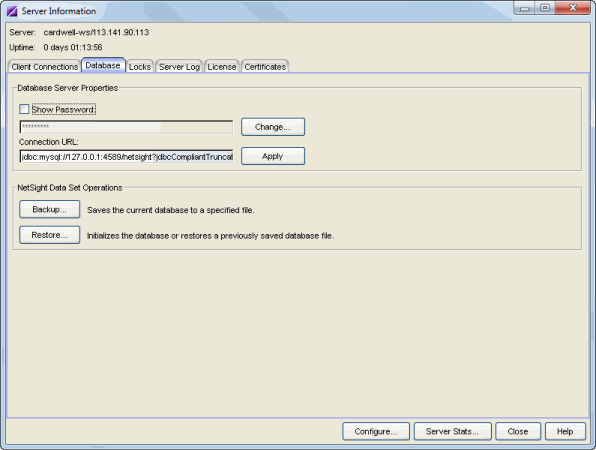
Database Server Properties
Database server properties are used by the Management Center Server when it connects to the database. The database is secured via a credential comprised of a user name and password (see the Important note above). This area lets you modify that password, and also view and modify the connection URL for the database.
- Password
- Click Change to display a window where you can enter a new password. The password is masked unless you select the checkbox to Show Password. You must restart both the Management Center Server and client after you change the database password.
- Connection URL
- Displays the URL the Management Center Server uses when connecting to the database.
For troubleshooting purposes, (for example, if you can't connect to the
database) you may wish to enter a new connection URL. Enter a new URL in
the following format, and click
Apply:
jdbc:mysql://[hostname]/<database>
where [hostname] is optional.
You must restart both the Management Center Server and client after you change the Connection URL.
Extreme Management Center Data Set Operations
This area lets you perform database backup and restore operations.
- Backup Button
- Opens the Backup Database window where you can save the currently active database to a file. If the Management Center Server is local, you can specify a directory path where you would like the backup file stored. If the server is remote, the database will be saved to the default database backup location.
- Restore Button
- Opens the Restore Database window where you can restore the initial database or restore a saved database. Restoring an initial database removes all data elements from the database and populates the Management Center Administrator authorization group with the name of the logged-in user. Both functions cause all current client connections and operations in progress to be terminated. You must restart both the Management Center Server and the client following an initialize database operation. When restoring a database, if the server is remote, you only have access to databases in the default database backup directory.
| NOTE: | When restoring a saved database to a new Management Center server installation, any memory or database configuration changes on the original server requires a manual change on the new server in order to replicate the configuration of the original Management Center server.
|
|---|
Locks Tab
The Locks tab lets you view a list of currently held operational locks. Operational locks are used to control the concurrency of certain client/server operations. They are used in two ways:
- to lock a device while a critical operation is being performed, such as a firmware download.
- to lock a certain function so that only one user can access it at a time. For example, only one user can have the Authorization/Device Access window open at a time.
In the Current Locks table you can view information about each lock, such as who owns the lock, the duration of the lock, and a description of the lock. You can cancel a lock by selecting it in the table and clicking the Revoke button. When a lock is revoked, a message is displayed on the user's machine informing them that their use of the locked functionality has been terminated. When the user acknowledges the message, the function closes. You must be assigned the appropriate user capability to revoke a lock.
Click the graphic for more information.
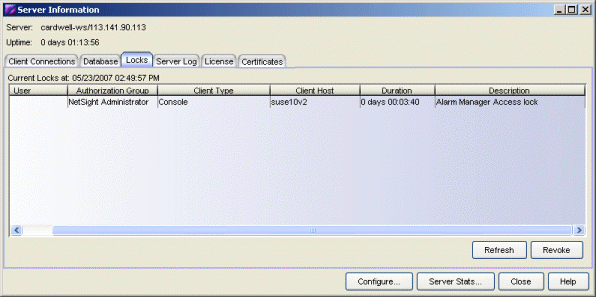
- Revoke Button
- Removes the selected lock. When a lock is revoked, a message is displayed on the user's machine informing them that their use of the locked functionality has been terminated. When the user acknowledges the message, the function closes.
Server Log Tab
The Server Log displays all the events for the server. Server Log entries are listed by date and time, with newer entries listed at the bottom. A new Server Log is created every day. If the Extreme Management Center Server is local, you can view previous logs using the File tab.
You can perform Find and Filter operations on Server Log entries to target specific entries of interest. The last Filter and Find settings you enter remain in the Server Log display until you refresh the display.
Information on the following tabs:
Find Tab
The Find tab lets you search the Server Log (filtered or unfiltered) for a specific set of characters, like a word, phrase, or number. Enter your search criteria in the Find field, and when you click the Find button, any search terms found will be highlighted in the Server Log display. You can search forward or backward from your current position, and restrict your search to match the exact upper or lowercase, and/or whole word.
Click the graphic for more information.
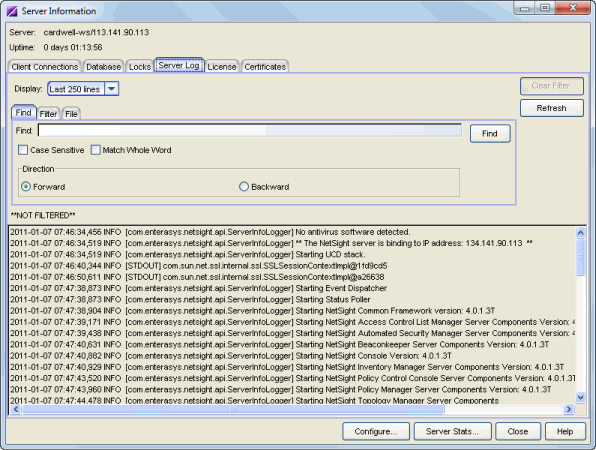
- Case Sensitive
- Select this checkbox to search based on an exact match of the upper or lowercase of the text entered in the Find field.
- Match Whole Word
- Select this checkbox to search based on an exact match of the whole word or numeric value entered in the Find field.
- Server Log Entries
- Lists the events by date and time, with the more recent entries at the bottom. Directly above the entries you can see the status of whether the entries are filtered or not filtered. Any search terms found are highlighted.
- Refresh Button
- Displays and updates log entries, and removes any filters. The Server Log does not refresh automatically. If the Server Log is open and new entries are written to the log, you must click Refresh to update the log.
Filter Tab
The Filter tab lets you specify which entries to display in the Server Log. Enter the information you want to see, and only matching log entries will be displayed. You can use any combination of filter options, and you can perform consecutive filters on the filtered events.
Click the graphic for more information.
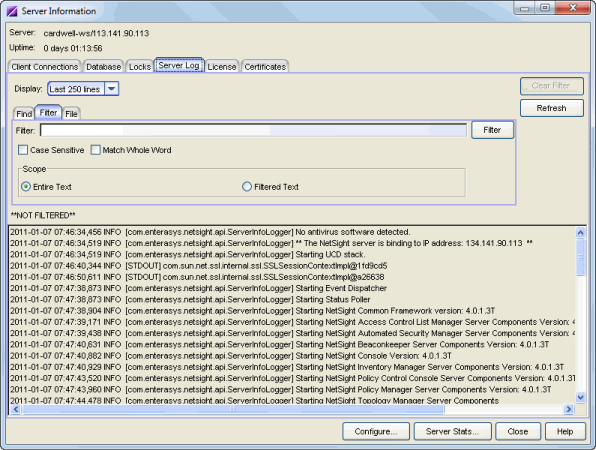
- Case Sensitive
- Select this checkbox to search based on an exact match of the upper or lowercase of the text entered in the Filter field.
- Match Whole Word
- Select this checkbox to search based on an exact match of the whole word or numeric value entered in the Filter field.
- Entire Text
- Select the Entire Text scope option to filter all text by the value in the Filter field. If you have already performed a filter, this will enable you to perform a new filter on all entries instead of just the filtered entries.
- Filtered Text
- Select the Filtered Text scope option to perform a new filter on the results of the previous filter.
- Server Log Entries
- After running the filter, this area displays the matching Server Log entries by date and time, with the more recent entries at the bottom. Click Clear Filter to remove the filter currently in effect. Directly above the entries you can see the status of whether the entries are filtered or not filtered.
- Refresh Button
- Displays and updates log entries, and removes any filters. The Server Log does not refresh automatically. If the Server Log is open and new entries are written to the log, you must click Refresh to update the log.
File Tab
The File tab lets you specify which day's server log you wish to view. You can select the current day's log file, or a previous day's log file. The Extreme Management Center Server must be local in order to view previous logs.
Click the graphic for more information.
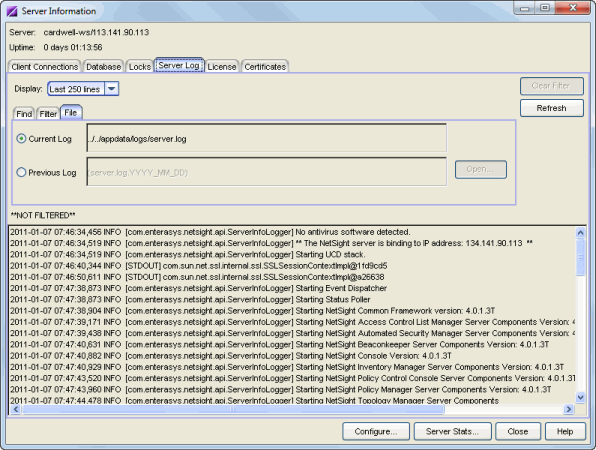
- Current Log
- Select this button to view the current day's log. The name of the log and the path to where it is located is displayed in the field to the right.
- Previous Log
- Select this button to view a previous day's log. Click the Open
button to open a file selection window where you can select the log you want to view. The file
names are dated, in the format
YYYY_MM_DD_events.log. The Management Center Server must be local in order to view previous logs.
- Server Log Entries
- Lists the entries in the currently selected Server Log, by date and time, with the more recent entries at the bottom. If you apply a filter to the log, only the entries that match the filter are displayed on this tab.
- Refresh Button
- Displays and updates log entries, and removes any filters. The Server Log does not refresh automatically. If the Server Log is open and new entries are written to the log, you must click Refresh to update the log.
License Tab
The License tab displays a list of all licenses that are present on the Extreme Management Center server. It also lists any Extreme Access Control assessment license and Access Control VM (virtual engine) license, if applicable. See below for more information on the Extreme Access Control VM license.
You can also use this tab to change a license. You would change a license in the event that you want to upgrade from an evaluation copy to a purchased copy or upgrade to a license that supports more users/devices.
Contact your Extreme Networks Representative to purchase the software and receive a Licensed Product Entitlement ID that allows you to generate a product license. Prior to changing a license, you must redeem your Entitlement ID for the new product license. Refer to the instructions included with the Entitlement that was sent to you. (For more information, view the Product Licensing information at http://www.extremenetworks.com/support/enterasys-support/how-to/ .)
Click the graphic for more information.
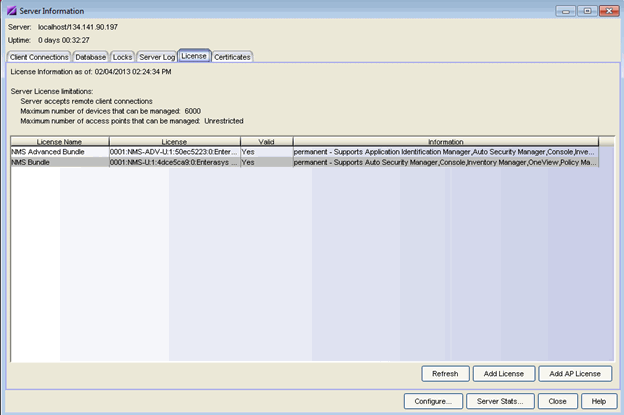
- Server License Limitations
- Information on the selected server license:
- whether the server accepts connections from remote clients.
- the maximum number of devices that can be managed by the server.
- the maximum number of access points that can be managed by the server.
- License Name
- Lists the Management Center (formerly NetSight) license name. It also lists any Access Control assessment license and Access Control VM (virtual engine) license, if applicable.
- Information
- Displays a list of the licensed feature. If the licensed application is an evaluation copy, this column displays the date the license expires.
- Add License Button
- Opens a window where you can add a new license. Read and accept the terms of the license agreement and click OK. Enter the license text that you received when you generated the product license. (When you purchased your Management Center software product, you received a License Entitlement ID that allows you to generate a product license. Refer to the instructions included with the License Entitlement ID that was sent to you.) Click Update. The license file will be updated with the new license text.
- Add AP License
- Opens a window where you can add an Access Point license. Enter the license text that you received when you generated the product license. (When you purchased your software product, you received a License Entitlement ID that allows you to generate a product license. Refer to the instructions included with the License Entitlement ID that was sent to you.) Click Update. The license file will be updated with the new license text.
Extreme Access Control VM License
The Extreme Access Control virtual engine requires the presence of an Access Control VM license in the Management Center Server. This license can be provided separately, as part of a bundle, or as part of an evaluation license.
The Access Control VM license includes a device limit which indicates the number of virtual Access Control engines that can be licensed. The Access Control VM license allocates license units to Access Control virtual engines according to the number of devices it supports. If a virtual engine has a license unit allocated to it, its license status is licensed; otherwise, it is unlicensed. You can see the license status for a virtual engine in the Access Control Manager engine Configuration tab or in the engine Administration web page. Additional Access Control VM licenses can be added to increase the device limit.
License units are allocated to virtual Access Control engines as follows:
- When a virtual Access Control engine is discovered, if there are any available license units, a license unit is allocated to the engine. (Management Center does not discover that an Access Control engine is virtual until it is contacted.) The number of available license units can be viewed in the License table in the Information column.
- When a licensed virtual Access Control engine is deleted, that license unit will be allocated to any unlicensed virtual Access Controlengine.
- IF the Access Control VM license is updated and license units have been added, they are allocated to unlicensed virtual engines. If license units have been removed, license units are revoked from licensed virtual engines as necessary, according to the device limit.
Certificates
The Certificates tab provides a central location for managing the Extreme Management Center server certificate. From this tab you can:
- Update the Management Center server certificate by replacing the server private key and certificate.
- View and change the client trust mode that specifies how Management Center clients handles a server certificate.
- View and change the server trust mode that specifies how servers handles certificates from other servers.
Click the graphic for more information.
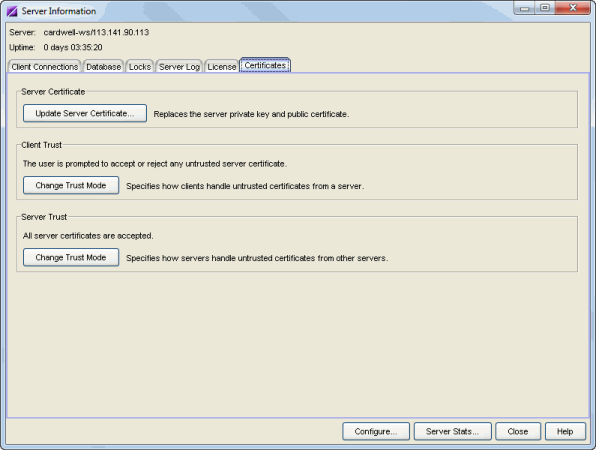
- Server Certificate
- Click the Update Server Certificate button to open the Update Server Certificate window where you can replace the Management Center server private key and certificate. For information and steps on how to update the certificate, see How to Update the Extreme Management Center Server Certificate.
- Client Trust
- This section displays the current client trust mode that specifies how Management Center clients handle a server certificate. Click the Change Trust Mode button to open the Update Client Certificate Trust Mode window where you can change the client trust mode.
- Server Trust
- This section displays the current server trust mode that specifies how servers handle certificates from other servers. Click the Change Trust Mode button to open the Update Server Certificate Trust Mode window where you can change the server trust mode.
- Configure Button
- Opens the Console Client Connections Options window where you can configure the maximum number of concurrent client connections supported by the Management Center Server.
- Server Stats Button
- Opens the Server Statistics window where you can view Management Center Server statistics such as CPU usage, and also launch Advanced statistics used for troubleshooting purposes.
For information on related windows:
 Refresh