ACL Manager provides the tools that let you efficiently manage the Access Control Lists (ACLs) on your Extreme Networks routers.
ACLs are the containers for the rules that govern network access through your routers. ACL Manager supports five types of ACLs: S/K/N 7.x+, N-Series 6.x, X-Series, XSR, and Common. Each ACL type can contain a specific set of rules that define parameters that are appropriate for the devices that they support. Common ACLs can contain rules that are supported by all five types.
To use ACL Manager, you will need to import the existing ACL data from your devices into ACL Manager. You can import ACL data from a Router Services Database file or from the devices you've modeled in Console. Once you've imported your ACL data, you can use the ACL Editor to edit and organize your ACLs, and assign ACLs to device interfaces and agent services using the ACL Manager's interface assignment and agent assignment views.
It is important to understand that using ACL Manager to manage and assign ACLs does not change the ACLs on the device until the Enforce operation is used. In ACL Manager you are managing a "view" of your ACLs that is stored in the NetSight database. You will then use the Enforce operation to write that data to the device's active configuration.
At the top left of the ACL Manager tab, there is a menu button  that provides the following
options:
- Import From RSD - Opens the RSM Data Importer window where you can select a Router Services Manager Data file to import.
- Well Knowns - Opens the Pre-Defined Well-Known IDs window.
- Options- Opens the ACL Manager options window where you can view and configure ACL Manager options.
- Hide Detail Log- Removes the Detail Log radio button.
- Show Detail Log - Adds the Detail Log radio button allowing you to access the Detail Log view.
- Clear Detail Log - Clears the Detail Log.
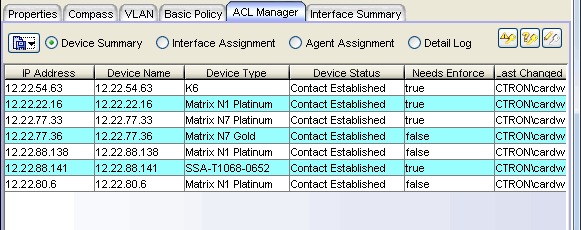
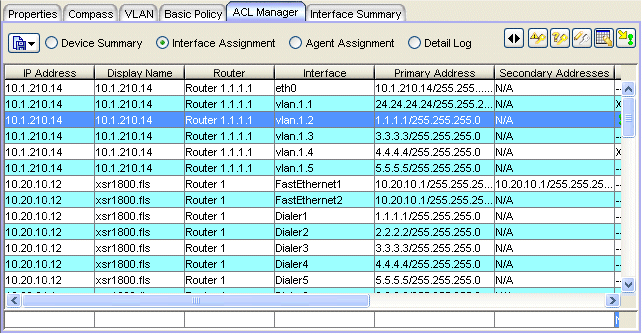
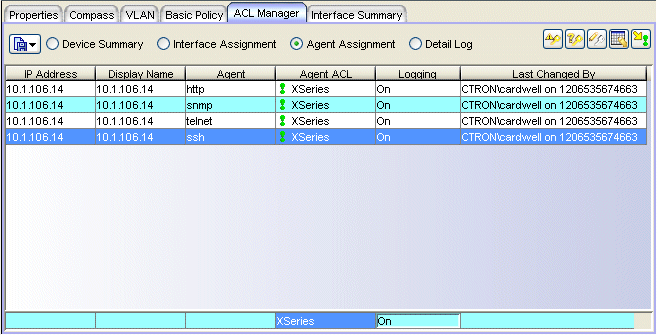
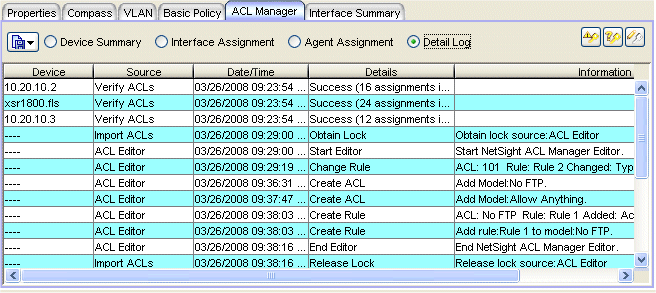
Four views are available in the right panel when the ACL Manager tab is selected. Use the radio buttons at the top of the tab to select the desired view.
Device Summary
The Device Summary view presents information about the device or devices selected in the left-panel tree that support ACLs.
Click column headings in the window for more information.

- Needs Enforce
- Indicates whether ACLs need to be enforced on the device: true or false. The value "Unsupported" is displayed for devices that have been imported into the ACL Manager database (via a Router Services Manager Data file import), but are not supported.
- Last Changed By
- Indicates the date and time that the device's ACL data in the database was last changed, and the user that initiated the action. This field is updated when the device data is imported or refreshed and there have been changes to the data, or when a change is made to the ACL data through ACL Manager and saved to the database. Keep in mind that the "Last Changed By" field is updated when the database data is updated, not when the device is modified, such as during an enforce.
- Last Verified By
- Identifies the user that performed the most recent verify of the ACLs on this device.
-
 ACL Device Enforce Button
 - Downloads ACLs from the ACL Manager database to the active configuration for enforcement on the currently selected device or devices.
-
 ACL Device Verify Button
 - Lets you compare the ACLs from the selected devices against the current ACLs defined in the ACL Manager database. When the Verify detects a mismatch between ACLs, the Verify Results window opens where you can view differences between the two sets of ACLs.
-
 ACL Editor Button
 - Opens the ACL Editor window where you can create a new ACL or modify an existing ACL.
Interface Assignment
The Interface Assignment view presents ACL information for the device interfaces. Use the table editor to change the inbound/outbound ACL value for a selected interface.
Click column headings in the window for more information.

- Inbound ACL
- Indicates the currently applied inbound ACL for this interface. To change the ACL, click on the Table Editor button to open the Table Editor row at the bottom of the table. Click on the Inbound ACL column in the Table Editor row to open the Select ACL window. Select the desired ACL and click OK. Be sure to save your changes to the database.
- In Last Changed By
- Indicates the date and time that the inbound ACL assignment on this interface was last changed, and the user that initiated the action. This field is updated when the device data is imported or refreshed and there have been changes to the interface assignment, or when a change is made to the interface assignment through ACL Manager and saved to the database. Keep in mind that the "Last Changed By" field is updated when the database data is updated, not when the device is modified, such as during an enforce.
- Outbound ACL
- Indicates the currently applied outbound ACL for the respective interface. To change the ACL, click on the Table Editor button to open the Table Editor row at the bottom of the table. Click on the Outbound ACL column in the Table Editor row to open the Select ACL window. Select the desired ACL and click OK. Be sure to save your changes to the database.
- Out Last Changed By
- Indicates the date and time that the outbound ACL assignment on this interface was last changed, and the user that initiated the action. This field is updated when the device data is imported or refreshed and there have been changes to the interface assignment, or when a change is made to the interface assignment through ACL Manager and saved to the database. Keep in mind that the "Last Changed By" field is updated when the database data is updated, not when the device is modified, such as during an enforce.
- Description
- If supported by the device and interface type, this field contains a description that was entered through the device's local management for this interface.
- Notes
- This column provides a place for user-editable notes. Use the table editor to create the note and then save it to the database.
-
 Swap In/Outbound ACLs Button
 - This button swaps the ACLs between the inbound and outbound interfaces, so that the ACL applied to the inbound interface is applied to the outbound interface and vice versa.
-
 ACL Device Enforce Button
 - Downloads ACLs from the ACL Manager database to the active configuration for enforcement on the currently selected device or devices.
-
 ACL Device Verify Button
 - Lets you compare the ACLs from the selected devices against the current ACLs defined in the ACL Manager database. When the Verify detects a mismatch between ACLs, the ACL Verification Results window opens where you can view differences between the two sets of ACLs.
-
 ACL Editor Button
 - Opens the ACL Editor window where you can create a new ACL or modify an existing ACL.
-
 Show/Hide Table Editor Button
 - This button toggles the Table Editor row that allows you to change the
inbound/outbound ACL value or add a note. When you change a value, a green exclamation
mark
 marks the cell that has been changed (but not saved to the
database) and the Save to Database button becomes active.
Agent Assignment
The Agent Assignment view provides ACL information for the agent services supported on the device: HTTP, SNMP, Telnet, and SSH. Agent services are only supported on Matrix X-Series devices.
Click column headings in the window for more information.

- Agent ACL
- The name of the ACL that is currently applied to agent traffic on this device. To change the ACL, click on the Table Editor button to open the Table Editor row at the bottom of the table. Click on the Agent ACL column in the Table Editor row to open the Select ACL window. Select the desired ACL and click OK. Be sure to save your changes to the database.
- Logging
- This column displays the selected logging capability for the agent
traffic on this device. You can use the Table Editor row to change the
logging capability.
For more information on logging functionality, refer to your
router User's Guide.
- On - enables logging and displays a message at the device console when traffic is permitted or denied on this interface.
- Off - disables logging for traffic on this interface.
- Deny-only - enables logging and displays a message at the device console when traffic is denied on this interface.
- Permit-only - enables logging and displays a message at the device console when traffic is permitted on this interface.
- On-syslog - enables logging and sends a message to the device console and syslog server when traffic is permitted or denied on this interface.
- Deny-syslog - enables logging and sends a message to the device console and syslog server when traffic is denied on this interface.
- Permit-syslog - enables logging and sends a message to the device console and syslog server when traffic is permitted on this interface.
- Last Changed By
- Indicates the date and time that the agent ACL assignment was last changed, and the user that initiated the action. This field is updated when the device data is imported or refreshed and there have been changes to the agent assignment, or when a change is made to the agent assignment through ACL Manager and saved to the database. Keep in mind that the "Last Changed By" field is updated when the database data is updated, not when the device is modified, such as during an enforce.
- Notes
- This column provides a place for user-editable notes. Use the table editor to create the note and then save it to the database.
-
 ACL Device Enforce Button
 - Downloads ACLs from the ACL Manager database to the active configuration for enforcement on the currently selected device or devices.
-
 ACL Device Verify Button
 - Lets you compare the ACLs from the selected devices against the current ACLs defined in the ACL Manager database. When the Verify detects a mismatch between ACLs, the Verify Results window opens where you can view differences between the two sets of ACLs.
-
 ACL Editor Button
 - Opens the ACL Editor window where you can create a new ACL or modify an existing ACL.
-
 Show/Hide Table Editor Button
 - This button toggles the Table Editor row that allows you to change
the Agent ACL and Logging values or add a note. When you change a value, a green exclamation
mark
 marks the cell that has been changed (but not saved to the
database) and the Save to Database button becomes active.
Detail Log
The Detail Log displays details about ACL Manager actions. You must select Show Detail Log from the drop-down menu in the upper-left corner of the ACL Manager tab in order to see the Detail Log radio button.
Click column headings in the window for more information.

-
 ACL Device Enforce Button
 - Downloads ACLs from the ACL Manager database to the active configuration for enforcement on the currently selected device or devices.
-
 ACL Device Verify Button
 - Lets you compare the ACLs from the selected devices against the current ACLs defined in the ACL Manager database. When the Verify detects a mismatch between ACLs, the ACL Verification Results window opens where you can view differences between the two sets of ACLs.
-
 ACL Editor Button
 - Opens the ACL Editor window where you can create a new ACL or modify an existing ACL.
For information on related windows:

