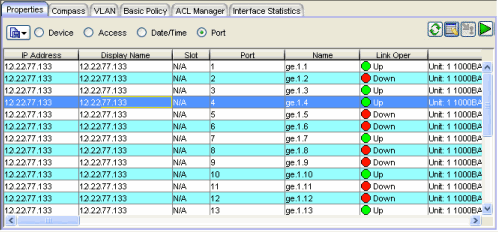
This tab lists port information for a device, device group, or port element, depending on your selection in the left-panel
device tree. The first time you access the Port Properties tab the table is
blank and you must click the
![]() Retrieve
button to display port information.
Retrieve
button to display port information.
IMPORTANT: The Port Properties table is not automatically updated. Instead, the table must be refreshed using the Retrieve button to update the table information each time you access this tab. For example, if you leave the Port Properties tab and then return, the contents of the table will not have changed, even though conditions on device ports may have changed. You must retrieve the information again to get the latest data.
At the top left of the tab, there is a menu button  that provides the following
options:
- Status Poller Options - opens a window where you can specify options for polling devices in the left-panel device tree. Console uses the polling options and poll groups defined here to contact the devices and update tree information.
- PropView Options - opens a window where you can specify options that define the SNMP polling parameters and appearance of the Properties tab in Console.
Click table headings for more information.

- Display Name
- The name that will be displayed for this device in Console's left-panel tree. The display name can be set in the Suite-Wide Options window to the device's IP Address, System Name, or Nickname.
- Slot
- The range of ports in some devices span multiple slots. For these devices, this column shows the board location (slot) within the chassis where the port is located.
- Link Oper
- Displays the status of the port's connection (link) with a remote port: Up, Down, Dormant, etc..
- Link Admin
- Configures the status of the port's connection (link) with a remote port: Up, Down, or Testing.
- Statistics
- These columns show port traffic statistics. These columns are hidden or displayed according to your selection from the Column Filter toolbar.
- Last Change
- The System Up Time at the time of the last change to the operational status for the port.
- In Ucast Pkts
- Displays the number of packets received on the port that had a single, unique source or destination address.
- In Discards
- The number of packets received on the port that were chosen to be discarded, even though no errors were detected.
- In Unknown Packets
- The number of packets received that were discarded because of an unknown or unsupported protocol.
- Out Ucast Pkts
- Displays the number of packets transmitted on the port that had a single, unique source or destination address.
- Configuration
- These columns can be used to configure auto negotiation for selected port(s). If auto negotiation is disabled, you can manually configure the speed, duplex, and flow control parameters of the selected port(s). These columns are hidden or displayed according to your selection from the Column Filter toolbar.
To configure parameters on multiple ports, enable the Table Editor and select the ports in the table by swiping with your mouse or using the Ctrl or Shift keys. The information for the first port selected will be displayed in the Table Editor row. Any changes that you make will be applied to all of the selected ports. Use the drop-down lists in the Table Editor row to manually configure the parameters when auto negotiation is disabled on the selected port(s).
NOTE: If you manually configure these parameters, be sure that the remote port supports the same mode. Otherwise, no link between the local and remote port will be achieved. - Remote Auto Signal
- Indicates whether auto negotiation signaling is detected on the remote port: Detected or Not Detected.
- Flow Control Columns
- Displays the current flow control method that the port uses to notify the remote port that congestion is occurring and that the sending device should stop transmitting until the congestion can be cleared.
- Full Duplex Flow Control Admin
- Configures the flow control method for the port.
- Enabled -- Enables flow control on the port.
- Disabled -- Enables flow control on the port.
- Enabled Transmit -- Configures the port to send pause control frames, but does not acknowledge received pause control frames. This option is only available for Gigabit Ethernet ports.
- Enabled Receive -- Configures the port to receive pause control frames, but does not transmit its own. This option is only available for Gigabit Ethernet ports.
- Enabled Transmit and Receive -- Configures the port to both receive and transmit pause control frames.
- Auto Negotiate -- Configures the port to only uses pause control frames if the negotiation process determines that the remote port supports them. Both ends of the link must support auto negotiation and a common mode of operation.
- Capabilities
- These columns display the operational modes that are supported by the local and remote ports and the specific operational modes, supported by the local port, that are being advertised to the remote port. These columns are hidden or displayed according to your selection from the Column Filter toolbar.
NOTE: This section does not apply if you have manually configured specific operational modes for your 100Base-TX port, or if you are configuring a 100Base-FX port. - Advertised Capabilities
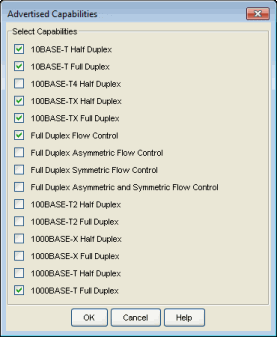
- Indicates the local port's advertised ability for each specific operational mode. The advertised ability only becomes active on ports that have auto negotiation enabled. Displays whether an operational mode is advertised to the remote port. Only those modes supported by the local port can be advertised. The table lists the currently advertised capabilities as a comma-separated string.
Advertised Capabilities Window With the Table Editor enabled, clicking in the editor row for this column opens the Advertised Capabilities window. This window lets you selectively advertise capabilities for one or more ports selected in the table.
Checked -- Indicates that the mode is being advertised.
Un-checked -- Indicates that the mode is not being advertised.
- Table Editor
- This row is visible when the Show/Hide Table Editor button is toggled to make the Table Editor visible. Columns that contain a writable MIB object will appear in the Table Editor as an editable field or drop down list as appropriate for the object type (integer, boolean, text, etc.). Changing the value in the Table Editor row alters the value for that entry in the row(s) selected in the table. Clicking Apply sets the current writable table values on the device(s) in the currently selected device group.
-
 (Table Editor)
 - This button toggles the Table Editor, where you can change the value of writable MIB objects in the table.
-
 (Apply)
 - This button sets the current writable table values on the devices in the currently selected device group.
| CAUTION: | Applying certain MIB objects can disable devices and cause interruptions to network operation. Do Not apply MIB values unless you are sure of the outcome. |
|---|
-
 (Retrieve)
 - This button attempts to contact the selected device or device group to update the table information. The Properties view uses the Profile for the Read Access Level of the customizations for the current user. While retrieving information the button changes to a red octagon.
Right-Click Menu
A right-mouse click on a column heading or anywhere in the table
body (or a left-mouse click on the Table
Tools ![]() button
when visible in the upper left corner of the table) opens a
popup menu that provides access to other device related
views and a set of
Table Tools
that can be used to manage information in the table.
button
when visible in the upper left corner of the table) opens a
popup menu that provides access to other device related
views and a set of
Table Tools
that can be used to manage information in the table.
For information on related windows: