Use the Capacity Planning tool to generate a report on your network front-panel port utilization. The Used/Unused Ports report provides valuable information to help you plan your network needs. For example, if you are adding a new department with 15 new employees, you can use this report to locate unused ports of a certain type. You can also use the report to quickly see where ports have been added or removed, or to view specific port details such as port type and speed.
Report results can be exported as an HTML file or as a delimited text file. In addition, Capacity Planning reports can be saved to use again at a later time, and they can also be scheduled to run at specified intervals with report results sent out via a notification e-mail.
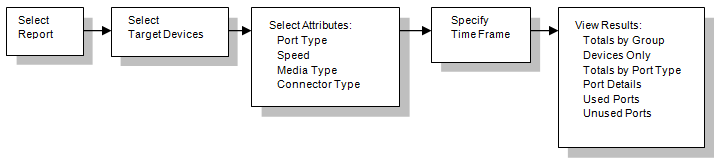
Flow
The flow chart below shows the sequence of windows that you will encounter when you create a Used/Unused Ports report using the Capacity Planning tool. As you progress through the steps of creating a report, the tool's left panel shows you a summary of your selections. You can click on the bold headings in this panel to navigate backward or forward between steps allowing you to change your report parameters. The summary information associated with each step appears in plain typeface beneath each step heading.
Click on blocks in the flow chart for more information about a specific window.
Select Report Window
Use this window to select either a report template or a saved report as your report type. Report templates are based on common network capacity planning questions. After you have created a report using one of the templates, you can save it (as a Saved Report) to use again at a later time. To create your Used/Unused Ports report, select the "How many used/unused ports do I have" report template.
Click the graphic for more information.
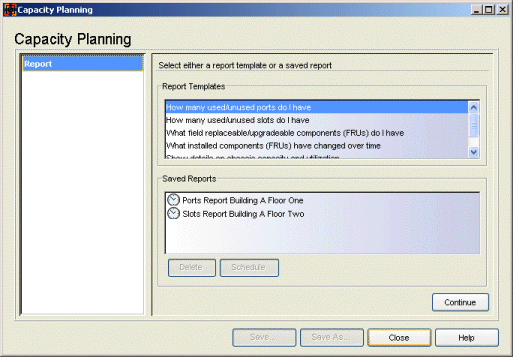
- Report Templates
- Lists the available report templates. Each report template is designed to answer a specific capacity planning question.
- Saved Reports
- Lists all your saved reports including reports saved by other Inventory
Manager clients connected to the server. After you have created a report using a template, you can save it as a
Saved Report, by clicking the Save button. This allows you to save
specific report attributes and parameters, so that you can regenerate the
same report at a later time. The schedule icon
 indicates that a saved report has
been scheduled. You can remove a schedule from a saved report by
right-clicking on the report and selecting Delete > Schedule.
indicates that a saved report has
been scheduled. You can remove a schedule from a saved report by
right-clicking on the report and selecting Delete > Schedule.
- Schedule Button
- When you have selected a saved report in the Saved Reports list, this button opens the Schedule Report window where you can configure scheduling information and notification settings for the report.
Select Targets Window
Use this window to select the target devices for your report and add filters to further refine the list of devices, if desired. For example, you could target the Floor One device group, but filter out a single device you don't want included in the report. Or, you could target the Building A device group, and filter in just one specific device type. Once you have made your selections, you can view a list of the devices you have targeted for your report to verify that your targets are correct.
| NOTE: | If you will be scheduling this Ports report, keep in mind when selecting your targets that results from scheduled reports are delivered via e-mail. Depending on the number of target devices you select and the number of ports on those devices, a ports report may generate results that are too large to be delivered via e-mail. In this case, you should consider creating multiple reports based on subnet or device type. This is primarily a concern when selecting the Port Details view for your report results. |
|---|
Click the graphic for more information.
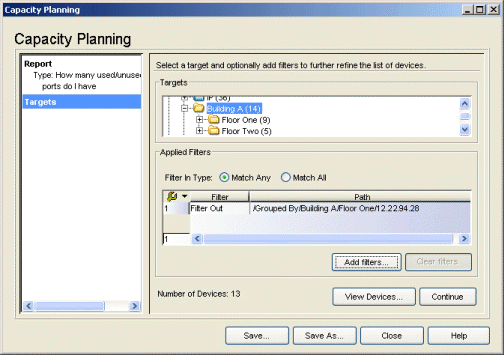
- Targets
- This panel displays your Network Elements tree. Expand the tree to select the target device group or individual device for your report.
- Applied Filters
- Lists any filters applied to your selected targets. Click the Add Filters button to open the Add Filters window and create your filters.
- Filter In Type
- If you have defined one or more "Filter In" filters, select how you want
the filters to work:
- Match Any - A device can match any of the filter-in filters to be included as a target. For example, if you have selected the Building A device group and you filter in Floor One devices and E7 devices, any device in Building A that is on Floor One or is an E7 device will be included as a target.
- Match All - A device must match all of the filter-in filters to be included as a target. For example, if you have selected the Building A device group and you filter in Floor One devices and E7 devices, a Building A device would have to be on Floor One and be an E7 device to be included as a target.
- Number of Devices
- A running total of the number of target devices with filters applied. Click View Devices to view a list of the target devices.
- Add Filters Button
- Opens the Add Filters window, where you can create filters to further qualify the list of devices for your report.
- View Devices Button
- Opens the View Devices window where you can see a list of the selected devices that will be included in your report.
Select Port Attributes Window
Use the checkboxes in this window to select specific port attributes for your report. The attributes define the port type, speed, media type, and connector type of the ports to be reported on. You must select at least one of each attribute. Select the "Any" checkbox for a report on all the listed attributes, or select individual attributes to narrow down the focus of your report.
Click the graphic for more information.
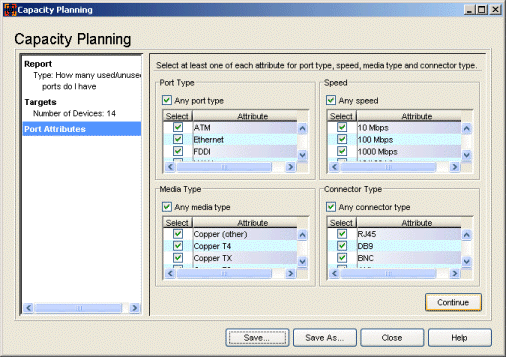
- Port Type
- Select the "Any port type" checkbox for a report on all listed port types, or select individual port types of interest. Select the "Other" checkbox if you wish to include data on port types other than the types listed here.
- Speed
- Select the "Any speed" checkbox for a report on all listed port speeds, or select individual port speeds of interest. Select the "Other" checkbox if you wish to include data on port speeds other than the speeds listed here. Select the "Unknown Speed" checkbox if you wish to include ports that do not report a speed.
- Media Type
- Select the "Any media type" checkbox for a report on all listed port
media types, or select individual media types of interest. Select the
"Other" checkbox if you wish to include data on media types other than
the types listed here. Select the "Unknown Media Type" checkbox if you
wish to include ports that do not report a media type.
For the purposes of this report, the media types are defined as follows:
- Copper (other) -- Copper media types other than those listed here.
- Copper T4 -- 4 pairs, category 3 UTP (Unshielded Twisted Pair) copper wire.
- Copper TX -- 2 pairs, category 5 UTP (Unshielded Twisted Pair) copper wire.
- Copper T2 -- 2 pairs, category 3 UTP (Unshielded Twisted Pair) copper wire.
- Copper CX -- Copper over 150-Ohm balanced cable.
- Fiber (other) -- Fiber media types other than those listed here.
- Fiber LX -- Fiber over long-wavelength laser.
- Fiber SX -- Fiber over short-wavelength laser.
- Fiber FX -- Fiber Fast Ethernet.
- Empty PIM Slot -- A device port that can accept a Port Interface Module (PIM). PIMs allow you to add ports of various media types to existing devices.
- Other -- Media types other than those listed here.
- Unknown Media Type -- Ports that do not report a media type.
- Connector Type
- Select the "Any connector type" checkbox for a report on all listed
port connector types, or select individual connector types of interest.
Select the "Other" checkbox if you wish to include data on connector
types other than the types listed here. Select the "Unknown Jack
Type" checkbox if you wish to include ports that do not report a
connector type. For the purposes of this report, the connector types are defined as follows:
- RJ45 -- An eight-wire modular connector similar to connectors used for a telephone. Used with twisted pair cable.
- DB9 -- A 9-pin connector most commonly used for an RS-232 interface, such as a console port on a network device.
- BNC -- A "bayonet-locking" connector used on 10Base2 thin coaxial cable.
- AUI -- A 15-pin connector interface for connecting transceivers to network devices and to a computer NIC.
- SC -- A fiber-optic "push and pull" cable connector: two fiber cables and two SC connectors provide bidirectional transmission.
- MIC -- A dual-fiber connector most widely used for FDDI and ATM.
- ST -- A fiber-optic "stab and twist" cable connector: two fiber cables and two ST connectors provide bidirectional transmission.
- Telco -- A 50-pin copper connector first used by telephone companies (telco), widely used for 10 and 100 Mbps Ethernet.
- MTRJ -- A fiber-optic connector; two fiber strands.
- SMA -- A fiber-optic connector with a plug that screws into a threaded socket.
- HSSDC -- A High-Speed Serial Data Connector.
- Other -- Connector types other than those listed here.
- Unknown Jack Type -- Ports that do not report a connector type.
Specify Time Window
Use this window to select a time period from which report data will be gathered. The report will be generated using device data saved in archive operations performed during the specified time period. Calculations are based on the first and last archives (data samples) in the time period selected, not on all archive information in the specified time frame. The archive operations must be configured to archive capacity planning data (see How to Archive for more information.) You can also select to use current data from devices as one of your data samples, in which case the report will use current data from the target devices, instead of the last archive in the time period.
Click the graphic for more information.
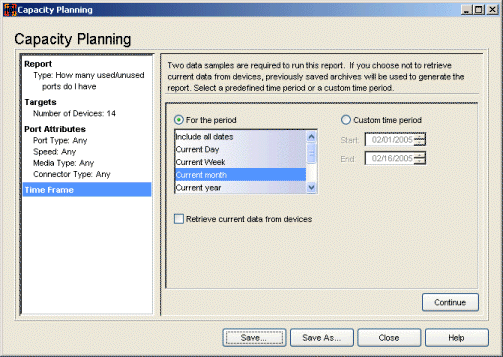
- For the Period
- Select a time period for your report. The report is generated using
device data saved in archive operations performed on the targeted devices
during the specified time period. Report
information is collected from the first and last archives
(data samples) in the
selected time period, not from every archive in the time period.
- Include all dates -- The report will use the first and last archives that exist for your target devices.
- Current Day -- The report will use the first and last archives from the current day.
- Current Week -- The report will use the first and last archives from the current week.
- Current month -- The report will use the first and last archives from the current month.
- Current year -- The report will use the first and last archives from the current year.
- Last month -- The report will use the first and last archives from the previous month.
- Last 3 months -- The report will use the first and last archives from the previous three months, not including the current month.
- Last 6 months -- The report will use the first and last archives from the previous six months, not including the current month.
- Last 12 months -- The report will use the first and last archives from the previous 12 months, not including the current month.
| TIP: | When you make a "For the Period" time selection, the "Custom time
period" Start and End dates are
automatically filled in with the selected dates. You can then switch to the Custom
time period option and refine your time period to the exact dates you would like.
For example, you could select the time period "Last 6 months", and then switch
to the Custom time period option and change the End date to the current date.
This would allow you to generate a report using data from the current month and
the last six months. |
|---|
- Retrieve current data from devices
- This checkbox is available when you select a time period where the End date is the current date. When the checkbox is selected, the report will use current data from the target devices, instead of the last archive in the time period. Because this requires the report to gather current data from the devices, extra time may be needed while report results are calculated.
- Custom Time Period
- Specify a custom time period for your report. Report information will be collected from the first and last archive (data samples) in the selected time period, not from every archive in the time period.
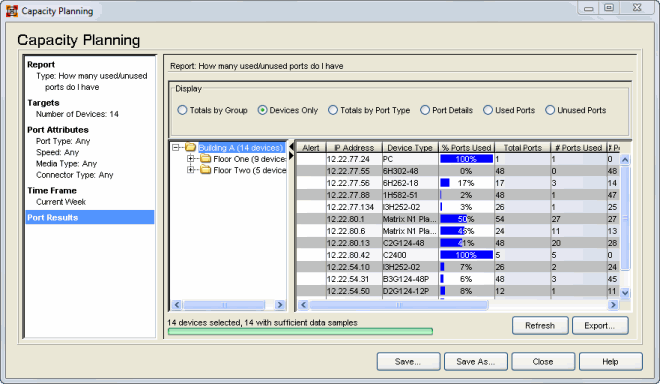
Port Results Window
Use this window to view the report data. The radio buttons at the top of the right panel let you select various ways to display the report results:
- Totals by Group -- displays the report results organized by totals based on device group.
- Devices Only -- lists the report results for each device.
- Totals by Port Type -- displays the report results organized by totals based on port type.
- Port Details -- lists the report results for each port.
- Used Ports -- lists the ports currently in use for the selected device or device group.
- Unused Ports -- lists the ports currently not in use for the selected device or device group.
In addition, your selection in the tree determines the results displayed in the table. For example, you can select a device group and view report data for that group. Then, you can expand the group and view data for a specific device. As you change your selection in the tree, the table is updated with the results for your specific selection.
Port Results - Totals by Group
The Totals by Group view gives you the flexibility of viewing your port results summarized by group or detailed by device. It provides an easy way to view top-level port information and quickly determine where to take a closer look. Simply by changing your selection in the tree, you can view port data for a group or port data for the individual devices that make up a group.
Click the graphic for more information.

- Target Device Tree
- Displays your target groups and devices. Your selection in the tree determines what results data will be displayed in the table. For example, select a device group to see results for that group, or select an individual device to see results for just that device. When you change your selection in the tree, the table is updated with the relevant information.
- Device Count, Sufficient Data
- The total number of target devices, followed by the number of devices with sufficient data to report results. A device is counted as having sufficient data if there were two data samples (either two archives, or one archive and current data) used to obtain report data. Devices with no data samples or only one data sample will show an alert icon in their table entry, and will display Unknown for some or all of their results.
Table
The Totals by Group table displays port data for the selected device groups or for the individual devices contained in a group. The report is generated based on the first and last data samples in the time period selected. Results that are not available are displayed as Unknown.
- Alert
- A yellow alert icon
 in this column
signifies that the report data for this table entry is questionable. It
indicates that:
in this column
signifies that the report data for this table entry is questionable. It
indicates that:
- there aren't enough data samples in the selected time period to generate report data. At least two data samples (either two archives, or one archive and current data) are required for each device. Devices with no data samples or only one data sample will display Unknown for some or all of their results.
- between the data samples ports were removed, and the port's link status in the first data sample is NO LINK. This causes the validity of the data to be in question because there is no way to determine if bytes had been transferred by a port before it was removed, and therefore the report cannot accurately determine if the port is being used.
- % Ports Used
- The percentage of ports being used in the device group or on the individual device.
- # Ports Used
- The number of ports being used in the device group or on the individual device.
- # Ports Unused
- The number of ports not in use in the device group or on the individual device.
- Ports Added
- The number of ports added (during the specified time frame) to the device group or to an individual device.
- Ports Removed
- The number of ports removed (during the specified time frame) from the device group or from an individual device.
Port Results - Devices Only
The Devices Only view lets you view port data for each individual target device. Depending on your selection in the tree, you can see report results for all the devices in a group, or for an individual device.
Click the graphic for more information.
- Target Device Tree
- Displays your target groups and devices. Your selection in the tree determines what results data will be displayed in the table. For example, select a device group to see results for the devices in that group, or select an individual device to see results for just that device. When you change your selection in the tree, the table is updated with the relevant information.
- Device Count, Sufficient Data
- The total number of target devices, followed by the number of devices with sufficient data to report results. A device is counted as having sufficient data if there were two data samples (either two archives, or one archive and current data) used to obtain report data. Devices with no data samples or only one data sample will show an alert icon in their table entry, and will display Unknown for some or all of their results.
Table
The Devices Only table displays port data for each individual device. The report is generated based on the first and last data samples in the time period selected. Results that are not available are displayed as Unknown.
- Alert
- A yellow alert icon in this column
signifies that the report data for this table entry is questionable. It
indicates that:
- there aren't enough data samples in the selected time period to generate report data. At least two data samples (either two archives, or one archive and current data) are required for each device. Devices with no data samples or only one data sample will display Unknown for some or all of their results.
- between the data samples ports were removed, and the port's link status in the first data sample is NO LINK. This causes the validity of the data to be in question because there is no way to determine if bytes had been transferred by a port before it was removed, and therefore the report cannot accurately determine if the port is being used.
- Rest your cursor on the alert to display a tooltip that describes the reason for the alert.
- % Ports Used
- The percentage of ports being used on the device.
- # Ports Used
- The number of ports being used on the device.
- # Ports Unused
- The number of ports not in use on the device.
- # Data Samples
- The number of data samples that were consulted to obtain report data. The maximum number would be two.
Port Results - Totals by Port Type
The Totals by Port Type view lets you view port data organized by port type: ATM, Ethernet, FDDI, WAN, or Other. Your port type selections in the Port Attributes window determine what port types are reported on. Depending on your selection in the tree, you can see report results summarized for all the devices in a group, or for an individual device.
Click the graphic for more information.

- Target Device Tree
- Displays your target groups and devices. Your selection in the tree determines what results data will be displayed in the table. For example, select a device group to see port type results summarized for that group, or select an individual device to see results for just that device. When you change your selection in the tree, the table is updated with the relevant information.
- Device Count, Sufficient Data
- The total number of target devices, followed by the number of devices with sufficient data to report results. A device is counted as having sufficient data if there were two data samples (either two archives, or one archive and current data) used to obtain report data. Devices with no data samples or only one data sample will display Unknown for some or all of their results.
Table
The Totals by Port Type table displays port data for the selected device groups or for the individual devices contained in a group, organized according to port type. However, there may be multiple entries for a single port type, due to different media types and connectors being used.
The report is generated based on the first and last data samples in the time period selected. Results that are not available are displayed as Unknown.
- Port Type
- The type of port: ATM, Ethernet, FDDI, WAN, or Other. Your selections in the Port Attributes window determine the port types included in the report.
- % Ports Used
- The percentage of ports of that port type being used in the device group or on the individual device.
- Total Ports
- The total number of ports of that port type installed in the device group or on the individual device.
- # Ports Used
- The number of ports of that port type being used in the device group or on the individual device.
- Ports Added
- The number of ports of that port type added (during the specified time frame) to the device group or to an individual device.
- Ports Removed
- The number of ports of that port type removed (during the specified time frame) from the device group or from an individual device.
Port Results - Port Details
The Port Details view provides an easy way to look at port information for a specific device. Depending on your selection in the tree, you can see port details for all the devices in a group, or for an individual device.
Click the graphic for more information.
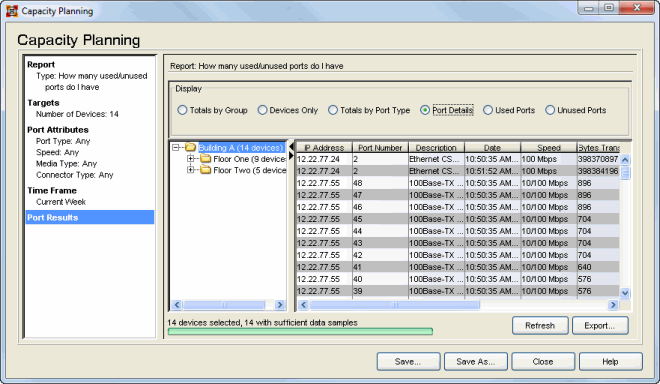
- Target Device Tree
- Displays your target groups and devices. Your selection in the tree determines what results data will be displayed in the table. For example, select a device group to see results for the devices in that group, or select an individual device to see results for just that device. When you change your selection in the tree, the table is updated with the relevant information.
- Device Count, Sufficient Data
- The total number of target devices, followed by the number of devices with sufficient data to report results. A device is counted as having sufficient data if there were two data samples (either two archives, or one archive and current data) used to obtain report data. Devices with no data samples or only one data sample will display Unknown for some or all of their results.
Table
The Port Details table displays information for each port on the target devices. The report is generated based on the first and last data samples in the time period selected, resulting in two entries per port (one for each data sample used.) Information that is not available is displayed as Unknown.
| TIP: | Right-click on the Port Number column heading to sort the table entries
according to port number. This allows you to easily view and compare both data sample
entries for each port. |
|---|
Port Results - Used Ports
The Used Ports view lists all the ports being used for a specific device. Depending on your selection in the tree, you can see used ports information for all the devices in a group, or for an individual device.
Click the graphic for more information.

- Target Device Tree
- Displays your target groups and devices. Your selection in the tree determines what results data will be displayed in the table. For example, select a device group to see results for the devices in that group, or select an individual device to see results for just that device. When you change your selection in the tree, the table is updated with the relevant information.
- Device Count, Sufficient Data
- The total number of target devices, followed by the number of devices with sufficient data to report results. A device is counted as having sufficient data if there were two data samples (either two archives, or one archive and current data) used to obtain report data. Devices with no data samples or only one data sample will display Unknown for some or all of their results.
Table
The Used Ports table displays port usage information for the target devices. The report is generated based on the first and last data samples in the time period selected, resulting in two entries per port (one for each data sample used.) Information that is not available is displayed as Unknown.
| TIP: | Right-click on the Port Number column heading to sort the table entries
according to port number. This allows you to easily view and compare both data sample
entries for each port. |
|---|
Port Results - Unused Ports
The Unused Ports view lists all the ports being not being used for a specific device. Depending on your selection in the tree, you can see used ports information for all the devices in a group, or for an individual device.
Click the graphic for more information.
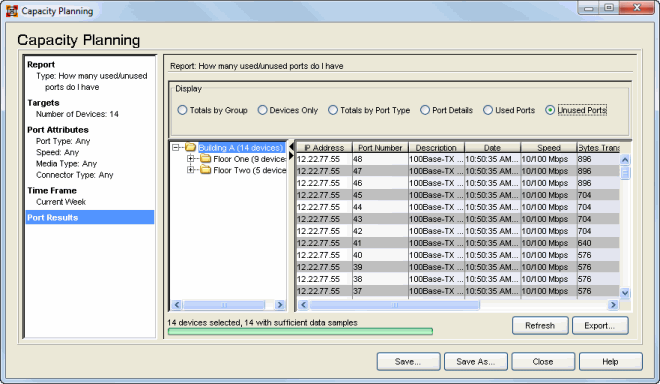
- Target Device Tree
- Displays your target groups and devices. Your selection in the tree determines what results data will be displayed in the table. For example, select a device group to see results for the devices in that group, or select an individual device to see results for just that device. When you change your selection in the tree, the table is updated with the relevant information.
- Device Count, Sufficient Data
- The total number of target devices, followed by the number of devices with sufficient data to report results. A device is counted as having sufficient data if there were two data samples (either two archives, or one archive and current data) used to obtain report data. Devices with no data samples or only one data sample will display Unknown for some or all of their results.
Table
The Unused Ports table displays port usage information for the target devices. The report is generated based on the first and last data samples in the time period selected, resulting in two entries per port (one for each data sample used.) Information that is not available is displayed as Unknown.
| TIP: | Right-click on the Port Number column heading to sort the table entries
according to port number. This allows you to easily view and compare both data sample
entries for each port. |
|---|
- Abort/Refresh Button
- This button toggles between Abort and Refresh. While a report is being generated, Abort stops the report and clears all data out of the table. Refresh restarts report generation and updates the table with new data. If you have selected the Retrieve current data from devices option in the Specify Time window, clicking Refresh allows you to update your report results with the latest data from your devices. In addition, if you have selected a current time frame for your report, and a new archive is saved after your report results are generated, clicking Refresh will regenerate your results using the new archive data.
- Export Button
- Allows you to export your report results table as an HTML file or as a delimited text file. A Save window opens where you can name your exported file, select the file extension, and navigate to a folder/directory where you want save the file.
- Save/Save As Button
- Opens the Save Report window where you can name a report and then save it so that you can run the report again. You can also select a checkbox to schedule the report. This opens the Schedule Report window where you can configure scheduling information and notification settings for the report. Once you have saved a report, it appears in the Saved Reports list in the Select Report window, where you can select it.
For information on related windows: