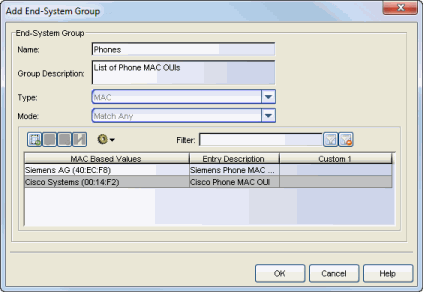
Use this window to add a new end-system group or edit an existing end-system group. End-system groups are rule components that allow you to group together devices having similar network access requirements or restrictions. You can access the Add/Edit End-System Group window from the Manage Rule Groups window or from the end-system group field in the Create Rule window.
There are six system-defined end-system groups that are automatically populated by NAC Manager. The first is the Assessment Warning end-system group that includes end-systems that have assessment warnings and must acknowledge them before being granted access to the network. The second is the Blacklist end-system group that includes end-systems denied access to the network. The other four system-defined groups are populated as end-systems register through the Registration portal.
You can view and edit the system-defined groups and your other end-system groups in the Manage Rule Groups window, by selecting Tools > Manage Rule Groups from the menu bar.
| NOTE: | Changes to rule components do not require an enforce. Changes are
automatically synchronized with engines on the next status update. Changes
do not affect end-systems until the next authentication and/or assessment
occurs. |
|---|
Click areas in the window for more information.

- Group Description
- Enter a description of the end-system group. If you are using Data Center Manager (DCM), the end-system group description contain the DCM specific settings as key/value pairs.
- Type
- Specify the criteria on which the end-system group is based:
- MAC - a list of MAC addresses, MAC OUI, or MAC Masks.
- IP - a list of IP addresses or subnets.
- Hostname - a list of hostnames: exact match or wild card (for example, *.extremenetworks.com).
- LDAP Host Group - a way to group hosts by doing an LDAP lookup on the resolved hostname of the end-system detected on the network. Note for the standard use with Active Directory, the Appliance Settings > Hostname Resolution must be configured to use DNS Hostname Resolution so NAC Manager can resolve the Fully Qualified Domain Name. In the LDAP configuration, you must also have the "Use Fully Qualified Domain Name" checkbox selected.
- Mode
- For LDAP Host Groups, the mode option lets you specify whether to match any or match all of the LDAP attributes listed below. You can also use "Exists" to just check to see if a host is present in LDAP.
-

- Use these buttons to add, edit, or delete end-system entries in the group. The
entries are displayed in the table below. Use the Move button to move a
selected end-system entry to a different end-system group.
| TIP: | You can also copy and edit entries by right-clicking on an entry and selecting Copy. This allows you to quickly add group entries by copying a single entry in the table and editing the entry values. |
-

- Use the configuration menu button to either open a window where you can select MAC OUI vendors (if you are creating MAC entries) or open a window where you can select a file for importing entries.
- Custom 1
- Use this column to add additional information that you would like displayed. To add or edit custom information, right-click on the table entry and select Edit Custom Information. You can add information for up to four Custom columns. The columns for Custom 2, Custom 3, and Custom 4 are hidden by default. To display these columns, right-click in the table body and select Table Tools > Settings. In the Table Settings window, you can select to show these columns in the table. To clear the custom information, right-click on the table entry and select Clear Custom Information. You can change the text of the Custom column heading in the Options window Display view (Tools > Options).
For information on related windows: