The Extreme Access Control Deployment Guide provides technical and administrative information for deploying, managing, and troubleshooting your Access Control deployment. The following topics are discussed:
- Phased Rollout Strategy
- Important Links in Extreme Access Control and Extreme Management Center
- MAC and IP Resolution
- Agent-Based Assessment
- Third-Party Device Considerations
- Extreme Management Center Server Data Retention Tools
- Troubleshooting
Phased Rollout Strategy
The Extreme Networks Access Control solution supports the five key network access control functions of detection, authentication, assessment, authorization, and remediation. These five Access Control functions do not need to be implemented concurrently in an Access Control deployment. Access Control can be rolled out in a phased deployment approach with each phase building on the knowledge gained along the way. A phased approach helps you to avoid wide-scale problems that can be associated with deploying all Access Control functionality at once throughout the network. It allows you to fix any underlying network, end-system, or user perception issues as they appear in each phase, making for a smooth deployment process.
A phased deployment:
- Allows full control over infrastructure changes during deployment.
- Minimizes impact to business processes.
- Initially deploys each function without enforcement and verifies results before enabling enforcement.
Following is a suggested rollout strategy that includes three phased Access Control deployments: Authentication Only, Assessment without Quarantine, and Location-Based Assessment and/or Registration.
Authentication Only
The first phase of the rollout strategy is called Authentication Only. In this phase, Access Control operates in a passive mode, providing you with information about who and what is connecting to the network, and when and where those connections are taking place. At this stage of the deployment, any end-system connecting to the network is authenticated and gets the basic access policy. Access Control is only detecting and tracking what is authenticating to your network; no access control decisions (apart from assigning the basic policy) are made. Then, as you come to understand what end-systems are connecting to the network, you can create Access Control Configuration rules that allow you to provide different access to specific end-systems.
This phase also allows you to work out the basic RADIUS configuration (if RADIUS authentication is being used), and gives you time to spread the end-system load across the Access Control appliances by moving switches from one appliance to another, as needed.
Assessment without Quarantine
The second phase of the rollout strategy is called Assessment without Quarantine. In this phase, Access Control is again operating in a passive mode, allowing you to understand the health of devices on the network without impacting end user connectivity. This is done by enabling assessment with all policies (including the Quarantine policy) set to full access -- no end users will be denied access based on assessment results. Then in NAC Manager, you can use the End-Systems tab to view each end-system's state to determine how many end-systems would lose network access with the configured assessment security level. In this way, you can roll out Access Control assessment, while avoiding problems that can result from a large number of end users suddenly being quarantined and unable to access the network because their patches or antivirus software aren't up-to-date. Once these issues are fixed, then assessment with quarantine can be enabled.
Location-Based Assessment and/or Registration
When deploying agent-based or agent-less assessment, a location-based rollout allows you to fix any problems as they appear for each location, making for a smoother deployment. It is also important to verify that end-systems can communicate with all Access Control appliances on the network, so that the assessment state can be maintained. In addition, Access Control appliances must also be able to communicate with each other. This is because when an end-system moves from one appliance to another (for example, the end user logs off in the dorm, then logs on in a classroom), Access Control has to be able to reconcile the connection and move the end-system from one appliance to another. You can test this by moving an end-system across the network and verifying that the agent stays connected.
For authenticated registration, a location-based rollout allows you to work out the LDAP configuration details prior to pushing out the configuration to the entire network. If an advanced LDAP configuration is used, it is important to test registration for users from different groups to verify that the LDAP rules are mapping the users to the correct group. Have an LDAP browser installed to aid in initial LDAP setup and rule creation.
Important Links in Extreme Access Control and Extreme Management Center
The following tables provide lists of URLs for accessing commonly used Extreme Access Control and Extreme Management Center web pages.
Access Control Pages on the Management Center Server
| Extreme Management Center Launch Page
Opens the Management Center Launch Page where you can launch Management Center applications. From the Launch Page you can also access the Administration web page that provides specific server administration functions such as client and server diagnostics, server utilities, and Access Control Server diagnostics. |
http://<Management CenterServerIP>:8080 |
| Extreme Access Control Diagnostics on Extreme Management Center
Launches the Access Control Server Administration web page that provides advanced diagnostic tools for Access Control. The page can also be accessed from the Management Center Launch page by clicking on the Administration tab and then the Access Control Server tab. |
http://<Management CenterServerIP>:8080/Clients/admin.jsp? tab=NAC |
| Extreme Management Center Launches Management Center, providing access to web-based reporting, network analysis, troubleshooting, and helpdesk tools. Management Center includes wired/wireless dashboards, reports, Access Control Management information and control, interactive topology maps, web-based FlexViews, device views and event logs. Search functionality enables end-systems to be searched by MAC address, IP address, end-system name, or user name. |
https://<Management CenterServerIP>:8443/Monitor/jsp/ reporting/reporting.jsp |
| Control T
Launches the Control tab that displays a selection of reports providing an overview of end-system connection and assessment information. This page can also be launched from the Extreme Access Control Dashboard button on the NAC Manager toolbar. |
https://<Management CenterServerIP>:8443/Monitor/jsp/ nac/IdentityAndAccess.jsp |
| Extreme Management Center Online Help
Launches searchable online help for all Management Center applications. The online help can also be launched from the Management Center Launch page Home tab and from the Help > Help Topics menu option in any Management Center application. |
http://<Management CenterServerIP>:8080/Clients/help |
Assessment/Remediation and Registration Pages on Extreme Access Control Appliances
| Extreme Access Control Screen Preview
The screen preview web page allows you to preview the web pages that may be accessed by the end user during the assessment/remediation and registration process. You can also access this web page using the Appliance Portal Pages > Preview Web Page button at the bottom of the Edit Portal Configuration window. |
https://<Access ControlApplianceIP>/screen_preview |
| Extreme Access Control Mobile Screen Preview
The mobile screen preview web page allows you to preview the mobile version of the web pages that may be accessed by the end user during the assessment/remediation and registration process. You can also access this web page using the Appliance Portal Pages > Preview Web Page button at the bottom of the Edit Portal Configuration window. |
https://<Access ControlApplianceIP>/mobile_screen_preview |
| Extreme Access Control Self-Registration Web Page
The self-registration web page allows an authenticated and registered end user to self-register additional devices that may not support authentication (such as Linux machines) or may not have a web browser (such as game systems). For example, a student may register to the network using their PC. Then, using a self-registration URL provided by the system administrator, they can register their additional devices. Once the additional devices have been registered, the student can access the network using those devices. |
https://<Access ControlApplianceIP>/self_registration |
| Extreme Access Control Administration Page
The administration web page lets administrators view registered devices and users, and manually add, delete, and modify users. |
https://<Access ControlApplianceIP>/administration |
| Extreme Access Control Sponsor Page
The sponsor web page lets sponsors view registered devices and users, and manually add, delete, and modify users. |
https://<Access ControlApplianceIP>/sponsor |
| Pre-Registration Page
The pre-registration web page lets selected personnel easily register guest users in advance of an event, and print out a registration voucher that provides the guest user with their appropriate registration credentials. |
https://<Access ControlApplianceIP>/pre_registration |
| Agent Download Page
The agent download page lets an end user download an agent regardless of the connection state of their end-system. |
https://<Access ControlApplianceIP>/agent_download (Displays only the agents applicable to the end user's operating system.) https://<Access ControlApplianceIP>/all_agent_download (Displays all agents available for download.) |
Extreme Access Control Appliance Administration Web Pages
| Extreme Access Control Appliance Administration Web Page
Displays appliance performance information including debugging information (such as CPU usage) that can help you determine if the appliance is being overloaded with requests. |
https://<Access ControlApplianceIP>:8444/Admin/ |
| Connected Agents Page
Displays information about the agent-based clients connected to Access Control. |
https://<Access ControlApplianceIP>:8444/Admin/status.jsp? tab=AGENTBASED-INFO |
| Downloads Page
Displays links for downloading agents and the assessment agent adapter for agent-based assessment. |
https://<Access ControlApplianceIP>:8444/Admin/downloads.jsp |
| Connection Diagnostics Page
Used to troubleshoot connection problems between the Access Control appliance and the Management Center Server. |
https://<Access ControlApplianceIP>:8444/Admin/diagnostics.jsp? tab=COMMUNICATION-DIAGNOSTICS |
MAC and IP Resolution
MAC to IP resolution is the process used by the Access Control L2 Controller and Access Control Gateway appliance to determine the IP address of an end-system from its MAC address. IP to MAC resolution is the process used by the Access Control L3 Controller to determine the MAC address of an end-system from its IP address. The following sections describe the MAC and IP resolution processes used by Extreme Access Control, and provide information for enabling diagnostic tools.
MAC to IP Resolution
Access Control L2 Controllers and Access Control Gateway appliances use MAC to IP resolution to determine an end-system's IP address from the MAC address that is learned from the RADIUS request used to authenticate the end-system. There are several reasons why MAC to IP resolution is critical to the Access Control process:
- The IP address is required for the end-system to be scanned with agent-less or agent-based assessment.
- The IP address is required for the Access Control Registration and Assessment/Remediation features. When the end user navigates to the Registration or Assessment/Remediation portal web page they are identified by the IP address found via the resolution process.
- The IP address also provides a way to identify an end-system in addition to its MAC address. This is useful when locating an end-system for blacklisting based on an Automated Security Manager (ASM) notification, which uses an IP address to specify what end-system to blacklist.
By default, Access Control is configured to always resolve the IP address for every end-system Access Control sees. If you have not deployed assessment, registration, and/or remediation on your network, you can disable MAC to IP Resolution by using the Advanced Configuration window (available from the Tools menu > Manage Advanced Configurations) and selecting Appliance Settings > IP Resolution Tab > Resolve IP Address Only for Assessment.
The MAC to IP Resolution Process
The MAC to IP Resolution process begins when an end-system authenticates to the network via a RADIUS request. From the RADIUS request, Access Control determines the end-system's MAC address by reading the Calling-Station-ID attribute. After determining what policy to assign to the end-system (Accept, Reject, or Scan), the MAC address to IP address resolution begins.
First, Access Control checks to see if there is a static MAC to IP address mapping defined in NAC Manager for the end-system's MAC address. If there is, then that IP address is used. If there is not, then the IP resolution process starts trying to resolve the IP address using IP discovery on the network access switch (NAS).
| NOTES: | NAC Manager provides a delay that allows the DHCP process to be completed prior to beginning the IP resolution process. You can configure the length of the delay via Appliance Settings > IP Resolution Tab > DHCP Resolution Delay Time option. The default delay time is 10 seconds. In order for NAC to resolve IP addresses from the ipNetToMedia table on ExtremeXOS devices, each VLAN that an authenticated end-system could belong to needs to have an IP addressed assigned in order for IP's from that VLAN to populate in that table. |
|---|
IP Discovery on Network Access Switch
Access Control makes SNMP requests for the IP information to the network access switch (NAS) that sent the RADIUS authentication request for the end-system. There are five supported MIBs that Access Control can read for the IP address information, depending on what MIBs the switch supports:
- ctAliasMacAddressTable - This MIB table contains IP address information for end-systems, indexed by MAC address.
- ctAliasTable -This MIB table is used only if the ctAliasMacAddressTable is not supported by the switch.
- CiscoDHCPSnooping -This MIB table is used for Cisco devices that are running the appropriate firmware.
- ipNetToMedia -This MIB table is used for third-party switches and for ExtremeWireless Controllers.
- ipNetToPhysical -This MIB table supports IPv6 addresses and is the IPv6 replacement for the ipNetToMedia table.
Following the SNMP requests, Access Control evaluates the IP addresses that it discovered. First, Access Control filters out any IP addresses that are invalid, such as 0.0.0.0. If there is only one IP address remaining, then this address is used and the process stops here. If there are no IP addresses remaining, Access Control proceeds to the router IP discovery process. If there are multiple IP addresses, then Access Control goes to the next step in the filtering process, VLAN IP Subnet Filtering.
If VLANs are being used for access control, Access Control looks up the IP subnet for the VLAN that the end-system is in. IP subnets can be defined for each VLAN to provide an IP range filter, which can be used to filter the list of IPs discovered on the switch. IP subnets are defined in NAC Manager under the Appliance Settings > IP Resolution Tab. If no IP subnet is found, Access Control proceeds to the router IP discovery process. If a subnet is found and filters down to one IP address, then that address is used and the process stops here. If the filter results contain no IP addresses, then Access Control proceeds to the router IP discovery process. If there are multiple IP addresses, then Access Control goes to the next step in the filtering process, NetBIOS IP Filtering.
Access Control makes NetBIOS requests to the list of IP addresses to determine the correct IP address. If the NetBIOS requests filter the list down to one IP address, then that IP address is used and the process stops here. If there are no IP addresses remaining, then Access Control proceeds to the router IP discovery process. If there are multiple IP addresses, then Access Control goes to the next step in the filtering process, Clear Duplicate IPs.
| NOTE: | If a firewall is enabled on the end-systems, disable the NetBIOS IP Filtering feature in NAC Manager via the Appliance Settings > IP Resolution Tab and the NetBIOS
Hostname Resolution feature should be disabled via the Appliance Settings >
Hostname/Username Resolution tab. The NetBIOS timing options
can be controlled from Appliance Settings > Miscellaneous Tab > NetBIOS. |
|---|
Access Control clears the duplicate IPs from the network access switch to which the end-system authenticated, and then tries to re-read the IP address from the switch to find the most recent entry. The only filtering done at this point is removing invalid IP addresses and VLAN IP Subnet Filtering. If only one IP address is read this time, then that IP address is used and the process stops here. If no IP addresses are read, then Access Control proceeds to the router IP discovery process. If there are multiple IP addresses, then Access Control looks to see if one IP address is the last one heard with DHCP, and if the DHCP information can be used. If so, then that IP address is used and the process stops here.
| NOTES: | The Clear Duplicate IPs process can be
disabled in NAC Manager via the Appliance Settings > IP Resolution Tab > Clear Duplicate
IPs on Switches. You can disable the use of DHCP Request IPs from Appliance Settings > IP Resolution Tab > Use DHCP Request IPs. By default this option only allows IPs learned from DHCP requests to be used in non-VLAN environments. This is because as an end-system transitions through VLANs, it will request the IP address of the previous VLAN making it inaccurate for Access Control to use. |
|---|
If the Access Control appliance was unable to resolve the end-system's IP address by querying the network access switch, Access Control makes SNMP requests to an end-system's gateway router ARP table to try to resolve the IP address. Access Control determines the router IP address by one of two mechanisms. If VLANs are being used for access control, Access Control looks up the IP subnet for the VLAN that the end-system is in. IP subnets are defined in NAC Manager in the Appliance Settings > IP Resolution Tab. If no IP subnet is found, Access Control will look for the last relay router heard for that end-system from any DHCP data. The router IP discovery process can be disabled via the Appliance Settings > IP Resolution Tab > Router IP Discovery option.
There are four supported MIBs that Access Control can read for the IP address information, depending on what MIBs the router supports:
- ipAddrTable - This MIB table is used to find the ifIndex for the IP address of the router in order to reduce the number of reads that need to be made against the ipNetToMedia or ipNetToPhysical MIB tables.
- ipAddressTable -This MIB table supports IPv6 addresses and is the IPv6 replacement for the ipAddrTable table.
- ipNetToMedia -This MIB table is used to locate the IP to MAC bindings.
- ipNetToPhysical -This MIB table supports IPv6 addresses and is the IPv6 replacement for the ipNetToMedia table.
Following the SNMP request, Access Control evaluates the IP addresses it discovered. First, Access Control filters out any invalid IP addresses, such as 0.0.0.0. If there is only one IP address remaining, then this address is used and the process stops here. If there are no IP addresses remaining, Access Control proceeds to the DHCP IP address process. If there are multiple IP addresses, then Access Control goes to the next step in the filter process, router IP subnet filtering.
If an IP subnet is defined with the relay router's IP as one of the gateways, then that subnet can be used to provide a filter. IP subnets are defined in NAC Manager in the Appliance Settings > IP Resolution Tab. If no IP subnet is found, Access Control proceeds to the DHCP IP address process. If a subnet is found and filters down to one IP address, then that address is used and the process stops here. If results after the filter contain no IP addresses, then Access Control proceeds to the DHCP IP address process. If there are multiple IP addresses, then Access Control goes to the next step in the filtering process, the NetBIOS filter.
Access Control makes NetBIOS requests to the list of IP addresses to determine the correct IP address. If the NetBIOS filters down to one IP address, then that IP address is used and the process stops here. If the filter results contain no IP addresses, then Access Control proceeds to the DHCP IP address process. If there are multiple IP addresses, then Access Control goes to the next step in the filtering process, Clear Duplicate IPs.
| NOTE: | If a firewall is enabled on the end-systems, enable the NetBIOS IP Filtering feature in NAC Manager via the Appliance Settings > IP Resolution Tab and the NetBIOS
Hostname Resolution feature should be disabled via the Appliance Settings >
Hostname/Username Resolution tab. The NetBIOS timing options
can be controlled from Appliance Settings > Miscellaneous > NetBIOS. |
|---|
Access Control clears the duplicate IPs in the ARP tables of an end-system's gateway router and then try to re-read the IP address from the router to find the most recent entry. The only filtering done at this point is removing invalid IP addresses and VLAN IP Subnet Filtering. If only one IP address is read this time, then that IP address is used and the process stops here. If no IP addresses are read, then Access Control proceeds to the DHCP IP address process. If the results contain multiple IP addresses, then Access Control looks to see if one IP address is the last one heard with DHCP, and if the DHCP information can be used. If so, then that IP address is used and the process stops here.
| NOTES: |
The Clear Duplicate IPs process can be
disabled in NAC Manager via the Appliance Settings > IP Resolution Tab > Clear Duplicate IPs on
Routers.
You can disable the use of DHCP Request IPs from Appliance Settings > IP Resolution Tab > Use DHCP Request IPs. By default this option only allows IPs learned from DHCP requests to be used in non-VLAN environments. This is because as an end-system transitions through VLANs, it will request the IP address of the previous VLAN making it inaccurate for Access Control to use. |
|---|
If the Access Control appliance was unable to resolve the end-system's IP address by querying the end-system's gateway router ARP table, then Access Control can use an IP address reported by a connected agent. This process looks for the end-system's MAC address in the list of MAC addresses from known connected agents. If an agent is connected and heartbeats during the IP Resolution process, then Access Control uses the IP address of that agent.
If the IP address resolution process has still not obtained an IP address, then Access Control uses a DHCP address, if one was heard and was deemed usable. Access Control uses it even though it could not be verified. You can disable the use of DHCP Request IPs in Appliance Settings > IP Resolution Tab > Use DHCP Request IPs. By default, this option only allows IPs learned from DHCP requests to be used in non-VLAN environments. This is because the IP addresses from request packets in a VLAN environment is always incorrect, because as an end-system transitions through VLANs, it always requests the IP from the previous VLAN.
If IP Resolution Fails
If Access Control is unable to resolve an IP address and assessment is enabled, the end-system is assigned the Error connection state, and its extended state is set to "MAC To IP Resolution Failed." If the IP resolution process takes more time than allowed by the IP Address Resolution Timeout setting, the end-system's extended state is set to "MAC to IP Resolution Timed Out." (The default timeout setting is 60 seconds and can be changed in Appliance Settings > IP Resolution Tab > IP Address Resolution Timeout.) When IP address resolution fails:
- Access Control is unable to apply rules that use IP-based end-system groups to this end-system.
- Access Control is unable to resolve the hostname, and is therefore be unable to apply rules using hostname-based end-system groups to this end-system.
- The Failsafe policy is applied to the end-system, if assessment is enabled.
- Assessment of the end-system (agent-less or agent-based) does not take place.
- The end-system is not be able to see the Registration web page.
- The end-system is not be able to see the Assessment/Remediation web page.
Deployment Considerations
The following Node/Alias configuration changes may increase the accuracy of IP resolution:
- Turn off learning on uplink ports.
- Increase the maximum number of entries per port for all downstream ports to the maximum, so that entries are timed out on a oldest per-switch basis instead of oldest per-port.
Diagnostics for IP Resolution
You can enable diagnostics for IP Resolution by going to the Access Control appliance
administration web page and enabling diagnostic groups that provides
troubleshooting information.
Launch the Access Control appliance administration web page by right-clicking on the Access Control appliance in the
NAC Manager left-panel tree and selecting WebView or by
using the following URL: https://<Access ControlApplianceIP>:8444/Admin. The default user name and password for
access to this web page is "admin/Extreme@pp."
Expand the Diagnostics folder in the left-panel tree and click on the Appliance/Server Diagnostics page.
| Debug Group | Definition |
|---|---|
|
|
This group enables debugging for the core IP address resolution logic.
There are three useful diagnostic levels that can be used: Informational - Enables high-level diagnostics to determine what methods of detection are being used, including device information. Verbose - Provides the same information as Informational, as well as enabling detailed logging that also specifies information such as what OIDs were read and the results of those reads. Note that this verbose mode is likely to incur a performance hit. Warning - Can be used to determine why failures occurred. For every IP Address Resolution Failed event, a verbose message will be printed out describing the entire process used and why the resolution ultimately failed. Note that running in this mode will incur the same performance hit that Verbose mode takes, but it will make the logs easier to read. This mode cannot be used for timeouts or errors where Access Control determines the incorrect IP. |
| DHCP | This group enables DHCP snooping diagnostics that describe what data is coming in from snooped DHCP packets. |
| NetBIOS | This group enables diagnostics for the core NetBIOS interaction with end-systems. This does not control the diagnostics on the timeout mechanism. |
| NetBIOS Timeout | This group enables diagnostics for the NetBIOS timeout logic. Note that this logging can be very verbose and is likely to incur a performance hit. |
The log output is saved in /var/log/tag.log on the Access Control appliance.
Debug diagnostic log data indicating a failure in the IP Resolution process is shown below.

Debug diagnostic log data indicating a successful IP Resolution is shown below.

IP to MAC Resolution
Access Control L3 Controllers use IP to MAC resolution to determine an end-system's MAC address after traffic from a new source IP address is detected on the controller. NAC Manager must know the end-system's MAC address in order to track the end-system through the Access Control process.
The IP to MAC Resolution Process
The IP to MAC Resolution process begins when an end-system authenticates to the network via a packet containing the end-system's IP address that crosses the Access Control L3 Controller.
First, Access Control checks to see if there is a static MAC to IP address mapping defined in NAC Manager for the end-system's IP address. If there is, then that MAC address is used. If there is not, then the MAC resolution process will make NetBIOS requests to the end-system's IP address.
| NOTE: | Static MAC resolution can be disabled in NAC Manager via the Appliance
Settings > MAC Resolution Tab > Static MAC Resolution. |
|---|
The NetBIOS request is made asynchronously, and until a MAC address is determined, all traffic from this end-system is dropped by the controller. If a valid response comes back, the MAC address is used if it is not one of the unusable MAC addresses defined under the Appliance Settings > MAC Resolution Tab > Unusable MAC Addresses section. If the MAC address is not valid, then Access Control proceeds to the DHCP MAC Resolution process.
| NOTE: | The NetBIOS request can be disabled
in NAC Manager via the Appliance Settings > MAC Resolution Tab > NetBIOS MAC
Resolution option. The NetBIOS timing options
can be controlled from Appliance Settings > Miscellaneous Tab > NetBIOS. |
|---|
If Access Control is able to snoop a DHCP packet for the end-system's IP address, it uses the data from that packet to obtain the MAC address. If no DHCP information is available for that IP address, then Access Control proceeds to NetBIOS Hostname Pseudo MAC Generation.
| NOTE: | The DHCP MAC Resolution process can be disabled
in NAC Manager via the Appliance Settings > MAC Resolution Tab > DHCP MAC
Resolution option. |
|---|
If a NetBIOS response was heard, but the MAC address was deemed to be unusable, Access Control looks for the hostname within the NetBIOS response. If there is one, a pseudo MAC address is generated starting with the prefix of AB:CD. The last four octets are generated by the hostname and are guaranteed to be unique on each Access Control Controller. However, there is the possibility that two end-systems with different names on different controllers could end up with the same pseudo MAC address. Because of this possibility, this option is disabled by default, but can be enabled in NAC Manager via Appliance Settings > MAC Resolution Tab > NetBIOS MAC Resolution > Allow Use of NetBIOS Hostname for Pseudo MAC Generation option.
If Access Control is unable to determine the MAC address through any of the processes described above, Access Control generates a pseudo MAC address from the IP address of the end-system. This method always generates the same MAC address, and it is more likely to generate an address that uniquely identifies the end-system if IP addresses are statically mapped to end-systems. Because a MAC address is required by Access Control to identify and track an end-system, there is no way to disable this final method.
Diagnostics for MAC Resolution
You can enable diagnostics for MAC Resolution by going to the Access Control appliance
administration web page and enabling diagnostic groups that help with
troubleshooting.
Launch the Access Control Appliance administration web page by right-clicking on the Access Control appliance in the
NAC Manager left-panel tree and selecting WebView or by
using the following URL: https://<Access ControlApplianceIP>:8444/Admin. The default user name and password for
access to this web page is "admin/Extreme@pp."
Expand the Diagnostics folder in the left-panel tree and click on the Appliance/Server Diagnostics page.
| Debug Group | Definition |
|---|---|
|
|
This group enables debugging for the core
MAC address resolution logic.
There are three useful diagnostic levels that can be used: Informational - Enables high-level diagnostics to determine what methods of detection are being used, including device information. Verbose - Provides the same information as Informational, as well as enabling detailed logging. Note that this verbose mode is likely to incur a performance hit. Warning - Can be used to determine why failures occurred. Whenever MAC resolution fails and Extreme Access Control generates a pseudo MAC address, a verbose message will be printed out describing the entire process used and why the resolution failed. Note that running in this mode will incur the same performance hit that Verbose mode takes, but it will make the logs easier to read. |
| DHCP | This group enables DHCP snooping diagnostics that describe what data is coming in from snooped DHCP packets. |
| NetBIOS | This group enables diagnostics for the core NetBIOS interaction with end-systems. This does not control the diagnostics on the timeout mechanism. |
| NetBIOS Timeout | This group enables diagnostics for the NetBIOS timeout logic. Note that this logging can be very verbose and is likely to incur a performance hit. |
Agent-Based Assessment
This section provides strategies on how to set up your Extreme Access Control assessment to take advantage of certain Extreme Access Control features. It includes information on how to configure assessment test cases based on the end-system's operating system, and how to use MAC OUIs to exclude end-systems such as printers and phones from assessment.
| NOTE: | Before configuring assessment, you must enable the Assessment/Remediation for End-Systems option in the NAC Manager Features options accessed from Tools > Options in the NAC Manager menu bar. |
Configure OS-Based Test Cases
Agent-based test sets can be configured to include individual test cases that apply only to end-systems running certain operating systems. Here are three examples of how this functionality could be used:
- Create different versions of the same test case based on the different
operating systems. For example, create a Mandatory test that requires antivirus
software to be installed and running on Windows XP end-systems (as shown below).
The end-system must pass the test, or it will be scored against them.
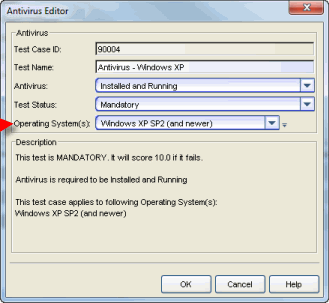
Then, create a Warning or Informational test for Mac end-systems that checks for antivirus software and reports the results without any score being applied towards risk assessment (as shown below).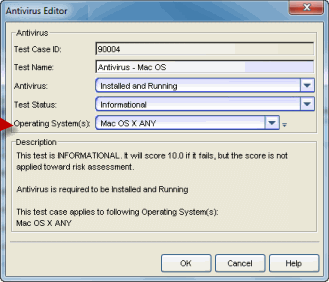
The Agent-Based Test Set shown below lists the two test cases: Antivirus - Windows XP and Antivirus - Mac OS.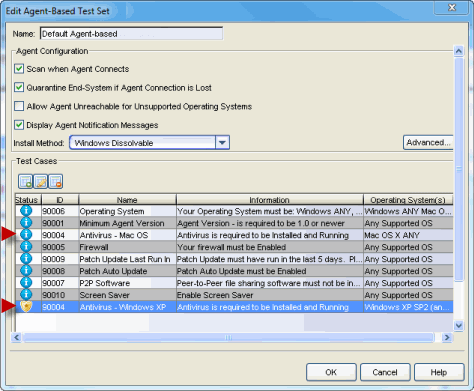
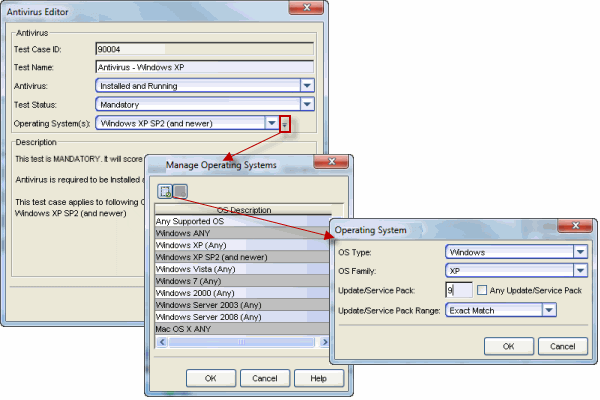
- Create tests that take into account operating system versions. This allows
you to
create a test case where end-systems running an older version of the operating
system must be tested while
end-systems with newer versions are not tested. For example, if Microsoft
released a new service pack that was incompatible with a certain agent-based
test, the test could be disabled for that new service pack. To do this, you
can define a new operating system definition for the new service pack using the Manage Operating Systems
window accessed from the Operating System(s) configuration menu button in the
test Editor window (as shown below).
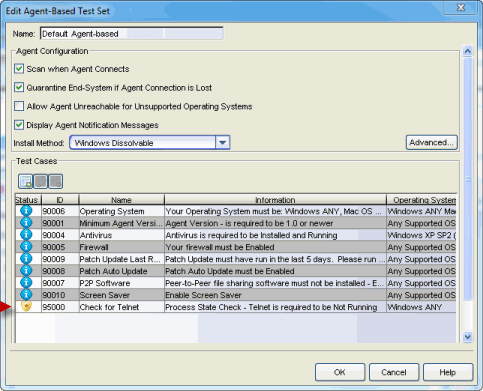
- Create a test case that checks for a specific process on a specific operating
system. For example, you could create a test that checks for Telnet installed on any
Windows end-system, while Mac end-systems would
not be checked.
The Agent-Based Test Set shown below shows an example of a Check for Telnet test case.
Exclude End-Systems from Assessment Using MAC OUIs
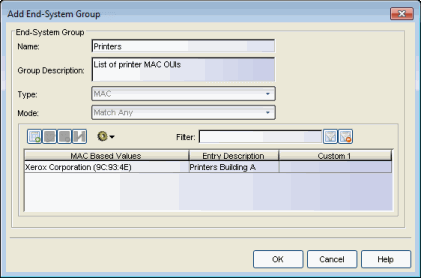
If you have assessment enabled on your network, you can use Extreme Access Control Configuration rules and MAC OUI end-system groups to exclude specific end-systems such as printers and phones from being assessed. Here are the steps you would use to create a printer end-system group and rule for your Extreme Access Control Configuration:
- Create an end-system group for your printers selecting a MAC OUI as your
end-system type.
 s
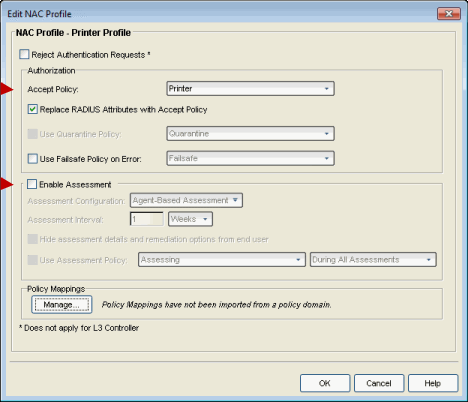
s - Create a printer profile that specifies a Printer Accept Policy and does not enable assessment.
(Use the Manage Policies button at the bottom of the Edit Extreme Access Control (NAC) Profile window to
open the Edit Policy Mapping window if you need to define a Printer Accept
Policy.)
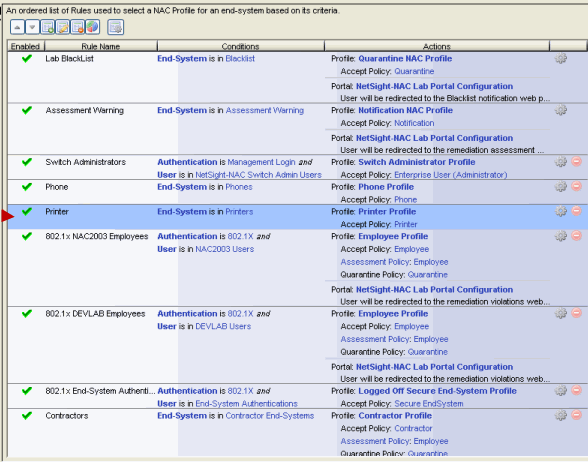
- Add a new rule to your Extreme Access Control (NAC) Configuration that uses the Printers end-system group
and Printer Profile.
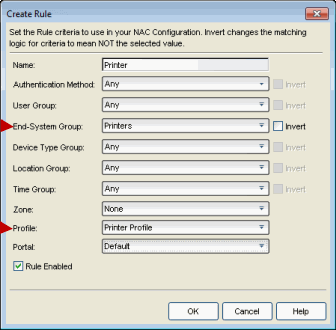
- Your Extreme Access Control Configuration now includes a Printer rule based on a MAC OUI. Any end-system connecting to the network
that matches the MAC OUI will be
assigned to the Printers end-system group and receive the Printer Profile. That
end-system is not assessed.
Third-Party Device Considerations
This section provides information on deploying Extreme Access Control with third-party devices.
RADIUS Configuration
RADIUS configuration on third-party devices must be performed manually, outside of NAC Manager.
RADIUS Attributes
For third-party devices that support RFC 3580, NAC Manager access policies are
by default associated
to VLAN ID assignment based on RFC 3580 tunnel attributes. NAC Manager also
allows you to define custom RADIUS attributes (such as vendor-specific ACL-based
attributes) which are included as part of the RADIUS response.
Reauthentication
For third-party wireless devices (such as Cisco Wireless devices), reauthentication is accomplished using
RFC 3576. For third-party wired switches, reauthentication is accomplished via
dot1x MIB (standards), HP User Auth MIB, or by linking down the port.
IP Resolution
Third-party devices must have the ipNetToMedia MIB for Extreme Access Control to be able to perform IP resolution.
Extreme Access Control also uses the Cisco DHCP Snooping MIB for Cisco devices.
Extreme Management Center Server Data Retention Tools
There are several NAC Manager options that allow you to configure the amount of data retained in the Extreme Management Center Server database. To access these options, select Tools > Options from the NAC Manager menu bar. In the NAC Manager Options window, expand the NAC Manager folder in the left-panel tree to see the options.
Extreme Access Control Capacity Option
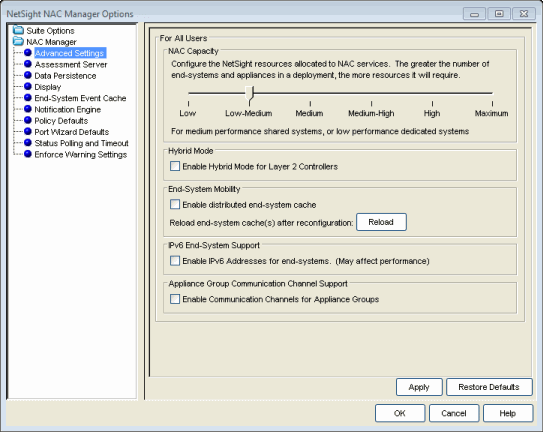
In the Advanced Settings Options panel, the Extreme Access Control (NAC) Capacity option (shown below) lets you configure the amount of Extreme Management Center resources allocated to Extreme Access Control services. The greater the number of end-systems and appliances in your Extreme Access Control deployment, the more resources Extreme Access Control services require. Use the slide bar to select the appropriate setting for your server.
- Low - For low performance shared systems.
- Medium - For medium performance shared systems, or low performance dedicated systems.
- High - For high performance shared systems, or medium performance dedicated systems.
- Maximum
- For high performance dedicated systems.
Data Persistence Options
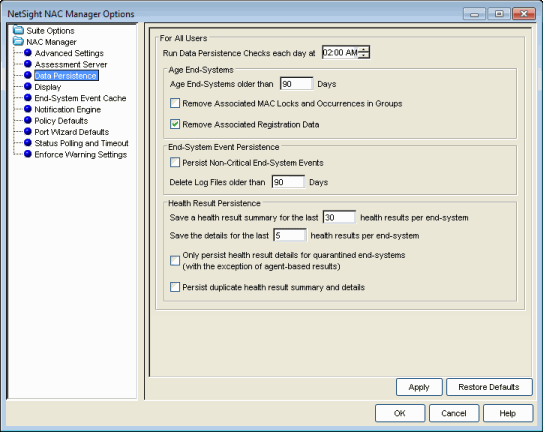
The Data Persistence options (shown below) let you customize how NAC Manager ages-out or deletes end-systems, end-system events, and end-system health results (assessment results) from the tables and charts in the End-Systems tab and the Statistics tab. By default, a data persistence check is performed each day at 2:00 a.m. (You can change the time that the check is performed, if desired.) Use the following options to configure what the data persistence check ages-out or deletes.
Age End-Systems
Each day, when the Data Persistence check runs, it searches the database for end-systems that NAC Manager has not received an event for in the number of days specified (90 days by default). It removes those end-systems from the End-System table in the End-Systems tab.
If the Remove Associated MAC Locks and Occurrences in Groups checkbox is selected, the aging check also removes any MAC locks or group memberships associated with the end-systems being removed.
End-System Event Persistence
If this checkbox is selected, NAC Manager stores non-critical end-system events, which are events caused by an end-system reauthenticating. End-system events are stored daily in the database. Each day, when the Data Persistence check runs, it removes all events which are older than the number of days specified (90 days by default).
Health Result Persistence
This section lets you specify how many health result (assessment results) summaries and details are saved and displayed in the End-Systems tab for each end-system. By default, the Data Persistence check saves the last 30 health result summaries for each end-system along with detailed information for the last five health result details per end-system.
In addition, you can specify to only save the health result details for quarantined end-systems (with the exception of agent-based health result details, which are always saved for all end-systems).
You can also specify to save duplicate health result summaries and detail. By default, duplicate health results obtained during a single scan interval are not saved. For example, if the assessment interval is one week, and an end-system is scanned five times during the week with identical assessment results each time, the duplicate health results are not saved (with the exception of administrative scan requests such as Force Reauth and Scan, which are always saved). This reduces the number of health results saved to the database. If you select this option, all duplicate results are saved.
Troubleshooting
This section provides information on tools supplied by Extreme Networks Extreme Access Control that provide diagnostic and troubleshooting information for the Extreme Access Control appliance and Extreme Management Center Server.
Extreme Access Control Appliance
The following tools can be used to collect and view diagnostic and troubleshooting information for the Extreme Access Control appliance.
Appliance Command Line Diagnostics
Use the following two commands to display Extreme Access Control (NAC) appliance data:
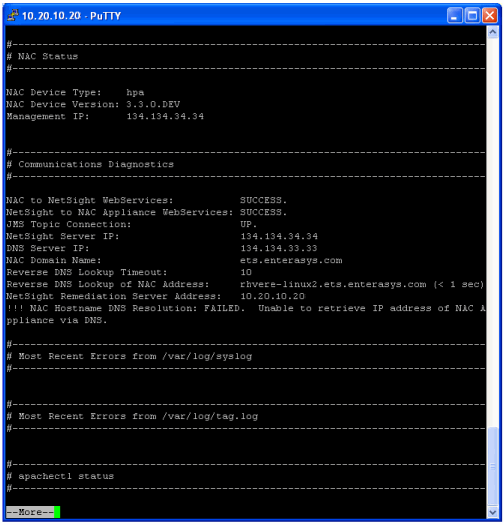
nacstatus
From the appliance command line, enter the command nacstatus to display appliance status information including communications diagnostics, recent errors, DNS configuration, and Navis configuration.
| TIP: | To collect this information from your Extreme Access Control appliances and save it to a
file on the Extreme Management Center Server, use the Generate Show Support feature in Extreme Management Center. |
|---|
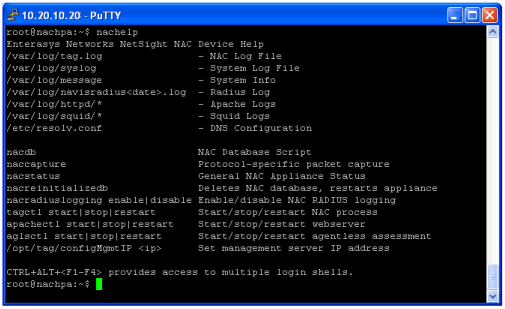
From the appliance command line, enter the command nachelp to display appliance status information including the location of specific log files and a list of administrative commands for the Extreme Access Control appliance.
Extreme Access Control Appliance Administration Web Page
To access status and diagnostic information for an Extreme Access Control appliance, launch the Extreme Access Control appliance administration web page by right-clicking on an Extreme Access Control appliance in the left-panel tree and selecting WebView, as shown below. (You can also access the administration web page using the following URL: https://<Extreme Access ControlApplianceIP>:8444/Admin.)
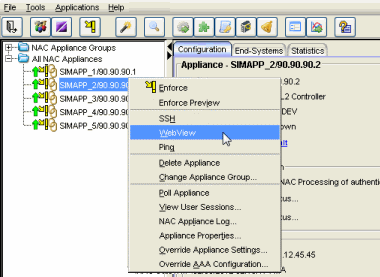
The default user name and password for access to this web page is "admin/Extreme@pp." The username and password can be changed in NAC Manager using the Advanced Configuration window (available from the Tools menu > Management and Configuration > Advanced Configurations) and selecting the Appliance Settings > Miscellaneous Tab > Web Service Credentials field.
The left-panel tree in the administration web page displays a Home folder plus several other folders: Status, Diagnostics, Log Files, Downloads, and Utilities. Following is an overview of each folder and the web pages it contains.
Home
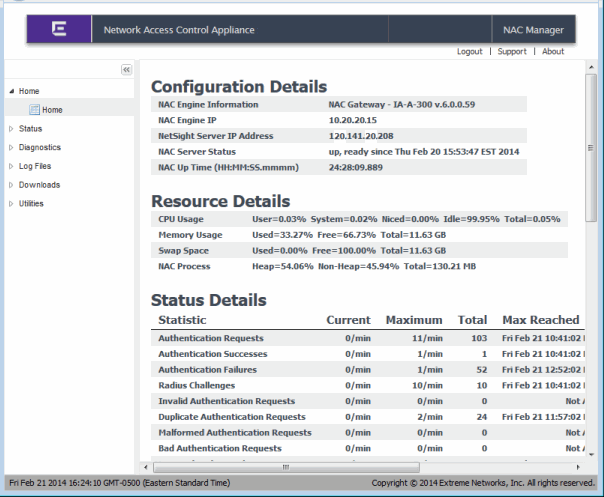
The Home web page provides appliance performance information including debugging information (such as CPU usage) that helps you determine if the appliance is being overloaded with requests.
| NOTES: |
Memory usage is normally close to 100% to allow for better performance.
An Extreme Access Control virtual appliance has an additional License Status field that displays whether the appliance has a license allocated to it. For more information on virtual appliance licensing, see the Suite-Wide Tools Server Information Window Help topic section on Extreme Access Control VM license. |
|---|
Home Web Page
Status
The Status folder provides the following diagnostic information:
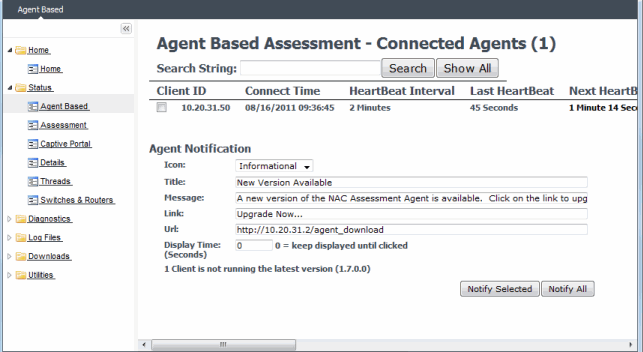
- Agent-Based - Displays information about the agent-based clients connected to Extreme Access Control. Click the Show All button to display all connected agents.
- Assessment - Provides performance information related to Extreme Access Control assessment.
- Captive Portal - Provides debug information for the captive portal including statistics on the number of requests served and the interaction with Extreme Management Center.
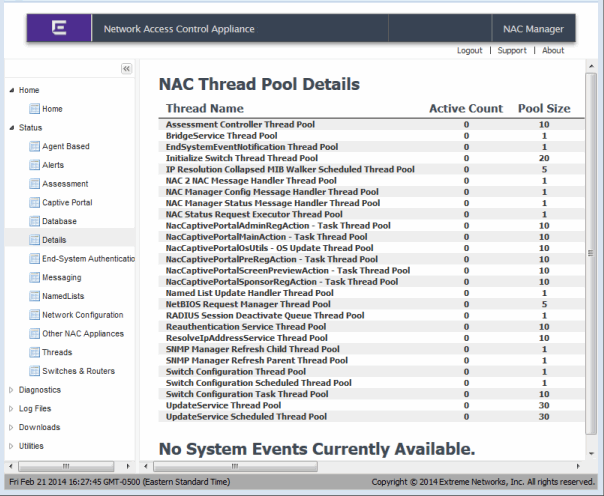
- Details - Provides additional Extreme Access Control performance information showing where performance bottlenecks may be occurring. The Throttled Tasks column can be used to help diagnose whether there is a problem in a specific part of the Extreme Access Control process.
- End-System Authentication - Provides information on currently managed end-systems and all end-systems managed in the last 24 hours.
- Messaging - Provides information on sent and received JMS Statistics.
- NamedLists - Provides information about named lists (rule groups).
- Network Configuration - Provides a history of network configuration commands.
- Threads - Provides debug information by showing the tasks that Extreme Access Control is currently performing.
- Switches & Routers - Displays basic configuration information about the switches that are configured to use this Extreme Access Control appliance.
Examples of the Details and Agent-Based web pages are shown below.
Status - Details Web Page
Status - Agent-Based Web Page
Diagnostics
The Diagnostics folder provides the following diagnostic information:
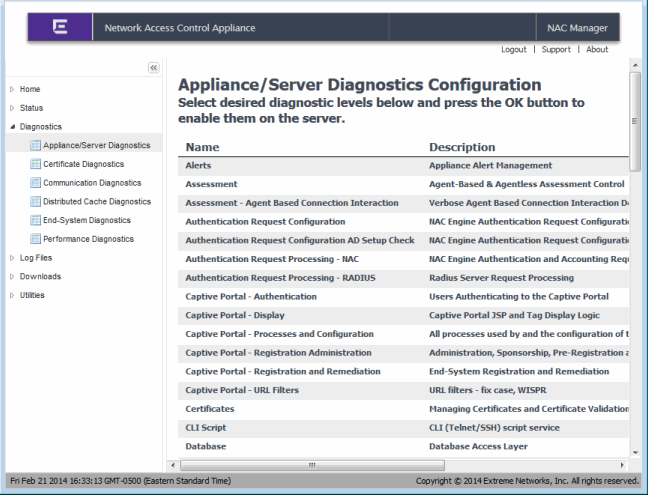
- Appliance/Server Diagnostics - Lets you enable diagnostic groups and diagnostic level that helps with troubleshooting.
- Certificate Diagnostics - Provides information on your Extreme Access Control appliance security certificates including the Internal Communications server certificate chain, the captive portal server certificate chain, the RADIUS server certificate chain, the Extreme Access Control Appliance Trusted Certificate Store, the AAA Trusted Certificate Store, and AAA Certificate Revocation Lists.
- Communication Diagnostics - Displays diagnostic information and provides active tests to help troubleshoot communication issues between the Extreme Access Control appliance and the Extreme Management Center Server. Note that when using the RADIUS request test, RADIUS servers must be enforced to an Extreme Access Control appliance before they are available for selection from the drop-down menu.
- Distributed Cache Diagnostics - Provides information and tools used to diagnose issues with data shared between the Extreme Management Center Server and Extreme Access Control appliances.
- End-System Cache Diagnostics - Provides information and tools to diagnose issues with Extreme Access Control's end-system cache.
- End-System Diagnostics - If the debug information provided in the Server Diagnostics tab is too extensive, this tab allows you to enable debug information for a single end-system, making it easier to search through the database for specific information.
- Server Diagnostics - Allows you to enable different levels of logging on specific Extreme Access Control appliance functionality and view the debug information in /var/log/tag.log on the Extreme Access Control appliance and in the Server Log web page. By default, error and informational data is logged to the tag.log file, with a new file created each day. You can set the diagnostic level to "Verbose" to collect additional data that is presented in an easy-to-read format.
An example of the Server Diagnostics web page is shown below.
Diagnostics - Server Diagnostics Web Page
The Log Files folder provides the following logs:
- Agent Logs - Displays the agent log files that have been retrieved from remote end-systems via the Client Diagnostics section on the Status > Agent-Based web page.
- RADIUS Log - Displays the last 1000 lines printed in the Extreme Access Control appliance RADIUS log (/var/log/radius/radius.log on the Extreme Access Control appliance).
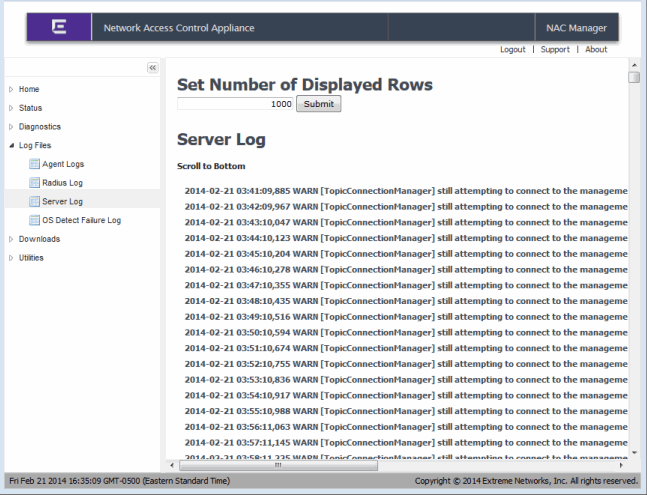
- Server Log - Displays the last 1000 lines printed in the Extreme Access Control appliance server log (/var/log/tag.log on the Extreme Access Control appliance).
- OS Detect Failure Log - Displays the last 1000 OS detection failures (/var/log/osdetectfailure.log on the Extreme Access Control appliance).
You can change the number of displayed rows using the input box at the top of the page. An example of the Server Log web page is shown below.
Log Files - Server Log Web Page
Downloads
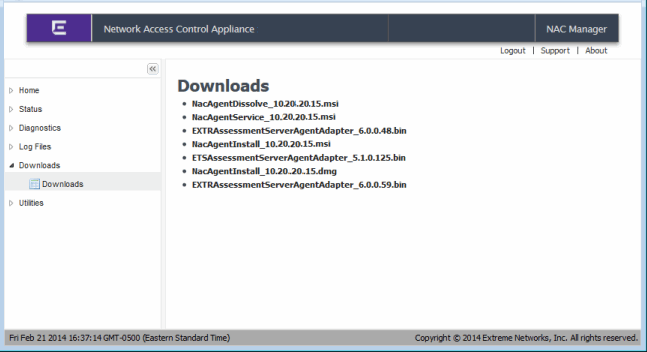
The Downloads web page screen provides links to the assessment agent adapter install file and the installers for agent-based assessment. The assessment agent adapter is required for communication between the Extreme Access Control appliance and the Nessus assessment server.
Downloads Web Page
Utilities
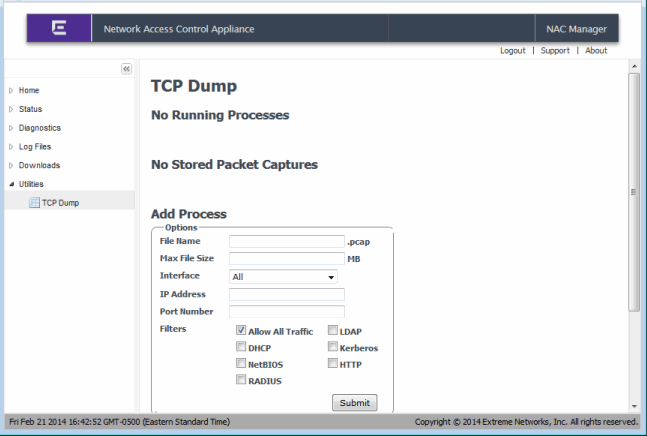
The TCP Dump web page provides the ability to run the TCP Dump packet analyzer and stores the packet capture files, which you can then download to view. Packet capture files (.pcap files) are stored on the Extreme Access Control appliance in /opt/nac/pcap.
You create a TCP Dump process by using the Add Process form or by typing in a CLI command in the Custom Command form. Two pcap files are created for each capture. When the first file reaches the maximum file size, the second file is started. When you download them, the server automatically zips these files together. If the server shuts down while a TCP Dump process (initialized through this interface) is running, the process automatically stops.
The options for the Add Process form are:
- File Name: Enter a name for the .pcap files. The .pcap extension is automatically added to the filename.
- Max File Size: Enter a maximum size for a single capture file. The default is 100 MB. A check is done to make sure there is enough disk room before running the process.
- Interface: Select a network interface on the server or use All (the default). Loopback is automatically ignored.
- IP Address: If you enter an IP address, only traffic going to or from this host is captured.
- Port Number: If you enter a port number, only traffic on this port is captured.
- Filters: Select the protocols on which to capture traffic or use Allow All
Traffic (the default). If
you have entered a port number, these checkboxes are ignored. Following are the
ports associated with each protocol:
- DHCP - port 67 and 68
- RADIUS - port 1645, 1646, 1812, 1813
- LDAP - port 389 and 636
- Kerberos - port 88
- HTTP - port 80, 443, 8080, 8443, and 8444
CAUTION: If you enable an HTTP capture, you should not download any pcap files while the download is running because the capture will grow by the size of the pcap file. You should refrain from downloading pcap files while an HTTP capture is running.
For information on the proper syntax for using the Custom Command form, see: http://www.tcpdump.org/tcpdump_man.html.
Utilities - TCP Dump Web Page
Extreme Management Center Server
The following Extreme Access Control diagnostic features can be used to collect and view diagnostic and troubleshooting information for the Extreme Management Center Server.
Generate Show Support
You can use Extreme Management Center to collect and save Extreme Access Control status information for your Extreme Access Control appliances and the Extreme Management Center Server to a file, allowing you to easily view the data and also send it to Extreme Networks Support for troubleshooting purposes. Extreme Access Control Status information includes communications diagnostics, recent errors, DNS configuration, and Navis configuration.
In Management Center, select the Administration tab. Under Support (in the left-panel tree), select the Generate Show Support report and click the Start button, as shown below.
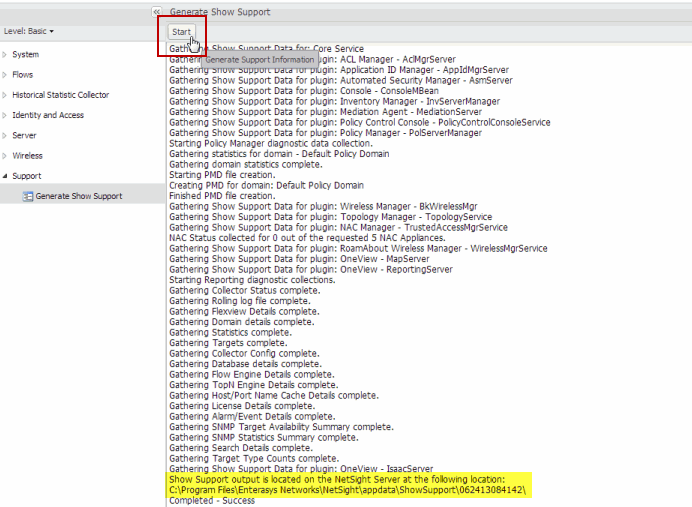
The Extreme Access Control status information is collected and saved in a dated subdirectory under the <install directory>\appdata\ShowSupport directory on the Extreme Management Center Server. After you unzip the file, you see separate directories for the different Extreme Access Control appliance and Extreme Management Center server information saved.
Monitoring
Use the following NAC Manager menu options to monitor Extreme Access Control appliance and switch performance information.
Launch CPU Utilization View
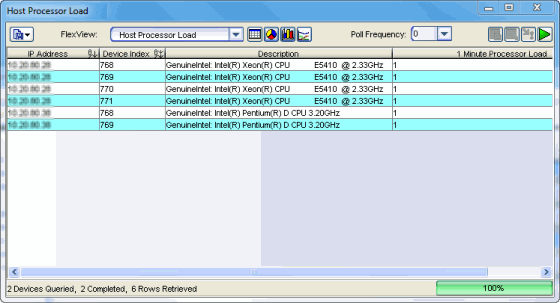
From NAC Manager, right-click on one or more appliances in the right-panel Extreme Access Control (formerly NetSight) Appliances tab and select Launch CPU Utilization View to open the Host Processor Load FlexView (shown below).
Launch Memory and Diskspace Utilization View
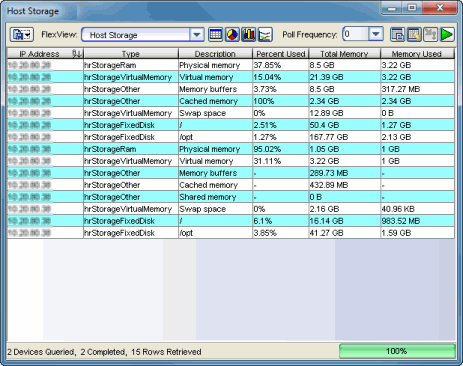
From NAC Manager, right-click on one or more appliances in the right-panel Extreme Access Control (NAC) Appliances tab and select Launch Memory and Diskspace Utilization View to open the Host Storage FlexView (shown below).
Launch RADIUS Client Information View
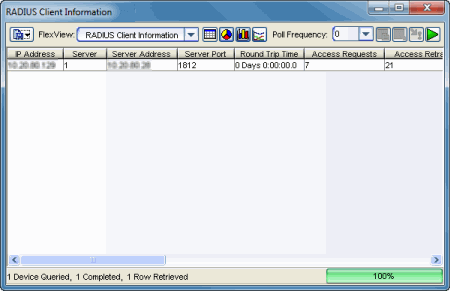
From NAC Manager, right-click on one or more switches in the right-panel Switches tab and select Launch RADIUS Client Information View to open the RADIUS Client Information FlexView (shown below).
Launch Node Alias and Multi Auth View
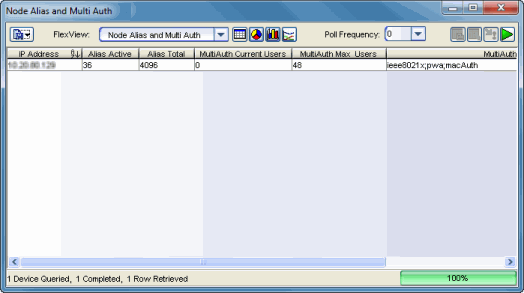
From NAC Manager, right-click on one or more switches in the right-panel Switches tab and select Launch Node Alias and Multi Auth View to open the Node Alias and Multi Auth FlexView (shown below).
View End-System Counts
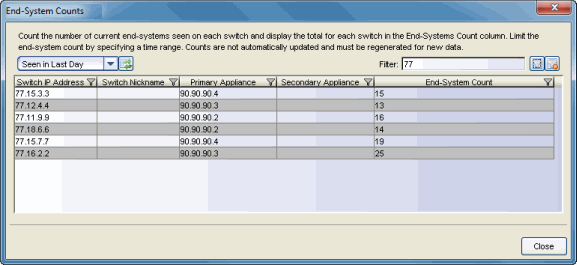
From NAC Manager, select Tools > View End-System Counts to open a window where you can view the total number of current end-systems seen on each switch. Counts can be limited by specifying a time range, if desired.
Extreme Management Center Server and Extreme Access Control Appliance Connectivity
There are four communications channels between the Extreme Management Center Server and the Extreme Access Control appliance: SNMP, Web Services from the Extreme Access Control appliance to the Extreme Management Center Server, Web Services from the Extreme Management Center Server to the Extreme Access Control appliance, and JMS (Java Message Service). Extreme Management Center Console, Policy Manager, and Inventory Manager use SNMP to communicate with the Extreme Access Control appliance and determine its state. NAC Manager uses Web Services and JMS communication instead of SNMP to determine appliance status, providing more robust connectivity information. NAC Manager status should always be used as the primary determination of appliance connectivity. For example, Extreme Access Control appliance status could be "up" in Console while "down" in NAC Manager.
The following sections explain how to determine the status of each communication channel, and provide troubleshooting information for connectivity problems.
SNMP
SNMP is the most basic communication method used to talk to the Extreme Access Control appliance. Extreme Management Center Console use SNMP to poll the Extreme Access Control appliance (both Extreme Access Control Gateways and Extreme Access Control Controllers) and determine its status. Policy Manager and Inventory Manager can be used to verify SNMP status for Extreme Access Control Controllers only. SNMP status is determined by looking at the device status icons in the left-panel tree. If the arrow on the Extreme Access Control appliance icon is green, SNMP connectivity is established. If the arrow is orange or red, there is an issue with SNMP connectivity. An orange arrow indicates that an SNMP error was returned (check the event log for an error description). A red arrow indicates an SNMP timeout. Check ping access between the server and the appliance, and verify SNMP credentials. Alternatively, MIB Tools can be used to verify SNMP connectivity between the server and the Extreme Access Control appliance.
Web Services
Java Web Services is an XML-based communications protocol that provides symmetric communication channels from the Extreme Access Control appliance to the Extreme Management Center Server and from the Extreme Management Center Server to the Extreme Access Control appliance.
When troubleshooting Web Services, start by verifying the following basic configuration requirements:
- Web Services occur over SSL with a destination of port 8444. Verify that port 8444 is not blocked between the server and appliance, in both directions.
- Verify that the Extreme Access Control appliance has DNS servers configured, and that the Extreme Management Center Server can resolve all appliance hostnames and the Extreme Access Control appliances can resolve the Extreme Management Center Server hostname.
- Verify that the Extreme Management Center server is bound to the proper interface (if there are multiple interfaces). For information see Systems with Multiple NICs in the Extreme Management Center Installation Guide.
- Ensure that the Extreme Access Control appliance has the correct IP address configured as the Management
Server IP address by running the command
cat /opt/nac/mgmtServerIP. Run the command /opt/nac/configMgmtIP at the appliance CLI to configure the IP address if necessary, and use the Extreme Management Center Server's IP address (the bound IP in the Extreme Management Center Server's server.log) as the Management Server IP address. To start using the new Extreme Management Center Server, you must restart the appliance by entering the command nacctl restart. - Verify Web Service credentials in NAC Manager (Tools > Manager Advanced Configurations > Global and Appliance Settings > Appliance Settings > Default > Credentials Tab).
- Reset the web service credentials on the Extreme Access Control appliances to ensure a match. From the /opt/nac/ directory, enter the command
./configWebCredentials.
The next step is to determine the current Web Service status for the appliance. The current status of the Web Service for an Extreme Access Control appliance is found on the Communications Diagnostics page of the Extreme Access Control Appliance Administration web page, as shown below.
Launch the Extreme Access Control Appliance administration web page by right-clicking on the Extreme Access Control appliance in the NAC Manager left-panel tree and selecting WebView or by using the following URL: https://<Extreme Access ControlApplianceIP>:8444/Admin. The default user name and password for access to this web page is "admin/Extreme@pp." Click on the Diagnostics page and then the Communication Diagnostics page.
Communication Diagnostics Web Page
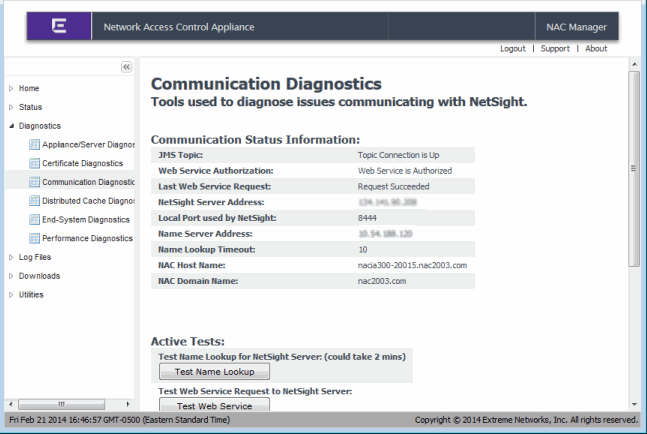
On the Communications Diagnostics page, you will find the Web Service Authorization and Last Web Service Request status. These two fields provide information on whether or not the Extreme Access Control appliance can contact the Extreme Management Center Server with Web Service calls. If Web Service Authorization says "Extreme Access Control (NAC) Appliance is not Authorized," there is a communication issue between the Extreme Access Control appliance and the Extreme Management Center Server. In this case, check the following points:
- If the JMS Topic status does not say "Topic Connection is Up," refer to the section on troubleshooting JMS Connections to resolve this issue.
- Verify that DNS is configured with hostnames of the Extreme Access Control appliance and Extreme Management Center Server. Test DNS resolution with the Test Name Lookup button.
- Verify that SSL Certificates have been configured for Web Service connections. To do this, open the Extreme Access Control Appliance Administration Web Page and view the certificate via the browser window. For Internet Explorer 8, use View > Security Report > View Certificates. For Internet Explorer 7, use File > Properties > Certificates. For Firefox 3.5, use Tools > Page Info > Security > View Certificate.
- Verify that the Web Service Credentials are configured correctly. Web credentials are used to negotiate Web Services between the Extreme Management Center Server and Extreme Access Control appliance They can be configured on the Extreme Management Center Server through NAC Manager, by going to Tools > Management and Configuration > Advanced Configuration > Global and Appliance Settings > Appliance Settings. Select the Appliance Settings to edit, click on the Credentials tab, and configure the credentials in the Web Service Credentials section. Changes to the credentials is propagated to the Extreme Access Control appliances on Enforce. (If for some reason the credentials are out of sync on the Extreme Access Control appliance, use the /opt/nac/configWebCredentials command to configure the Web Service Credentials on the appliance. Restart the appliance by entering the command nacctl restart.)
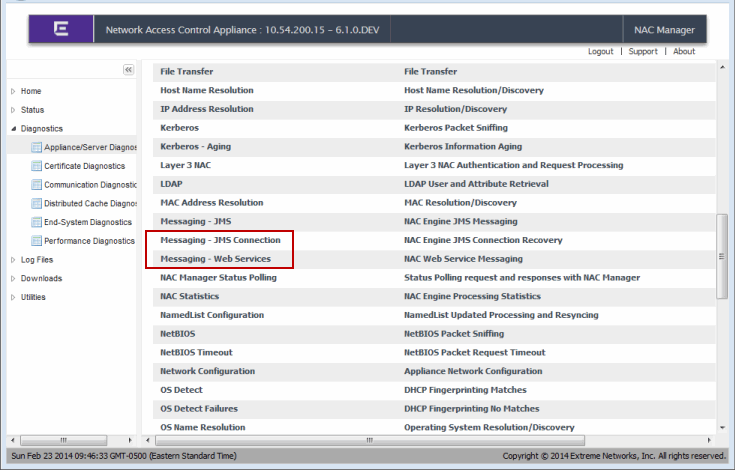
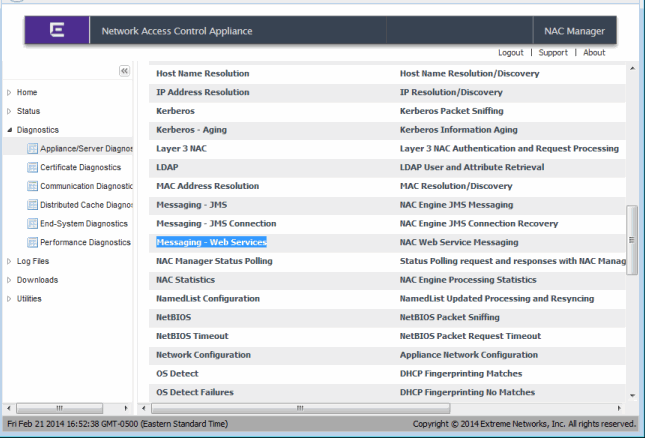
Use the appliance's Server Diagnostics page to obtain additional information on Web Service connectivity. Access this web page from the Extreme Access Control Appliance administration web page by clicking on the Diagnostics page and then the Appliance/Server Diagnostics page. Enable the "Messaging - Web Services" debug group to log detailed debug information on Web Service connectivity. Set the Diagnostic Level to "Verbose" and access the debug information in /var/log/tag.log on the Extreme Access Control appliance or in the Server Log web page.
Server Diagnostics Web Page for Extreme Access Control Appliance
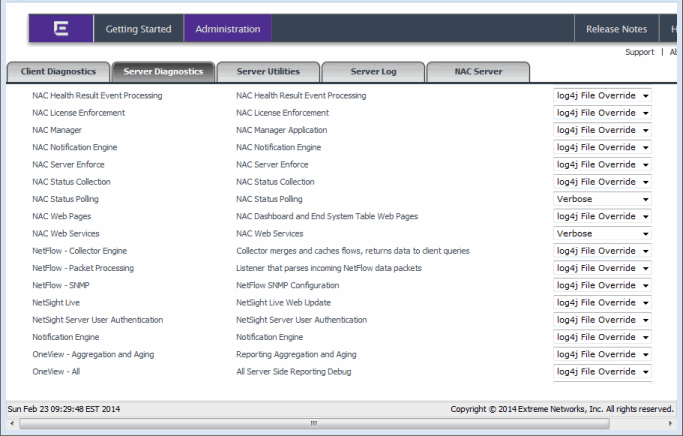
On the Extreme Management Center Server, use the Server Diagnostics page to obtain detailed debug information on Web Service connectivity. Access this page from the Extreme Management Center Launch page by clicking the Administration tab. To access the server diagnostics, you need to log in with your username and password. (If the Extreme Management Center Server is a Windows platform system, in the Username field you must enter a domain name and a username using the following format: <domain name>\<username>). Enable the "Extreme Access Control Web Services" and "Extreme Access Control Status Polling" debug groups by setting the Diagnostic Level to "Verbose." Access the debug information in <install directory>\appdata\logs\server.log on the Extreme Access Control Server.
Server Diagnostics Web Page for Extreme Management Center Server
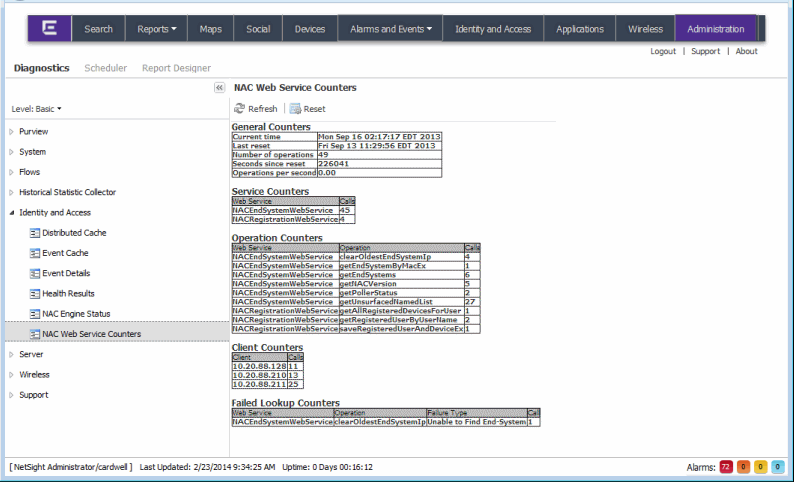
Use the Administration tab to view Extreme Access Control web service counters. Launch Management Center and select the Administration tab. Click on the Diagnostics sub-tab, expand the Extreme Access Control folder, and click on Extreme Access Control Web Service Counters.
Administration Tab
JMS Connections
The Extreme Management Center Server and Extreme Access Control appliance also use JMS (Java Message Service) as a communications channel for sending messages back and forth. JMS is proprietary socket-based and the Extreme Management Center Server and Extreme Access Control appliance listen on message "topics" for new messages to and from each other.
The state of JMS connections can be determined by looking at the JMS Topic field on the Communication Diagnostics page on the Extreme Access Control Appliance. Access this web page from the Extreme Access Control Appliance Administration web page by clicking on the Diagnostics page and then the Communications Diagnostics page. You can also determine the state of JMS connections from the /var/log/tag.log file on the Extreme Access Control appliance, which contains error messages from TopicConnectionManager that helps troubleshoot JMS connectivity issues.
Additional debug information can be retrieved on the Extreme Access Control appliance by enabling the "Messaging - JMS" and "Messaging - JMS Connection" debug groups on the Server Diagnostics page. Access this web page from the Extreme Access Control Appliance Administration web page by clicking on the Diagnostics page and then the Server Diagnostics page. Set the Diagnostic Level for these two groups to "Verbose" and access the debug information in /var/log/tag.log on the Extreme Access Control appliance or in the Server Log web page.
Server Diagnostics Web Page for Extreme Access Control Appliance
