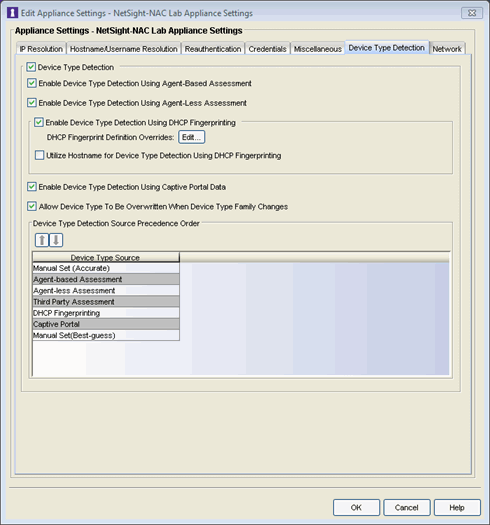
When enabled, the Access Control engine detects the device type of end-systems connecting to your network. One of the methods the Access Control engine uses to detect a device type is to fingerprint the operating system by snooping DHCP packets. A fingerprint is a description of a pattern of network traffic which can be used to identify a device type. You can define new DHCP fingerprints for additional device types using XML in NAC Manager.
Adding a Fingerprint
Use the following steps to add a new DHCP fingerprint:
- Open NAC Manager.
- Right-click an Access Control engine from the All Access Control Engines folder in the left panel and select Appliance Settings > Device Type Detection.
The Edit Appliance Settings window opens. - Select the Device Type Detection tab.

- Ensure Enable Device Type Detection Using DHCP Fingerprinting is selected.
- Click the Edit button in the DHCP Fingerprint Definition Overrides field.
The DHCP Fingerprint Definition Overrides window opens. - Click the View Sample button to view a sample DHCP fingerprint in a separate window.
- Select the DHCP Fingerprint Definition Overrides sample text and press [CTRL] + [C] to copy it to the clipboard.
- Click Close.
- Press [CTRL] + [V] to paste the sample DHCP fingerprint into the DHCP Fingerprint Definition Overrides window.
- Type the operating system for which you are creating a fingerprint as the
fingerprint os=definition in the DHCP Fingerprint Definition Overrides window. - Type the operating system family as the
os_class=definition (e.g. Windows, Linux). - Type the url of the operating system as the
os_url=definition. - Use a network protocol analyzer (e.g. Wireshark) to analyze the PCAP file with the network traffic for which you want to add a fingerprint.

- Type the information presented in the Option: (55) Parameter Request List section of the PCAP file following
dhcpoption55in your new fingerprint in the DHCP Fingerprint Definition Overrides window of NAC Manager. - Type the information presented in the Option: (60) Vendor class identifier section of the PCAP file in a new line of your fingerprint in the DHCP Fingerprint Definition Overrides window of NAC Manager, if the device type cannot be determined using the information in Option (55).
- Enter Discover, Inform, Request, or Any for the dhcptype.
The fingerprint you enter to detect the network traffic shown in the screenshot in Step 13 looks like the following:<fingerprint os="Windows" os_class="Windows" os_url="http://www.microsoft.com/windows" comments="" author="customer@example.com" lastmodified="2016-11-30">
<tests>
<test weight="5" matchtype="exact" dhcptype="Discover" dhcpoption55="1,15,3,6,44,46,47,31,33,249,43" dhcpvendorcode="MSFT 5.0"/>
</tests>
</fingerprint> - Click OK.
The new fingerprint is created on the Management Center server. - Enforce the Access Control engine to push the new fingerprint to your engine.
| NOTE: | The information in this window is for informational purposes and cannot be edited. |
|---|
| NOTE: | Format the line with the Option: (60) Vendor class identifier data in your new fingerprint the using dchpoptionvendorcode as the line definition. |
|---|
Deleting a Fingerprint
Use the following steps to delete an existing DHCP fingerprint:
- Open NAC Manager.
- Right-click an Access Control engine from the All Access Control Engines folder in the left panel and select Appliance Settings > Device Type Detection.
The Edit Appliance Settings window opens. - Select the Device Type Detection tab.

- Click the Edit button in the DHCP Fingerprint Definition Overrides field.
The DHCP Fingerprint Definition Overrides window opens. - Remove the fingerprint by deleting the text from
<fingerprint>to</fingerprint>. - Click OK.
The fingerprint is deleted from the Management Center server. - Enforce the Access Control engine to remove the fingerprint from your engine.