Using Extreme Networks' ZTP+ (Zero Touch Provisioning Plus) functionality, you can quickly add new devices to your network and configure them in Extreme Management Center.
Typically, when adding a new device to the network, a network administrator connects a console cable to the device to access the local console and manually configure the device.
| IMPORTANT: | Accessing the device via the local console during ZTP+ device configuration using a console cable causes the process to fail. To complete the process after a failure, either configure the device manually or type unconfigure switch all and restart the ZTP+ configuration process outlined in this topic. Stacked systems do not currently support ZTP+ configuration. This functionality will be added in a later release. |
|---|
In Management Center, new devices are automatically discovered on the network the moment they are connected. ZTP+ enabled devices send information to Management Center automatically, including the serial number, the number and speed of the ports, and the firmware version. Once a ZTP+ device is connected, you can add it to Management Center with minimal server configuration. In addition, the latest updates are automatically downloaded to the new device. This process minimizes the amount of time needed to configure a new device and deploy it on the network.
| NOTES: | ZTP+ currently allows you to configure new Layer 2 access devices. Future releases will allow additional device types. ZTP+ is currently only available on ExtremeXOS devices on which version 21.1 or newer is installed or on an Application Analytics appliance. |
Pre-configuration
Before connecting your devices, you need to pre-configure the following:
- Select the Default Firmware Image Location
- Default Device Configuration in Extreme Management Center
- Switch/Appliance Settings
Select the Default Firmware Image Location
ZTP+ devices automatically update using the most recent firmware image version detected on the system.
| NOTE: |
Application Analytics engines do not support firmware image downgrades via ZTP+. |
For the device to recognize a new version is available, the firmware image must be saved in a directory you specify in Management Center.
To configure the file transfer location:
- Access the Administration > Options tab.
- Select Inventory Manager in the left panel.
- Enter the Firmware Directory Path in either the FTP Server Properties, SCP Server Properties, or TFTP Properties section of the right panel, depending on the file transfer settings used.
- Download the latest firmware image for your device from ExtremeNetworks.com and save it in the specified directory.
Your device automatically updates with this firmware image when it restarts and is logged in the Event log with a Category of Inventory.
| IMPORTANT: | ExtremeXOS devices on which version 21.1.1.4 is running require an update to the CloudConnector XMOD for ZTP+ functionality to work properly. Saving the most recent XMOD in the directory specified above updates the device and allows ZTP+ to function as intended. |
Default Device Configuration in Extreme Management Center
Before connecting your devices, you can configure the default settings that Management Center applies to all devices you add to the network. This is accomplished using the Site tab. For information about each of the fields in the Site tab, see the Site tab help topic.
- Access the Network > Devices tab in Management Center.
- Expand the World Site navigation tree and select the map in the left panel into which you are adding the devices.
- Select the Site tab in the right panel.
- Select the profiles you want the devices on your network to Accept or Reject using the Profiles list in the Discover section of the tab.
Create new profiles by clicking the Add button. For additional information about profiles, see the Profiles tab help topic.
- Select the Enable ZTP+ and Automatically Add Devices checkboxes in the Discovered Device Actions section and any other actions you want to occur on your devices discovered in Management Center.

- Enter the Domain Name and DNS Server address in the ZTP+ Device Defaults section. Additionally, you can configure the NTP Server address and select the protocols to enable on your devices, if necessary.
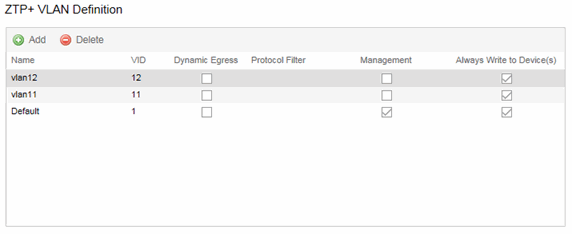
- Add the VLANs that are used on your devices in the ZTP+ VLAN Definition section of the tab by clicking the Add button and entering the Name and VID.
- Click Save.
The default configuration for this site is complete and any devices you discover with this site selected use this criteria.
Switch/Appliance Settings
In order for the switch or appliance to communicate to the Management Center server:
- The DHCP Server needs to return a DNS Server and Domain Name to the ZTP+ device.
- The DNS Server needs to map the name extremecontrol.<domain-name> to the IP address of the Management Center server.
Once the Management Center and ZTP+ device are pre-configured, you can add the site definition to the Management Center database.
Adding the Device to the Extreme Management Center Database
Now that you have set the default criteria for devices added to the World Site and set up the DHCP and DNS servers allowing the device to communicate with the Management Center database, you can connect the device and add it to Management Center.
- Connect the device to your network.
ZTP+ enabled devices communicate with Management Center securely via an HTTPS connection and transmits information to Management Center, including the serial number, firmware version, MAC address, operating system, and port information. Management Center determines the status of devices and if new updates are available in the Firmware tab and set as Reference images, they are automatically installed. For more information, see the Firmware tab help topic. - Open the Network > Discovered tab in Management Center.
The device is listed with a Status of ZTP+ Pending Edit, indicating the device configuration needs to be edited before adding it to the Management Center server. For more information about the Discovered tab, see the Discovered tab help topic.
- Select the device and click the Edit Devices button.
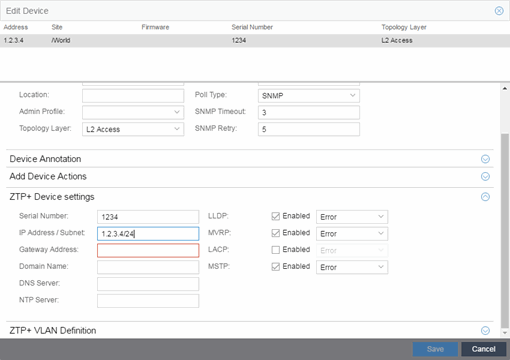
The Edit Devices window opens.
- Open the ZTP+ Device settings section by clicking the heading.
- Enter an IP address and subnet in the IP Address/Subnet field.
- Enter the Gateway Address.
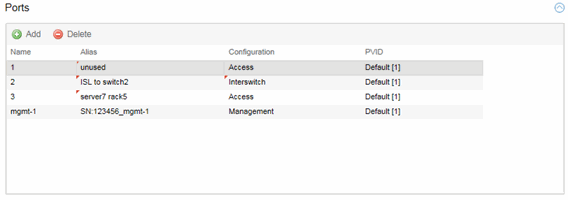
- Open the Ports section of the window by clicking the section heading.
The Ports section opens, displaying the ports transmitted by the device to Management Center when connected to the network.
- Select a port in the list to configure the port Name, Alias, Configuration, or port VLAN ID.
You can also add and delete ports by clicking the Add and Delete buttons, respectively.- Enter the Name by which the port is known.
- Enter the port Alias.
- Select the port Configuration, which is its role or purpose for the device.
- Access — The port provides access to end-systems.
- Interswitch — The port connects the switch to another switch.
- Management — The port is used to manage the network via Management Center.
- Enter a VLAN ID for the port in the PVID field.
- Open the ZTP+ VLAN Definition section of the window by clicking the section heading.
The ZTP+ VLAN definition section opens, containing any VLANs you configured on the Site tab.
- Add any device-specific VLANs to those already included in the list by clicking the Add button.
- Change any incorrect fields in the Device, Device Annotation, or Discovered Device Actions sections.
For additional information, see the Edit Device window help topic. - Click the Save button at the bottom of the window.
The device is added to the Management Center database and moves from the Network > Discovered tab to the Network > Devices tab.
| NOTE: | Management Center allows you to enter the IP address in either IPv4 of IPv6 format. |
| NOTES: | If you did not select Automatically Add Devices on the Site tab, the device remains on the Discovered tab with a Status of ZTP+ Complete. Select the device, click the Add Devices button (the Add Device window appears), and click the Add button to add the device to the Management Center database. | |
| In the event a configuration is not correctly transmitted to the switch or if connectivity is lost during any part of this process, the device resets and allows the process to restart. |
For information on related topics: