This Help topic provides an overview of Policy Manager's class of service (CoS) functionality, including information about defining rate limits and configuring transmit queues.
After you have read this topic, look at an example of how a network administrator might use CoS to configure VoIP traffic with appropriate priority, ToS, queue treatment, and flood control by clicking on the link: Class of Service Example.
This guide includes the following information:
Class of Service Overview
Class of Service (CoS) provides the ability to give certain network traffic preferential treatment over other traffic. It classifies traffic into categories such as high, medium, and low, where high-priority traffic gets the best service while low-priority traffic is "drop eligible."
Class of Service helps you manage the bandwidth requirements of a given network flow with the available port resources on your network devices. (In a CoS context, a flow is a stream of packets that are classified with the same class of service as the packets transit the interface). Using CoS, you can:
- Assign different priority levels to different packet flows.
- Mark or re‐mark the packet priority at port ingress with a Type of Service (ToS).
- Sort flows by transit queue. Higher priority queues get preferential access to bandwidth during packet forwarding.
- Limit the amount of bandwidth available to a given flow by either dropping (rate limiting) or buffering (rate shaping) packets in excess of configured limits.
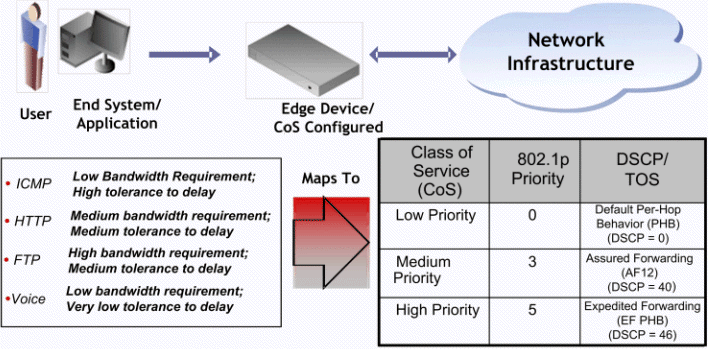
The following figure shows how you can manage network bandwidth requirements by assigning different classes of service to different types of network traffic.

The ICMP protocol, used for error messaging, has a low bandwidth requirement, with a high tolerance for delay and jitter, and is appropriate for a low priority setting. HTTP and FTP protocols, used respectively for browser‐generated and file transfer traffic, have a medium to high bandwidth requirement, with a medium to high tolerance for delay and jitter, and are appropriate for a medium priority level. Voice (VoIP), used for voice calls, has a low bandwidth requirement, but is very sensitive to delay and jitter and is appropriate for a high priority level.
Implementing CoS
CoS determines how a given network flow will be assigned bandwidth as it transits your network devices. As a preliminary step to using CoS, it is important that you understand the characteristics of the flows on your network and associate these flows with your policy roles. In this sense, CoS is the third step in a three step process:
- Understand your network flows using NetFlow.
- Associate your network flows with a Policy Manager role.
- Configure your classes of service and associate them with the rules contained in your roles.
Configuring CoS
Policy Manager lets you configure multiple classes of service that include one or more of the following components:
- 802.1p priority
- IP type of service (ToS) value
- drop precedence
- inbound and outbound rate limits
- outbound rate shaper per transmit queue.
- flood control rate limits
After you have created and defined your classes of service, they are then available when you make a class of service selection for a rule action (General tab), a role default (General tab), or an automated service (General tab).
To view and configure CoS, open the Class of Service Configuration window from the Policy Manager Edit menu. You will see that it is pre-populated with eight static classes of service, each associated with one of the 802.1p priorities (0-7). You can use these classes of service as is, or configure them to include ToS/DSCP, drop precedence, rate limit, and/or transmit queue values. In addition, you can also create your own classes of service (user-defined CoS).
Rate Limits
Rate limits are one component of a Policy Manager class of service. They are used to control the transmit rate at which traffic enters and exits ports in your network. All traffic mapped to a Class of Service on a given port will share the bandwidth specified by the rate limit.
For instructions on how to configure rate limits, see How to Define Rate Limits.
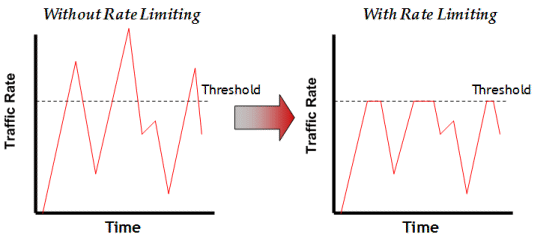
Rate limits are tied directly to roles and rules, and are written to a device when the role/rule is enforced. When rate limits are implemented, all traffic on the port that matches the rule with the associated rate limit cannot exceed the configured limit. If the rate exceeds the configured limit, frames are dropped until the rate falls below the limit.
The rate limit will remain on the port only as long as the role using the rate limit is active on the port either as the authenticated role or as the port's default role.
The following figure shows how bursty traffic is clipped above the assigned threshold when rate limiting is applied.

The CoS can be configured to perform one or all of the following actions when a rate limit has been exceeded:
- Generate System Log on Rate Violation - a syslog message is generated when the rate limit is first exceeded.
- Generate Audit Trap on Rate Violation - an audit trap is generated when the rate limit is first exceeded.
- Disable Port on Rate Violation - the port is disabled when the rate limit is first exceeded.
Policy Manager class of service also provides the ability to create rate limit port groups. Port groups let you specify different rate limits within the same class of service. For example, you might create a port group for edge ports and a port group for core ports, and assign two different rate limits. For more information on rate limit port groups, see Creating Class of Service Port Groups.
Transmit Queues
Transmit queue configuration is defined within a class of service and associated with a specific role via a rule action or as a role default. It is implemented based on the role assigned to a port. All traffic received on a port and matching a rule with the associated class of service will be forwarded using the defined transmit queue configuration.
For instructions on how to configure transmit queues, see How to Configure Transmit Queues.
There are three components to transmit queue configuration:
- Transmit Queue Configuration allows you to set the transmit queue associated with the class of service.
- Transmit Queue Rate Shapers let you pace the rate at which traffic is transmitted out of that transmit queue.
- Bandwidth Configuration allows you to specify how the traffic in each transmit queue is serviced as it egresses the port.
The transmit queue configuration will remain on the port only as long as the role using the configuration is active on the port either as the authenticated role or as the port's default role.
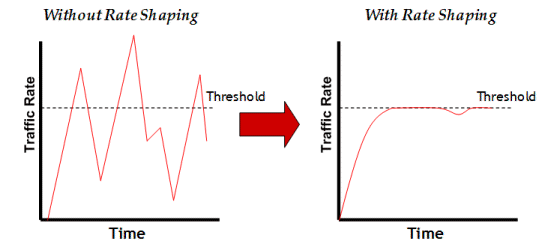
The following figure shows how bursty traffic is smoothed out when it goes above the assigned threshold when rate shaping is applied.

Rate shaping retains excess packets in a queue and then schedules these packets for later transmission over time. Therefore, the packet output rate is smoothed and bursts in transmission are not propagated as seen with rate limiting.
Rate shaping can be used for the following reasons:
- to control bandwidth
- to offer differing levels of service
- to avoid traffic congestion on other network links by removing the bursty property of traffic that can lead to discarded packets
Policy Manager class of service also provides the ability to create transmit queue shaper port groups that allow you to isolate certain kinds of sensitive network traffic so that you can vary the bandwidth of the shape for that single queue. For more information on transmit queue port groups, see Creating Class of Service Port Groups.
Flood Control
Flood control provides rate limiting capabilities to individual Class of Service to allow certain types of flooded traffic to be dropped. When enabled, incoming traffic is monitored over one second intervals. Traffic is identified using the following configuration types:
- unknown - unicast
- broadcast
- multicast
A traffic control rate sets the acceptable flow for each type, specified in packets per second. If, during a one second interval, the incoming traffic of a configured type reaches the traffic control rate on the port, the traffic is dropped until the interval ends. Packets are then allowed to flow again until the limit is reached.
By default, Flood Control is disabled for each CoS. Similar to CoS Port Groups, a different configuration can be assigned for each group. Since Flood Control is shared across all CoS, once Flood Control is enabled on at least one CoS, those rates apply to all ports that have Flood Control enabled.
For instructions on how to configure flood controls, see How to Configure Flood Control.
For information on related tasks: