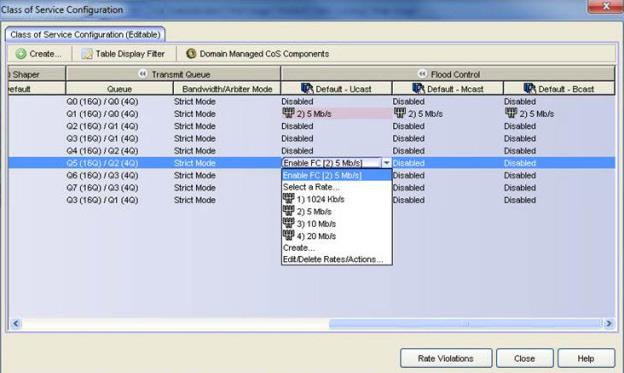
Flood Control provides rate limiting capabilities to CoS to allow certain types of flooded traffic to be dropped. The flood control traffic types are:
- unknown - unicast
- broadcast
- multicast
When Flood Control is enabled, incoming traffic is monitored over one second intervals. A traffic control rate sets the acceptable flow for each type, specified in packets per second. If, during a one second interval, the incoming traffic of a configured type reaches the traffic control rate on the port, the traffic is dropped until the interval ends. Packets are then allowed to flow again until the limit is reached.
By default, Flood Control is disabled for each CoS. Similarly to CoS Port Groups, a different configuration can be assigned for each group. Since Flood Control is shared across all CoS, once Flood Control is enabled on at least one CoS, those rates apply to all ports that have Flood Control enabled.
How to Display Flood Control Port Groups on the CoS Configuration Window
- From the Edit menu, select Class of Service Configuration. The CoS Configuration window opens.
- Verify that Flood Control is set to be managed by Policy Manager for this domain by ensuring that either All Components or Flood Control are selected in the Domain Managed CoS Components menu.
- To easily navigate to Flood Control components of CoS, click the Table Display Filter button, and select Flood Control. A Flood Control column displays for each CoS. Each column will either display the configured rate limit or None, if no rate has been defined for that portion of Flood Control. This will remove the other sections of Class of Service, making the table easier to read.
How to Create a Flood Control Port Group
- From the Edit menu, select Class of Service Configuration. The CoS Configuration window opens.
- Click the Create button or right-click the Flood Control column header, and select Create Flood Control Port Group.
- In the Create CoS Port Group dialog, under Create FLD Port Group, enter a name for the Flood Control Port Group. In addition to CoS, you can also create a port group for IRL, ORL, and TXS by selecting each individual group from the drop-down menu. A New Flood Control item is added to the CoS Configuration Window.
How to Enable/Disable Flood Control for a CoS
Flood Control Rate Limits are shared across all CoS. Once a Flood Control rate has been enabled on at least one CoS, that is the rate specified for all Flood Control enabled CoS.
- Double-click the column for the desired Flood Control broadcast traffic type Ucast (unicast), Mcast (multicast), or Bcast (broadcast), and select a rate from the drop-down menu.
- Select a rate that has been created or create a new one. If Flood Control is enabled on an existing CoS, the Flood Control can be enabled/disabled for this CoS by selecting the Enable/Disable Flood Control option from the drop-down menu.

How to Add/Remove Ports to Flood Control Port Groups
- From the Edit menu, select Class of Service Configuration. The CoS Configuration window opens.
- Right-click the Flood Control column header, and select Add/remove Ports.
- In the Add/Remove Ports dialog, select the Port Groups from the right column and click Remove. You can also delete multiple Port Groups by clicking Remove All.
For information on related concepts:
For information on related tasks:
For information on related windows: